Achieving perfectly tender and succulent chicken breasts on the stove top is a skill every home cook should master. By utilizing a high-heat sear followed by a gentle butter finish, you can transform simple poultry into a restaurant-quality meal in minutes. This reliable technique ensures consistent results that avoid the dreaded dry, chewy texture often associated with pan-cooking chicken.
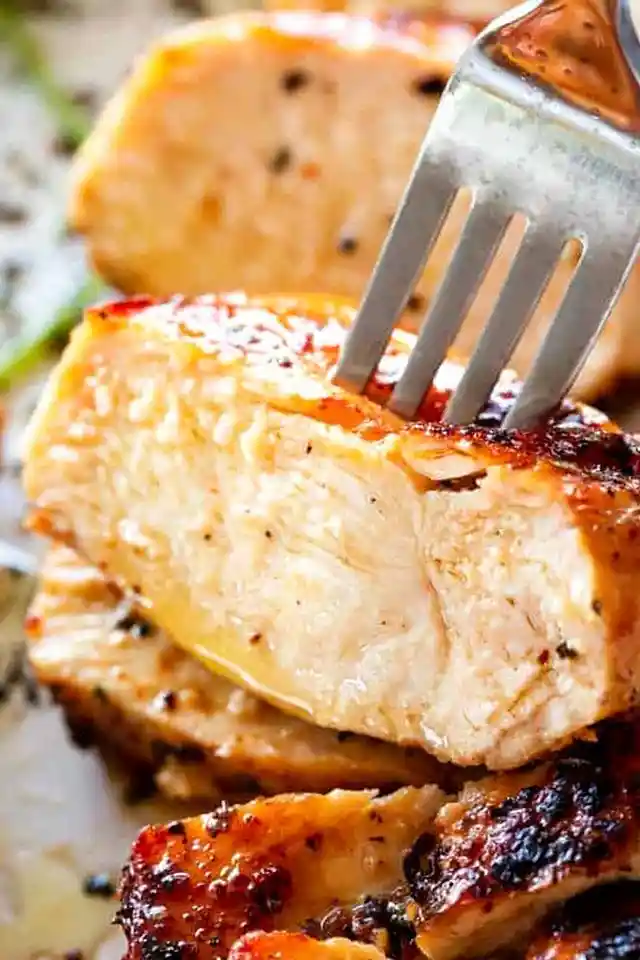
List of ingredients
- 3 tablespoons vegetable oil or canola oil, divided
- 4 (1 pound total) boneless, skinless chicken breasts
- cooking spray
- salt and fresh ground pepper, to taste
- 1/2 teaspoon garlic powder
- 1/2 teaspoon onion powder
- 1/2 teaspoon dried basil
- 1/2 teaspoon smoked or sweet paprika
- 2 tablespoons unsalted butter, divided
step-by-step instructions
- Step: Heat 1-1/2 tablespoons vegetable oil over medium-high heat in a large 10-inch or 12-inch skillet.
- Step: Pat dry the chicken breasts with paper towels.
- Step: Drizzle a bit of oil over each chicken breast, or spray with cooking oil, and rub it all over.
- Step: In a small mixing bowl combine salt, pepper, garlic powder, onion powder, basil, and paprika.
- Step: Season both sides of each chicken breast with the prepared seasoning and rub it all around.
- Step: Add 2 chicken breasts to the hot skillet.
- Step: Cook chicken breasts for 5 to 7 minutes without moving them around.
- Step: Flip both chicken breasts over, add 1 tablespoon of butter to the skillet, swirl butter around, and continue to cook for 7 more minutes, or until internal temperature reaches 165F.
- Step: Remove chicken breasts from skillet; set aside and keep covered.
- Step: Repeat the same method with the remaining 2 chicken breasts.
- Step: When finished, transfer chicken to a cutting board, let rest for 5 minutes, then slice and serve.
Refining Your Searing Technique
Managing Chicken Thickness for Uniform Cooking
Chicken breasts often have a thick end and a thinner, tapering end, which can lead to uneven cooking. Before you start, use a meat mallet or a heavy rolling pin to gently pound the thicker sections to match the thinner part of the breast. Aim for a maximum thickness of 1 inch across the entire piece to ensure the interior reaches safety temperatures at the same time the exterior develops its crust.
The Role of Smoke Points in Oil Selection
Choosing the right oil is vital for stove top cooking because the pan must reach high temperatures. Vegetable, canola, and refined avocado oils are superior for this method because they have high smoke points, meaning they won’t burn or turn bitter when exposed to high heat. Avoid using extra virgin olive oil for the initial sear, as its lower smoke point can result in an acrid taste and unnecessary smoke in your kitchen.
Mastering the No-Move Rule
The secret to a perfect sear is resisting the temptation to move or check the chicken prematurely. If you attempt to flip the meat before the crust has properly formed, the protein fibers will stick to the pan and potentially tear. Trust the timing, and if the chicken feels like it is resisting your spatula, simply wait an extra 60 seconds for the Maillard reaction to finalize the release.
Practical Serving and Pairing Suggestions
Building a Balanced Plate
This chicken is incredibly versatile and pairs beautifully with a wide variety of sides. For a light dinner, serve the sliced breasts over a bed of crisp greens tossed with a lemon-herb vinaigrette. If you prefer something heartier, roasted root vegetables, garlic-sautéed broccoli, or a creamy potato mash serve as excellent, satisfying companions that soak up any extra pan drippings.
Creating Dynamic Flavor Profiles
While the provided spice rub is excellent on its own, you can easily shift the flavor profile to match your mood. A touch of dried oregano and a pinch of chili flakes can turn the dish into a Mediterranean-inspired meal. If you prefer a brighter, more citrus-forward finish, squeezing a fresh lemon over the breasts immediately after removing them from the heat provides a zesty contrast to the rich, buttery coating.
Long-Term Storage and Freshness Strategies
Optimizing Refrigerated Storage
Once your chicken has reached room temperature, place it in an airtight glass or plastic container. Properly stored, it will maintain its quality in the refrigerator for up to 4 days. When storing, consider keeping the breasts whole rather than pre-slicing them; leaving them intact helps preserve the moisture inside the meat fibers, keeping them from drying out before you are ready to use them again.
Freezer Management for Busy Schedules
If you find yourself with extra cooked chicken, you can extend its life significantly by freezing it. Wrap each breast tightly in plastic wrap followed by a layer of heavy-duty aluminum foil to prevent freezer burn. For the best flavor, try to use your frozen stock within 3 months, ensuring you label the package with the date so you can keep track of your inventory effectively.
Common Queries Regarding Stove Top Preparation
What causes the chicken to become rubbery?
Rubbery or tough chicken is almost always a result of overcooking or cooking at temperatures that are too low. By cooking the meat quickly at medium-high heat, you seal in the juices effectively. Always use an internal meat thermometer to remove the chicken from the heat the exact moment it hits 165F, as even an extra minute or two over the heat can significantly change the texture.
Can I substitute dried herbs with fresh ones?
While fresh herbs are delicious, they are not ideal for this specific pan-searing method. Fresh herbs contain high moisture and delicate oils that will likely burn or char during the 5-7 minute searing process. Stick to dried herbs for the initial seasoning to ensure the flavors bloom without becoming acrid, and save your fresh herbs to sprinkle over the dish as a garnish just before serving.
How do I fix a pan that is smoking too much?
If your pan begins to smoke excessively, your heat is likely slightly too high for the specific oil you are using. Immediately lower the heat to medium and move the pan to a cooler burner for 30 seconds. In the future, keep a close watch on the oil shimmer; if it begins to smoke before the chicken even touches the pan, it is already too hot, and you should let it cool slightly before proceeding.
Print
The Ultimate Method for Perfect Stove Top Chicken Breasts
- Total Time: 25 minutes
- Yield: 4 servings 1x
- Diet: Gluten-Free
Description
Tried and true method for preparing the most tender and juicy chicken breasts right on the stove top.
Ingredients
- 3 tablespoons vegetable oil or canola oil, divided
- 4 (1 pound total) boneless, skinless chicken breasts
- cooking spray
- salt and fresh ground pepper, to taste
- 1/2 teaspoon garlic powder
- 1/2 teaspoon onion powder
- 1/2 teaspoon dried basil
- 1/2 teaspoon smoked or sweet paprika
- 2 tablespoons unsalted butter, divided
Instructions
- Step: Heat 1-1/2 tablespoons vegetable oil over medium-high heat in a large 10-inch or 12-inch skillet.
- Step: Pat dry the chicken breasts with paper towels.
- Step: Drizzle a bit of oil over each chicken breast, or spray with cooking oil, and rub it all over.
- Step: In a small mixing bowl combine salt, pepper, garlic powder, onion powder, basil, and paprika.
- Step: Season both sides of each chicken breast with the prepared seasoning and rub it all around.
- Step: Add 2 chicken breasts to the hot skillet.
- Step: Cook chicken breasts for 5 to 7 minutes without moving them around.
- Step: Flip both chicken breasts over, add 1 tablespoon of butter to the skillet, swirl butter around, and continue to cook for 7 more minutes, or until internal temperature reaches 165F.
- Step: Remove chicken breasts from skillet; set aside and keep covered.
- Step: Repeat the same method with the remaining 2 chicken breasts.
- Step: When finished, transfer chicken to a cutting board, let rest for 5 minutes, then slice and serve.
Notes
Chicken breasts should not be thicker than 1-inch, max. If chicken breasts are thick, use a meat mallet to pound them to a smaller and even thickness before cooking. Do not move or stir the chicken while it is searing to ensure a golden crust.
- Prep Time: 5 minutes
- Cook Time: 15 minutes
- Category: Dinner
- Method: Pan-searing
- Cuisine: American
Nutrition
- Serving Size: 1 breast
- Calories: 273 kcal
- Sugar: 0 g
- Sodium: 182 mg
- Fat: 19 g
- Saturated Fat: 12 g
- Unsaturated Fat: 7 g
- Trans Fat: 0 g
- Carbohydrates: 0 g
- Fiber: 0 g
- Protein: 24 g
- Cholesterol: 87 mg