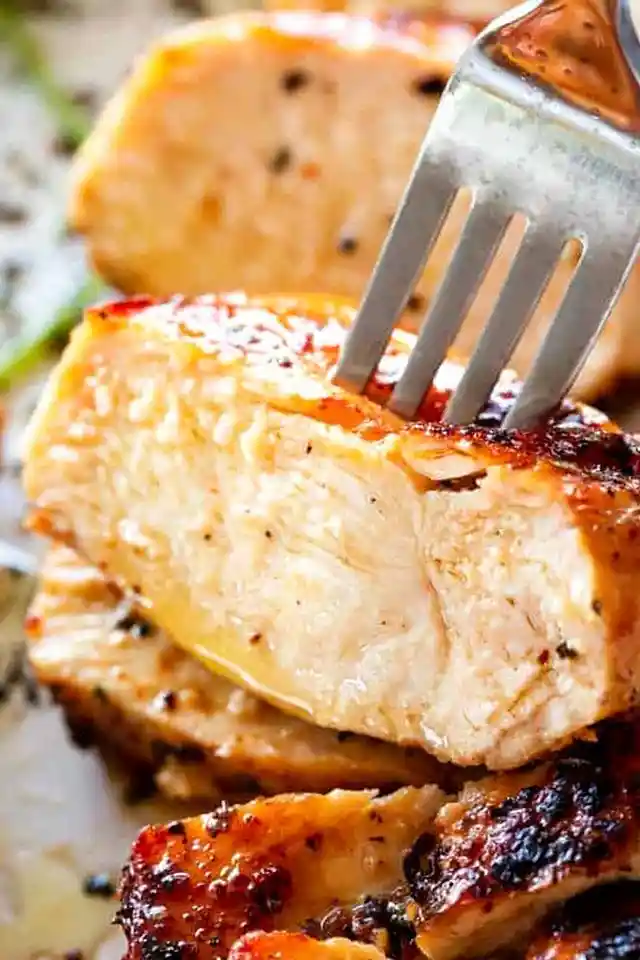
This method ensures your chicken breasts remain tender and moist without drying out during the cooking process. It is a quick, pan-seared approach that is perfect for a healthy weekday dinner. By using a specific sequence of heat and butter, you can achieve a professional sear at home.
List of ingredients
- 3 tablespoons vegetable oil or canola oil, divided – used for searing and coating.
- 4 (1 pound total) boneless, skinless chicken breasts – ensure they are of similar size.
- cooking spray – for an even coating of oil on the meat.
- salt and fresh ground pepper, to taste – basic seasonings for flavor enhancement.
- 1/2 teaspoon garlic powder – provides a robust flavor without burning.
- 1/2 teaspoon onion powder – adds a subtle sweetness.
- 1/2 teaspoon dried basil – adds a touch of herbal freshness.
- 1/2 teaspoon smoked or sweet paprika – contributes color and a smoky depth.
- 2 tablespoons unsalted butter, divided – adds richness and aids in browning.
step-by-step instructions
- Prepare the pan: Heat 1-1/2 tablespoons of vegetable oil over medium-high heat in a 10-inch or 12-inch skillet.
- Dry the meat: Pat the chicken breasts dry with paper towels to ensure a better sear.
- Coat the chicken: Drizzle a small amount of oil over each breast or use cooking spray to rub oil all over the surface.
- Mix spices: Combine salt, pepper, garlic powder, onion powder, basil, and paprika in a small bowl.
- Season: Rub the seasoning blend thoroughly onto both sides of each chicken breast.
- Sear first batch: Place 2 chicken breasts in the hot skillet.
- Initial cook: Cook for 5 to 7 minutes without moving the chicken to allow a crust to form.
- Flip and baste: Flip the breasts, add 1 tablespoon of butter to the skillet, swirl it around, and cook for another 7 minutes.
- Check temperature: Ensure the internal temperature reaches 165F using a meat thermometer.
- Remove and cover: Take the chicken out of the skillet and keep it covered to retain heat.
- Repeat: Follow the same process for the remaining 2 chicken breasts.
- Rest and serve: Let the chicken rest on a cutting board for 5 minutes before slicing.
Optimal Meat Preparation Techniques
Pounding Chicken to an Even Thickness
Chicken breasts often have one end thicker than the other, which leads to uneven cooking. Use a meat mallet or a rolling pin to pound the thickest part until the entire breast is about 1 inch thick. This ensures the edges do not overcook while the center reaches the safe temperature.
Removing Surface Moisture
Moisture on the surface of the meat creates steam, which prevents the chicken from browning. Use paper towels to pat the breasts completely dry before applying oil or seasonings. A dry surface allows the Maillard reaction to occur more efficiently, resulting in a golden-brown crust.
Proper Application of Cooking Spray
Applying oil directly to the meat helps the seasonings adhere more effectively. Using a cooking spray provides a thin, even layer that prevents sticking without adding excessive fat. This technique ensures that the spices are locked onto the meat during the searing process.
Managing Pan Heat and Oil
Selecting High Smoke Point Fats
Vegetable and canola oils are preferred over olive oil for this recipe because they have higher smoke points. High smoke point oils can withstand medium-high heat without breaking down or producing acrid smoke. Avocado oil is another excellent alternative if you prefer a neutral-tasting, high-heat fat.
Preventing Pan Overcrowding
Cooking only two breasts at a time prevents the pan temperature from dropping too sharply. When too much cold meat is added, the oil cools down, and the chicken begins to boil in its own juices rather than searing. Maintaining space between the breasts allows moisture to evaporate quickly from the surface.
Resisting the Urge to Move the Meat
Moving the chicken too early disrupts the development of the brown crust. Let the meat sit undisturbed for the first 5 to 7 minutes to allow the proteins to sear. If the meat resists when you try to flip it, it hasn’t formed a proper crust yet, so wait another minute.
Customizing the Flavor Profile
Alternative Herb Combinations
While basil adds a fresh note, you can replace it with dried oregano or thyme for a more Mediterranean flavor. Rosemary is also a great substitute, though it should be crushed slightly to release its oils. Experiment with these herbs to change the aromatic profile of the dish.
Adjusting the Paprika Type
Smoked paprika provides a deep, woody flavor that mimics a grill. If you prefer a milder, sweeter taste, use sweet Hungarian paprika instead. The choice of paprika primarily affects the depth of the smokiness and the final color of the chicken.
Using Pre-Mixed Seasoning Blends
You can substitute the individual spices with a high-quality poultry seasoning or a homemade rub. Be cautious with pre-mixed blends as they often contain high amounts of salt. If using a blend, reduce the additional salt you add to the chicken to avoid over-seasoning.
Serving and Pairing Ideas
Vegetable Side Dish Pairings
Pair this chicken with steamed asparagus or roasted carrots to maintain a balanced meal. The richness of the butter-basted chicken complements the natural sweetness of roasted root vegetables. Sautéed spinach with lemon also provides a bright contrast to the savory seasonings.
Grain and Starch Accompaniments
Serve the sliced breasts over a bed of fluffy quinoa, brown rice, or mashed potatoes. The resting juices from the chicken can be drizzled over the grains for extra flavor. Polenta or a wild rice blend also works well to soak up the pan butter.
Incorporating into Salads and Bowls
Cold or warm sliced chicken breasts are ideal for topping a Caesar salad or a Greek bowl. Use a variety of fresh greens, cucumbers, and cherry tomatoes to create a nutrient-dense meal. This makes the recipe an excellent choice for meal-prepping proteins for the week.
Storage and Meal Prep Guide
Refrigeration Limits and Containers
Store completely cooled chicken breasts in an airtight glass or plastic container. Keep them in the refrigerator for up to 4 days. Ensuring the meat is fully cooled before sealing prevents condensation, which can make the crust soggy.
Long-term Freezing Methods
Wrap cooled chicken tightly in plastic wrap and then add a layer of aluminum foil to prevent freezer burn. Place the wrapped meat in a heavy-duty freezer bag and remove as much air as possible. Cooked chicken can be stored in the freezer for up to 3 months.
Safe Defrosting Procedures
The safest way to thaw frozen cooked chicken is in the refrigerator overnight. Avoid thawing meat on the counter to prevent bacterial growth. If you are in a rush, use the defrost setting on a microwave, but reheat immediately afterward.
Best Reheating Practices
Stovetop Reheating for Texture
To maintain the best texture, reheat sliced chicken in a skillet over low heat with a small pat of butter. This refreshes the exterior and prevents the meat from becoming rubbery. Heat just until the internal temperature is warm, as overcooking will dry it out.
Microwave Tips to Avoid Dryness
When using a microwave, place the chicken in a microwave-safe dish and add a teaspoon of water or broth. Cover the dish with a damp paper towel to trap steam. Use medium power and heat in short 30-second intervals to avoid overshooting the temperature.
Oven Reheating for Large Batches
For multiple portions, place the chicken in a baking dish and cover it tightly with foil. Heat at 300F (150C) until the chicken is warmed through. The foil prevents moisture loss, keeping the breasts as juicy as they were when first cooked.
Cooking Troubleshooting
Preventing Chicken from Sticking
If the chicken sticks to the pan, it usually means the oil wasn’t hot enough or the meat was flipped too early. Ensure the oil is shimmering before adding the chicken. Using a heavy-bottomed skillet also helps distribute heat more evenly to prevent hotspots.
Correcting Overcooked Meat
If the chicken becomes too dry, slice it very thinly across the grain to make it easier to chew. You can also serve it with a sauce, such as a mushroom cream sauce or a lemon-butter glaze. The added moisture from a sauce helps mask the dryness of overcooked poultry.
Ensuring Even Internal Temperature
Always insert the meat thermometer into the thickest part of the breast, avoiding any bone or fat deposits. If the outer edges are done but the center is undercooked, lower the heat and cover the pan for a few minutes. This allows the center to cook through via trapped steam.
Frequently Asked Questions
Can I use frozen chicken breasts?
No, you should not cook frozen chicken breasts using this searing method. Frozen meat will release too much water in the pan, preventing a sear and potentially causing oil splatters. Thaw them completely in the refrigerator before prepping.
Is it safe to use olive oil for searing?
Extra virgin olive oil has a lower smoke point and can burn at the temperatures required for a good sear. This results in a bitter taste and unhealthy smoke. Stick to canola, vegetable, or avocado oil for stovetop searing.
How do I know the chicken is fully cooked?
The only foolproof method is using a digital meat thermometer to confirm an internal temperature of 165F. While clear juices are a sign of doneness, a thermometer ensures safety and prevents overcooking.
Can I use bone-in chicken breasts?
This recipe is specifically designed for boneless breasts. Bone-in chicken requires much longer cooking times and typically needs a combination of searing and oven-roasting to cook through without burning the outside.
Print
Juicy Stove Top Chicken Breasts
- Total Time: 25 minutes
- Yield: 4 servings 1x
- Diet: General
Description
Tried and true method for preparing the most tender and juicy chicken breasts right on the stove top.
Ingredients
- 3 tablespoons vegetable oil or canola oil, divided
- 4 (1 pound total) boneless, skinless chicken breasts
- cooking spray
- salt and fresh ground pepper, to taste
- 1/2 teaspoon garlic powder
- 1/2 teaspoon onion powder
- 1/2 teaspoon dried basil
- 1/2 teaspoon smoked or sweet paprika
- 2 tablespoons unsalted butter, divided
Instructions
- Step: Heat 1-1/2 tablespoons vegetable oil over medium-high heat in a large skillet; use a 10-inch or 12-inch skillet.
- Step: Pat dry the chicken breasts with paper towels.
- Step: Drizzle just a bit of oil over each chicken breast, or spray with cooking oil, and rub it all over.
- Step: In a small mixing bowl combine salt, pepper, garlic powder, onion powder, basil, and paprika.
- Step: Season both sides of each chicken breast with the prepared seasoning; rub it all around.
- Step: Add 2 chicken breasts to the hot skillet.
- Step: Cook chicken breasts for 5 to 7 minutes without moving them around.
- Step: Flip both chicken breasts over, add 1 tablespoon of butter to the skillet; swirl butter around and continue to cook the chicken for 7 more minutes, or until internal temperature reaches 165F.
- Step: Remove chicken breasts from skillet; set aside and keep covered.
- Step: Repeat the same method with the remaining 2 chicken breasts.
- Step: When finished, transfer chicken to a cutting board; let rest for 5 minutes, then slice and serve.
Notes
Chicken breasts should not be thicker than 1-inch; use a meat mallet to pound to even thickness if needed. Use high-smoke point oils (vegetable or avocado) rather than olive oil for searing. Do not move the chicken until it releases easily from the pan.
- Prep Time: 5 minutes
- Cook Time: 15 minutes
- Category: Dinner
- Method: Pan Searing
- Cuisine: American
Nutrition
- Serving Size: 4 ounces
- Calories: 273 kcal
- Sugar: 0 g
- Sodium: 182 mg
- Fat: 19 g
- Saturated Fat: 12 g
- Unsaturated Fat: 7 g
- Trans Fat: 0 g
- Carbohydrates: 0 g
- Fiber: 0 g
- Protein: 24 g
- Cholesterol: 87 mg