This Hawaiian Fried Garlic Chicken delivers a delicious culinary adventure with tender, crispy pieces enveloped in a sticky, aromatic garlic sauce. Perfectly suited for both casual weeknight meals and vibrant gatherings, this dish brings the bold, sweet, and savory essence of island-style cooking directly to your home kitchen in under forty minutes. Its light, golden coating and deep umami profile make it an instant favorite for anyone seeking a satisfying, comfort-forward dining experience.
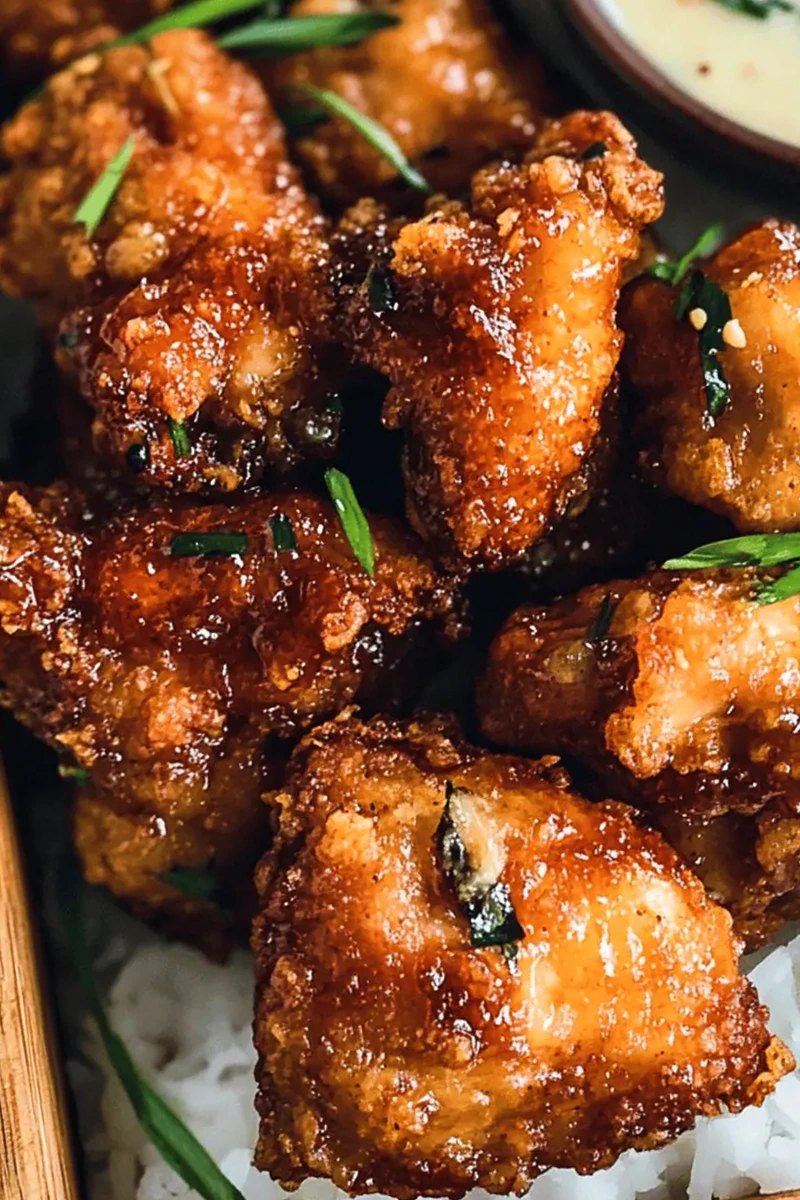
List of ingredients
- 2 pounds chicken, cut into cubes
- 1 tablespoon cornstarch (for chicken)
- 3/4 cup soy sauce
- 3/4 cup sugar
- 1/2 cup garlic, crushed or finely chopped
- 1 tablespoon vegetable oil (for marinade)
- 1 1/2 cups flour
- 1/2 cup cornstarch (for coating)
- 1/2 teaspoon salt
- 1/4 cup green onion, chopped
- 1 tablespoon sesame oil
- 1 teaspoon red chili flakes
- 1/2 teaspoon white pepper
- Vegetable oil (for frying)
step-by-step instructions
- Step 1: In a small saucepan, combine soy sauce and sugar over medium heat, bringing to a gentle boil for 2-3 minutes until it thickens. Stir in garlic, green onion, sesame oil, chili flakes, and white pepper. Boil for another minute, remove from heat, and set aside to cool.
- Step 2: In a large bowl, combine chicken, 4-5 tablespoons of the prepared garlic sauce, 1 tablespoon cornstarch, and 1 tablespoon vegetable oil. Mix well, cover, and marinate for 30 minutes at room temperature.
- Step 3: In a separate bowl, whisk together flour, 1/2 cup cornstarch, and salt. Stir in 3 tablespoons of the garlic sauce until small clumps form.
- Step 4: Heat 2 inches of vegetable oil in a deep frying pan to 350°F–375°F.
- Step 5: Dredge marinated chicken in the flour mixture, pressing firmly. Fry in batches for 3-4 minutes until golden and crispy. Drain on paper towels.
- Step 6: Warm the remaining garlic sauce over low heat and toss with the crispy chicken, or serve on the side for dipping.
Practical Frying and Coating Advice
Achieving the Perfect Crispy Texture
Maintaining a high oil temperature is the secret to a professional-grade crunch. When the oil is at the correct 350°F-375°F range, the coating sets instantly, preventing the oil from soaking into the meat. If the temperature drops too low, the crust will become dense and oily rather than light and airy.
Ensuring Even Coating Adherence
To guarantee that your flour coating stays attached during the frying process, be sure to pat the chicken dry if it seems overly wet before dredging. Pressing the flour mixture firmly onto every side of the chicken cube ensures a complete seal that locks in moisture. The small clumps created by adding a bit of sauce to the dry flour are a key element in achieving that classic, jagged, crispy surface.
Customizing the Flavor Profile
Modifying the Heat Level
This recipe provides a balanced level of spice, but you can easily adjust it to match your preference. If you enjoy a sharper kick, double the amount of red chili flakes or incorporate fresh sliced jalapeños directly into the sauce. For a more subtle experience, reduce the chili flakes by half or swap the white pepper for a milder black pepper.
Exploring Herbal Infusions
Adding fresh herbs is a simple way to elevate the aromatic profile of the finished dish. Stirring in fresh basil, cilantro, or even finely minced ginger during the sauce preparation creates a more complex fragrance. These additions work well with the garlic base and help brighten the overall richness of the fried chicken.
Serving and Pairing Suggestions
Starch Sides for Maximum Sauce Absorption
The sticky garlic sauce is the highlight of this dish, so pairing it with a neutral starch is essential to ensure no drop goes to waste. Fluffy jasmine rice is the traditional choice, as its mild flavor and soft texture perfectly complement the intense, savory-sweet coating of the chicken. Alternatively, serve the chicken over garlic-infused noodles or a simple vegetable-based fried rice to create a more substantial meal.
Refreshing Tropical Contrasts
To cut through the richness of the fried poultry, consider serving the meal with bright, refreshing sides. A quick slaw featuring shredded cabbage, carrots, and a light rice vinegar dressing adds a necessary crunch and acidity. Grilled pineapple slices also provide a beautiful visual and flavor contrast, echoing the tropical origins of the recipe and adding a caramelized sweetness that pairs wonderfully with the garlic notes.
Management and Storage Techniques
Efficient Short-Term Storage
Leftover chicken should be stored in an airtight container in the refrigerator for no longer than three days to maintain its safety and flavor. For the best quality, store the remaining garlic sauce in a separate jar rather than tossing the chicken in it before storing. This prevents the breading from becoming overly saturated and soggy while sitting in the fridge.
Long-Term Freezer Considerations
When freezing the chicken, ensure it has cooled completely to room temperature to prevent condensation from turning the breading into ice crystals. Flash-freeze the pieces in a single layer on a sheet tray before placing them in a freezer-safe bag to ensure they do not clump together. They will remain fresh for up to three months, though the texture may vary slightly upon reheating compared to freshly prepared batches.
Methods for Maintaining Crispness
Reheating for Optimal Texture
To restore the original crunch of the chicken, avoid the microwave, which tends to soften the coating significantly. Reheat the pieces in an oven preheated to 375°F (190°C) on a wire rack set over a baking sheet. This allows hot air to circulate under and around the chicken, evaporating excess moisture and re-crisping the exterior effectively.
Preventing Soggy Results
The placement of your chicken immediately after pulling it from the oil is vital to its final quality. Always use a wire cooling rack rather than placing the chicken directly onto a plate or a solid surface. This prevents steam from being trapped underneath the meat, which is the primary cause of a softened, soggy coating.
Frequently Asked Questions
Why did my coating fall off during the frying process?
If the coating is detaching, the most likely culprit is either the temperature of the oil being too low or the chicken being too wet before the initial dredging. Ensuring the chicken is well-coated in the flour mixture and letting it rest for a minute before dropping it into the oil can help the bond solidify.
Can I prepare this recipe using a different protein?
Yes, this recipe is highly versatile and works exceptionally well with firm tofu or even portobello mushroom chunks. For tofu, ensure you press out all excess moisture before marinating to allow the flavors to penetrate the surface and to improve the final texture after frying.
What if I do not have a thermometer for the oil?
If a thermometer is unavailable, test the oil with a tiny pinch of the flour mixture or a wooden skewer. If the flour sizzles and bubbles immediately upon contact without burning instantly, the oil is likely in the correct temperature range for frying.
Is it necessary to use cornstarch in the coating?
Cornstarch is essential for achieving that specific airy, light, and crispy texture characteristic of island-style fried chicken. Substituting all of the cornstarch with flour will result in a denser, bready crust that lacks the distinct crunch you get from this specific blend.
How can I make this meal ahead of time for guests?
You can marinate the chicken and whisk the dry coating mixture hours in advance, keeping both separate until the moment you are ready to fry. This reduces your active time significantly when guests arrive, allowing you to focus on the final fry and sauce toss while keeping the kitchen clean and organized.
Print
Crispy Hawaiian Fried Garlic Chicken for a Flavorful Dinner
- Total Time: 40 minutes
- Yield: 4 servings 1x
- Diet: Non-Vegetarian
Description
This Hawaiian Fried Garlic Chicken delivers a delicious adventure with tender, crispy pieces enveloped in a sticky, savory garlic sauce. Perfect for a quick weeknight dinner or a tropical-inspired feast.
Ingredients
- 2 pounds chicken, cut into cubes
- 1 tablespoon cornstarch (for chicken)
- 3/4 cup soy sauce
- 3/4 cup sugar
- 1/2 cup garlic, crushed or finely chopped
- 1 tablespoon vegetable oil (for marinade)
- 1 1/2 cups flour
- 1/2 cup cornstarch (for coating)
- 1/2 teaspoon salt
- 1/4 cup green onion, chopped
- 1 tablespoon sesame oil
- 1 teaspoon red chili flakes
- 1/2 teaspoon white pepper
- Vegetable oil (for frying)
Instructions
- Step 1: In a small saucepan, combine soy sauce and sugar over medium heat, bringing to a gentle boil for 2-3 minutes until it thickens. Stir in garlic, green onion, sesame oil, chili flakes, and white pepper. Boil for another minute, remove from heat, and set aside to cool.
- Step 2: In a large bowl, combine chicken, 4-5 tablespoons of the prepared garlic sauce, 1 tablespoon cornstarch, and 1 tablespoon vegetable oil. Mix well, cover, and marinate for 30 minutes at room temperature.
- Step 3: In a separate bowl, whisk together flour, 1/2 cup cornstarch, and salt. Stir in 3 tablespoons of the garlic sauce until small clumps form.
- Step 4: Heat 2 inches of vegetable oil in a deep frying pan to 350°F–375°F.
- Step 5: Dredge marinated chicken in the flour mixture, pressing firmly. Fry in batches for 3-4 minutes until golden and crispy. Drain on paper towels.
- Step 6: Warm the remaining garlic sauce over low heat and toss with the crispy chicken, or serve on the side for dipping.
Notes
Serve alongside steamed jasmine rice or a side of fresh slaw. You may also swap chicken for firm tofu for a plant-based version.
- Prep Time: 30 minutes
- Cook Time: 10 minutes
- Category: Main Course
- Method: Deep Frying
- Cuisine: Hawaiian
Nutrition
- Serving Size: 1 serving
- Calories: 400 kcal
- Sugar: 18 g
- Sodium: 950 mg
- Fat: 12 g
- Saturated Fat: 2 g
- Unsaturated Fat: 8 g
- Trans Fat: 0 g
- Carbohydrates: 45 g
- Fiber: 1 g
- Protein: 32 g
- Cholesterol: 85 mg