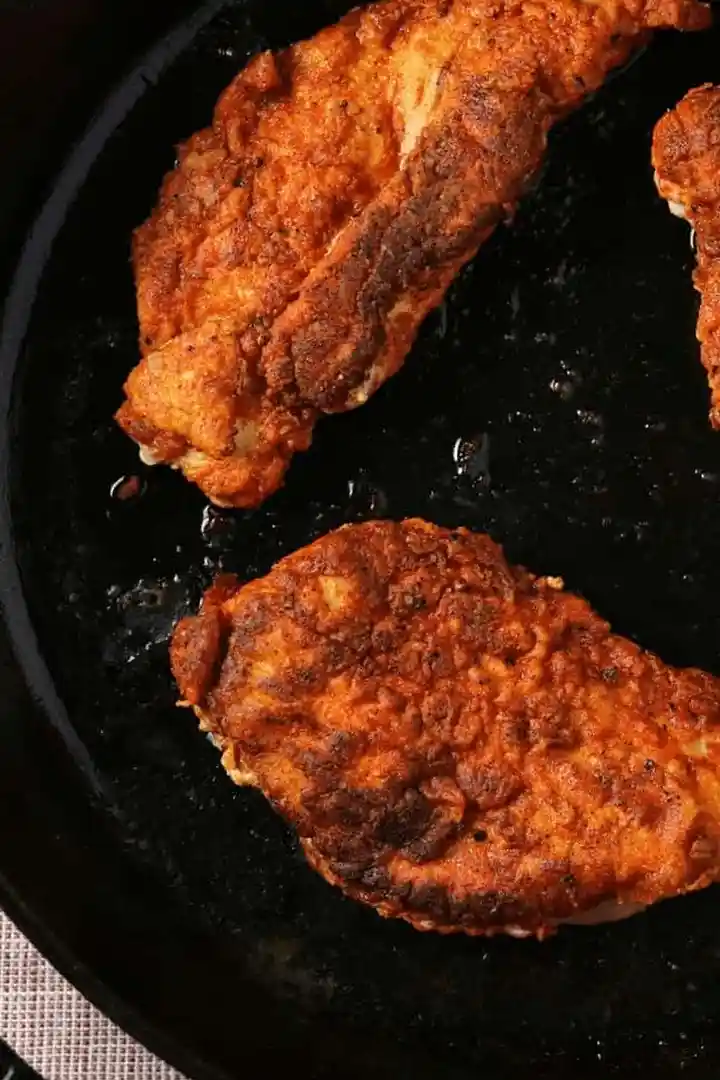
These buttermilk pan fried chicken breasts are exceptionally juicy and tender with a perfectly crisp exterior. By combining a stovetop sear with an oven finish, you achieve a professional texture without the need for deep frying.
List of ingredients
- 3 Boneless Skinless Chicken Breasts (about 5-6 ounces each) – used for consistent portion sizes.
- 1/2 C (120mL) Low Fat Buttermilk – provides acidity for tenderizing the meat.
- 1 large Egg – acts as a binder for the flour coating.
- 1/4 C (30g) All Purpose Flour – creates a light, crispy breading.
- 1 Tbsp Paprika – adds a rich color and mild earthiness.
- 1/2 Tbsp Ground Mustard – introduces a subtle, sharp tang.
- 1/2 Tbsp White Pepper – provides a distinct, pungent heat.
- 1/2 tsp Black Pepper – adds classic savory depth.
- 1/2 tsp Kosher Salt – essential for flavor enhancement.
- 1 1/2 Tbsp (24g) Extra Virgin Olive Oil – used for the initial searing process.
step-by-step instructions
- Prepare the Marinade: Whisk the egg and buttermilk together in a resealable container or shallow dish. Add the chicken breasts and toss to evenly coat. Cover and refrigerate for 4 hours or overnight.
- Preheat the Oven: Set your oven to 400F.
- Drain the Chicken: Remove the chicken from the marinade and place it on a wire rack. Discard the remaining marinade.
- Apply the Coating: Mix the flour and spices together in a bowl. Place one chicken breast at a time in the flour mixture and toss to coat. Place each coated breast back onto the wire rack and repeat until very little flour remains in the bowl.
- Heat the Skillet: Heat a 12″ cast iron skillet or a large, oven-safe skillet over medium heat with the olive oil.
- Sear the Chicken: Once the oil is hot, gently place the chicken breasts in the skillet. Cook for 3 minutes.
- Flip and Finish Searing: Flip the chicken breasts and cook for an additional 2 minutes.
- Oven Roast: Immediately transfer the skillet into the preheated oven. Cook for 5 minutes or until the internal temperature reaches 165F.
- Rest the Meat: Transfer the cooked chicken to a clean wire rack or dish. Allow the meat to rest for at least 5 minutes before serving.
Optimizing Chicken Preparation
Pounding Chicken for Uniform Thickness
Chicken breasts often vary in thickness, which can lead to uneven cooking. Place the breasts between two sheets of plastic wrap and use a meat mallet or a heavy blunt object to lightly pound the thickest part. This ensures the entire piece cooks at the same rate.
Maximizing Marinade Duration
While a quick soak of 30 to 60 minutes is possible, it will not provide the same level of tenderness. Aim for at least 4 hours to allow the buttermilk acids to break down the muscle fibers. Marinating overnight yields the most tender results.
Utilizing a Wire Rack for Breading
Placing marinated chicken on a wire rack before dredging prevents the meat from sitting in excess liquid. This helps the flour adhere more effectively to the surface. It also prevents the breading from becoming a thick, gummy paste.
Flavor and Ingredient Modifications
Substituting White Pepper
White pepper provides a specific heat that differs from black pepper. If you do not have white pepper on hand, you can simply increase the amount of black pepper used. This maintains the spicy profile without altering the overall recipe structure.
Expanding the Spice Blend
The current blend is a balanced base, but you can add other dried herbs. Consider adding a pinch of garlic powder or onion powder for more depth. Avoid adding too much salt, as the kosher salt already provides sufficient seasoning.
Alternative Flour Options
All-purpose flour provides a traditional light crust. For a different texture, you can substitute a portion of the flour with cornstarch. This often results in an even crispier exterior that holds up better during the oven phase.
Advanced Pan Frying Techniques
Determining the Correct Oil Temperature
Adding chicken to cold oil leads to grease absorption and a soggy crust. Wait until the olive oil is shimmering or just beginning to smoke. A small drop of water should sizzle immediately upon contact with the oil.
Selecting the Best Cookware
A cast iron skillet is ideal because it retains heat consistently and can move seamlessly from the stove to the oven. If you do not have one, use any heavy-bottomed skillet that is explicitly labeled as oven-safe. Avoid using non-stick pans that cannot withstand 400F.
Preventing the Breading from Burning
If the oil is too hot, the flour will brown too quickly before the chicken is seared. Maintain a steady medium heat. If you notice the edges darkening too rapidly, lower the flame slightly before transferring the pan to the oven.
Suggested Serving Pairings
Pairing with Fresh Salads
The richness of the fried chicken balances well with acidic dressings. A Caesar salad or a mixed green salad with a lemon vinaigrette provides a refreshing contrast. This helps cut through the oil and buttermilk flavors.
Complementing with Starchy Sides
Serve the chicken alongside roasted rosemary potatoes or garlic parmesan carrots. Air-fried sweet potato fries are another excellent option for a complete meal. These sides complement the savory notes of the paprika and mustard.
Transforming Chicken into Sandwiches
You can slice the cooked chicken breasts in half lengthwise to create fillets. Place them on toasted brioche buns with lettuce, tomato, and a swipe of mayonnaise. This turns the recipe into a high-protein version of a classic chicken sandwich.
Storage and Reheating Guidelines
Refrigeration Best Practices
Store leftover chicken in an airtight container in the refrigerator. Ensure the chicken has cooled completely before sealing the lid to prevent steam from making the crust soggy. The chicken will remain fresh for 3 to 4 days.
Freezing for Long Term Storage
You can freeze the cooked chicken breasts by wrapping them individually in parchment paper and placing them in a freezer bag. This prevents the pieces from sticking together. They can be stored in the freezer for up to three months.
Maintaining Crispiness During Reheating
Avoid using a microwave, as it will make the breading soft and rubbery. Instead, reheat the chicken in an oven or air fryer at 350F for a few minutes. This restores the original crunch of the crust while warming the center.
Troubleshooting Common Issues
Resolving Clumpy Breading
Clumps occur when the chicken is too wet when it hits the flour. To fix this, let the chicken drain on the wire rack for a minute longer. Gently shake off any excess flour before placing the chicken in the skillet.
Preventing Dry Chicken Breasts
Overcooking is the primary cause of dry chicken. Always use a digital food thermometer to check the internal temperature. Remove the skillet from the oven the moment the thickest part of the breast hits 165F.
Managing Oil Splatter
Splatter happens when moisture from the chicken hits the hot oil. Gently lay the chicken into the pan rather than dropping it. Using a skillet with higher sides can also help contain the oil during the searing process.
Frequently Asked Questions
Can I use full-fat buttermilk?
Yes, you can use full-fat buttermilk. It will provide a slightly richer flavor and may result in a marginally crispier crust, though it increases the overall fat content of the dish.
What if I do not have a cast iron skillet?
Any oven-safe stainless steel or ceramic skillet will work. Ensure the handle is heat-resistant, as it will be exposed to 400F temperatures in the oven.
How do I know when the chicken is perfectly done?
The most reliable method is using a meat thermometer to reach 165F. Visually, the chicken should be golden brown and the juices should run clear when pierced.
Do I have to marinate the chicken overnight?
No, overnight is optional for maximum tenderness. A minimum of 4 hours is recommended for the best flavor, but the recipe remains functional with a shorter marination period.
Can I use a different oil for frying?
You can use other oils with high smoke points, such as avocado oil or grapeseed oil. Extra virgin olive oil works well for this specific method because the frying time is relatively short.
Print
Crispy Buttermilk Pan Fried Chicken Breast
- Total Time: 4 hours 20 minutes
- Yield: 3 servings 1x
- Diet: General
Description
Lightly breaded chicken breasts pan fried and finished in the oven for a crispy exterior and juicy, tender interior.
Ingredients
- 3 Boneless Skinless Chicken Breasts (about 5–6 ounces each)
- 1/2 C 120mL Low Fat Buttermilk
- 1 large Egg
- 1/4 C 30g All Purpose Flour
- 1 Tbsp Paprika
- 1/2 Tbsp Ground Mustard
- 1/2 Tbsp White Pepper
- 1/2 tsp Black Pepper
- 1/2 tsp Kosher Salt
- 1 1/2 Tbsp 24g Extra Virgin Olive Oil
Instructions
- Marinade: Whisk the egg and buttermilk together in a resealable container or shallow dish.
- Marinate: Add the chicken breasts and toss to evenly coat. Cover and refrigerate for 4 hours or overnight.
- Preheat: Preheat oven to 400F.
- Prep: Remove the chicken from the marinade and place on a wire rack. Discard remaining marinade.
- Breading: Mix the flour and spices together.
- Coat: Place one chicken breast at a time in the flour mixture and toss to coat. Add the coated chicken breast back to the wire rack. Repeat until no flour (or very little) remains.
- Heat: Heat a 12″ cast iron skillet or large, oven-safe skillet over medium heat with the olive oil.
- Sear: Once hot, gently place the chicken breasts in the skillet.
- Fry: Cook for 3 minutes, flip, and cook for an additional 2 minutes before adding the skillet to the oven.
- Finish: Cook for 5 minutes or until the chicken reaches an internal temp of 165F.
- Rest: Transfer the cooked chicken to a clean wire rack or dish to rest for at least 5 minutes before serving.
Notes
For even cooking, you may want to place chicken breasts between plastic wrap and use a blunt object to lightly pound them to the same thickness.
- Prep Time: 10 minutes
- Cook Time: 10 minutes
- Category: Chicken Recipes
- Method: Pan Frying and Baking
- Cuisine: American
Nutrition
- Serving Size: 1 chicken breast
- Calories: 285 kcal
- Sugar: 2 g
- Sodium: 520 mg
- Fat: 10.3 g
- Saturated Fat: 2.5 g
- Unsaturated Fat: 7.8 g
- Trans Fat: 0 g
- Carbohydrates: 9.6 g
- Fiber: 0.5 g
- Protein: 38 g
- Cholesterol: 125 mg