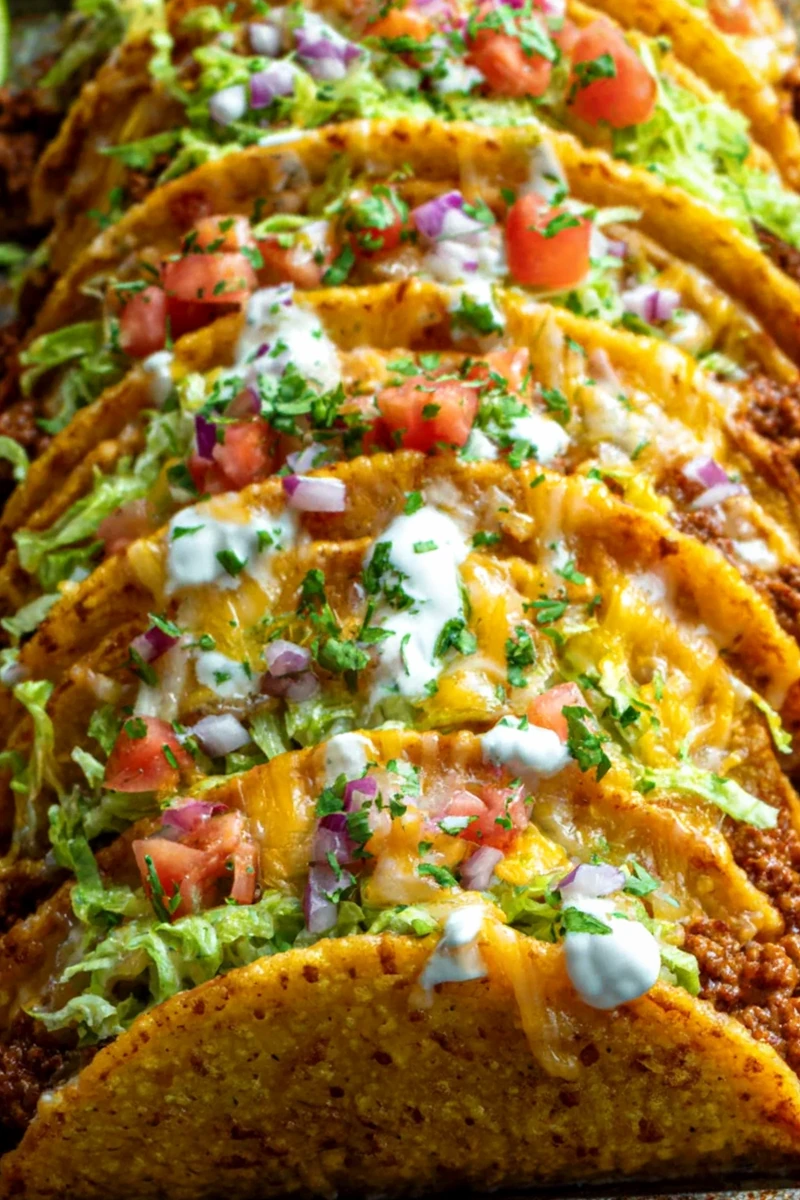
These oven-baked cheesy tacos provide a crispy texture and rich flavor without the mess of pan-frying. This method ensures the shells stay crunchy while the cheese melts perfectly over a savory beef filling.
List of ingredients
- 1 lb ground beef – use 80/20 for better flavor or 90/10 for less fat.
- 1 tablespoon olive oil – used for sautéing the aromatics.
- 1 small onion, finely diced – adds a sweet, savory base to the meat.
- 2 cloves garlic, minced – provides a sharp, aromatic punch.
- 1 packet taco seasoning – ensures a consistent blend of spices.
- ½ cup tomato sauce – creates a cohesive, moist binding for the beef.
- Salt and freshly ground black pepper, to taste – used for final seasoning adjustments.
- 10 small taco shells – hard corn shells work best for the baked method.
- 2 cups shredded cheddar cheese – provides a gooey, melted topping.
- 1 cup shredded lettuce – adds a fresh, cool crunch.
- ½ cup diced tomatoes – adds acidity and moisture.
- ½ cup red onion, diced – adds a sharp, fresh bite.
- ¼ cup fresh cilantro, chopped – provides a bright, herbal finish.
- Optional: Sour cream, sliced jalapeños, guacamole, hot sauce – for personalized heat and creaminess.
step-by-step instructions
- Brown the meat: Heat olive oil in a large skillet over medium-high heat. Add ground beef and cook until browned, breaking it up with a spoon. Drain excess fat if desired. Add diced onion and cook until translucent (3-5 minutes). Add minced garlic and cook for 1 minute until fragrant.
- Simmer the filling: Sprinkle taco seasoning over the beef and onion mixture. Stir to coat evenly. Pour in tomato sauce. Bring to a simmer, then reduce heat to low, cover, and simmer for 10-15 minutes to allow flavors to meld and liquid to reduce. Season with salt and pepper to taste.
- Prepare the shells: Preheat oven to 375°F (190°C). Place taco shells on a baking sheet or directly on the oven rack and warm for 5-7 minutes until pliable and slightly crispy.
- Fill and cheese: Carefully fill the warmed taco shells generously with the beef mixture. Sprinkle shredded cheddar cheese over the filling in each taco.
- Bake the tacos: Arrange filled tacos on a baking sheet and bake for 8-10 minutes, or until cheese is melted, bubbly, and golden brown. Watch closely to prevent burning.
- Garnish and serve: Remove tacos from oven. Top with shredded lettuce, diced tomatoes, diced red onion, and chopped cilantro. Add any optional toppings like sour cream, jalapeños, guacamole, or hot sauce. Serve immediately.
Protein Alternatives and Substitutions
Using Ground Turkey
Ground turkey is a leaner alternative to beef. Because turkey has less fat, you may need to increase the olive oil by one tablespoon to prevent the meat from sticking to the pan and to maintain a moist texture.
Using Ground Chicken
Ground chicken provides a milder flavor profile. To enhance the taste, consider adding a pinch of smoked paprika or a teaspoon of Worcestershire sauce during the simmering stage to mimic the depth of beef.
Plant-Based Crumbles
For a meatless version, use plant-based beef crumbles. Follow the same sautéing and simmering process, but be mindful that some plant-based proteins absorb liquid differently and may require a splash more tomato sauce.
Optimizing the Taco Shells
Hard Corn Shells
Pre-formed hard corn shells are ideal for this recipe as they hold their shape during baking. Warming them before filling prevents the shells from cracking when you spoon in the heavy meat mixture.
Soft Flour Tortillas
If using flour tortillas, fold them into a taco shape and brush the edges with a small amount of oil. Bake them at the same temperature, but monitor them closely as flour tortillas can brown faster than corn.
Homemade Corn Tortillas
Fresh corn tortillas can be used by lightly frying them into a shell shape first. Once shaped, treat them like the store-bought hard shells by warming them briefly before adding the filling.
Cheese Variety and Melting Tips
Sharp Cheddar Cheese
Sharp cheddar provides a bold, tangy flavor that cuts through the richness of the beef. For the best melt, grate the cheese from a block rather than using pre-shredded bags, which often contain anti-clumping agents.
Monterey Jack Cheese
Monterey Jack is known for its superior melting capabilities. It creates a smoother, more cohesive layer of cheese that binds the beef filling to the shell more effectively than cheddar alone.
Pepper Jack Cheese
Use Pepper Jack if you prefer a built-in spicy element. The jalapeño bits within the cheese complement the taco seasoning and reduce the need for additional hot sauce on top.
Advanced Filling Enhancements
Adding Diced Bell Peppers
Sauté finely diced green or red bell peppers along with the onions. This adds a subtle sweetness and additional nutrients to the beef filling without changing the overall texture.
Incorporating Black Beans
Stir in a half-cup of rinsed black beans after the simmering process. This increases the bulk of the filling and adds a creamy contrast to the granular texture of the ground beef.
Adding Corn Kernels
Adding frozen or canned corn kernels during the last five minutes of simmering adds pops of sweetness. This creates a more complex flavor profile and makes the tacos feel more loaded.
Professional Baking Techniques
Preventing Soggy Bottoms
To avoid soggy shells, ensure the beef filling is simmered until the liquid has reduced significantly. If the filling is too watery, the moisture will seep into the bottom of the shell during the baking process.
Choosing the Right Baking Sheet
Use a rimmed baking sheet to catch any overflowing cheese. For extra stability, you can use a taco holder or crumble small balls of aluminum foil to prop the tacos up, preventing them from tipping over.
Managing Oven Hot Spots
Ovens often have hot spots that can burn the cheese on a few tacos while others remain unmelted. Rotate the baking sheet 180 degrees halfway through the baking time to ensure an even golden brown finish.
Fresh Topping Strategies
Creating a Balanced Garnish
Balance the heavy, salty flavors of the meat and cheese with high-acidity toppings. Diced tomatoes and red onions provide the necessary sharpness to cleanse the palate between bites.
Managing Lettuce Texture
Add shredded lettuce only after the tacos have left the oven. If the lettuce is added too early, the residual heat from the cheese will wilt the leaves and remove the desired crunch.
The Role of Fresh Cilantro
Fresh cilantro adds a citrusy, herbal note that brightens the entire dish. Chop the leaves finely and sprinkle them last to preserve the volatile oils that provide the aroma.
Storage and Preservation
Storing the Meat Filling
Cooked beef filling can be stored in an airtight container in the refrigerator for up to three days. This makes it easy to assemble these tacos for a quick weeknight meal during the week.
Freezing the Filling
The simmered beef mixture freezes well for up to two months. Thaw it overnight in the refrigerator before reheating on the stovetop over medium heat with a tablespoon of water to restore moisture.
Handling Leftover Baked Tacos
Once baked and topped, these tacos are best consumed immediately. However, if you have leftover baked tacos without fresh toppings, store them in a sealed container and reheat in the oven at 350°F for 5 minutes.
Reheating and Refreshing
Restoring Shell Crispiness
Avoid the microwave when reheating baked tacos, as it makes the shells chewy. Instead, use a toaster oven or a standard oven to crisp the shell and melt the cheese simultaneously.
Reheating the Beef Filling
If reheating the filling separately, do so in a skillet over medium heat. Add a small amount of tomato sauce or water if the mixture appears too dry after being refrigerated.
Refreshing Fresh Toppings
Never reheat the lettuce, tomatoes, or sour cream. Always apply fresh toppings to reheated tacos to maintain the contrast between the hot filling and cold garnishes.
Make-Ahead Advice
Prepping the Aromatics
Dice the onions, mince the garlic, and chop the cilantro a day in advance. Store them in separate containers or a prepped meal kit to reduce the active cooking time on the day of serving.
Pre-Shredding the Cheese
Grate your block of cheddar or Monterey Jack ahead of time. Keep the shredded cheese in a parchment-lined container to prevent it from clumping together in the fridge.
Preparing the Topping Station
Set up a ‘taco bar’ by placing all the diced vegetables and optional condiments in small bowls. This allows guests to customize their tacos and keeps the assembly process organized.
Troubleshooting Common Issues
What to do if shells crack
If your shells crack during filling, you can ‘patch’ them with a small piece of melted cheese. Ensure you warm the shells in the oven first, as cold shells are significantly more brittle.
Fixing over-salted meat
If the taco seasoning makes the meat too salty, stir in an extra tablespoon of tomato sauce or a small amount of unsweetened Greek yogurt. This helps neutralize the excess salt.
Addressing burnt cheese
If the cheese browns too quickly, lower the oven temperature to 350°F for the final few minutes. Using a broiler is not recommended for this recipe as it often burns the edges of the shells.
Frequently Asked Questions
Can I make the filling ahead of time for Oven-Baked Cheesy Tacos?
Yes, you can prepare the meat filling and cook it up to two days in advance. Store it in an airtight container in the refrigerator and reheat it on the stovetop or in the microwave before assembling.
What kind of taco shells work best for Oven-Baked Cheesy Tacos?
Hard taco shells are ideal for achieving the signature crispy texture. While corn tortillas can be used, they may not get as uniformly crispy as pre-formed shells unless they are fried first.
Can I use a different type of cheese?
Absolutely. While cheddar is traditional, Monterey Jack, Pepper Jack, or a Mexican blend work wonderfully. The key is choosing a cheese with a good melting point to bind the filling.
How do I stop the tacos from falling over in the oven?
The best method is to use a baking sheet and arrange the tacos closely together so they support each other. Alternatively, use aluminum foil to create small supports under each shell.
Is it possible to make these tacos in an air fryer?
Yes, you can air fry the assembled tacos at 370°F for about 3-5 minutes. Be careful, as the high airflow can sometimes blow the toppings or cause the shells to brown very quickly.
Print
Cheesy Oven-Baked Beef Tacos
- Total Time: 50 minutes
- Yield: 10 tacos 1x
- Diet: General
Description
Enjoy delicious oven-baked cheesy tacos with crispy loaded beef filling. These tacos are packed with flavor and topped with fresh ingredients for a delightful meal.
Ingredients
- 1 lb ground beef
- 1 tablespoon olive oil
- 1 small onion, finely diced
- 2 cloves garlic, minced
- 1 packet taco seasoning
- ½ cup tomato sauce
- Salt and freshly ground black pepper, to taste
- 10 small taco shells
- 2 cups shredded cheddar cheese
- 1 cup shredded lettuce
- ½ cup diced tomatoes
- ½ cup red onion, diced
- ¼ cup fresh cilantro, chopped
Instructions
- Step 1: Heat olive oil in a large skillet over medium-high heat. Add ground beef and cook until browned, breaking it up with a spoon. Drain excess fat if desired. Add diced onion and cook until translucent (3-5 minutes). Add minced garlic and cook for 1 minute until fragrant.
- Step 2: Sprinkle taco seasoning over the beef and onion mixture. Stir to coat evenly. Pour in tomato sauce. Bring to a simmer, then reduce heat to low, cover, and simmer for 10-15 minutes to allow flavors to meld and liquid to reduce. Season with salt and pepper to taste.
- Step 3: Preheat oven to 375°F (190°C). Place taco shells on a baking sheet or directly on the oven rack and warm for 5-7 minutes until pliable and slightly crispy.
- Step 4: Carefully fill the warmed taco shells generously with the beef mixture. Sprinkle shredded cheddar cheese over the filling in each taco.
- Step 5: Arrange filled tacos on a baking sheet and bake for 8-10 minutes, or until cheese is melted, bubbly, and golden brown. Watch closely to prevent burning.
- Step 6: Remove tacos from oven. Top with shredded lettuce, diced tomatoes, diced red onion, and chopped cilantro. Add any optional toppings like sour cream, jalapeños, guacamole, or hot sauce. Serve immediately.
Notes
These tacos are incredibly customizable and adaptable to any dietary preference, making them a crowd-pleaser for families.
- Prep Time: 20 minutes
- Cook Time: 30 minutes
- Category: Dinner
- Method: Oven-Baked
- Cuisine: Mexican-inspired
Nutrition
- Serving Size: 1 taco
- Calories: 450 kcal
- Sugar: 4 g
- Sodium: 750 mg
- Fat: 25 g
- Saturated Fat: 10 g
- Unsaturated Fat: 15 g
- Trans Fat: 0 g
- Carbohydrates: 22 g
- Fiber: 3 g
- Protein: 22 g
- Cholesterol: 65 mg