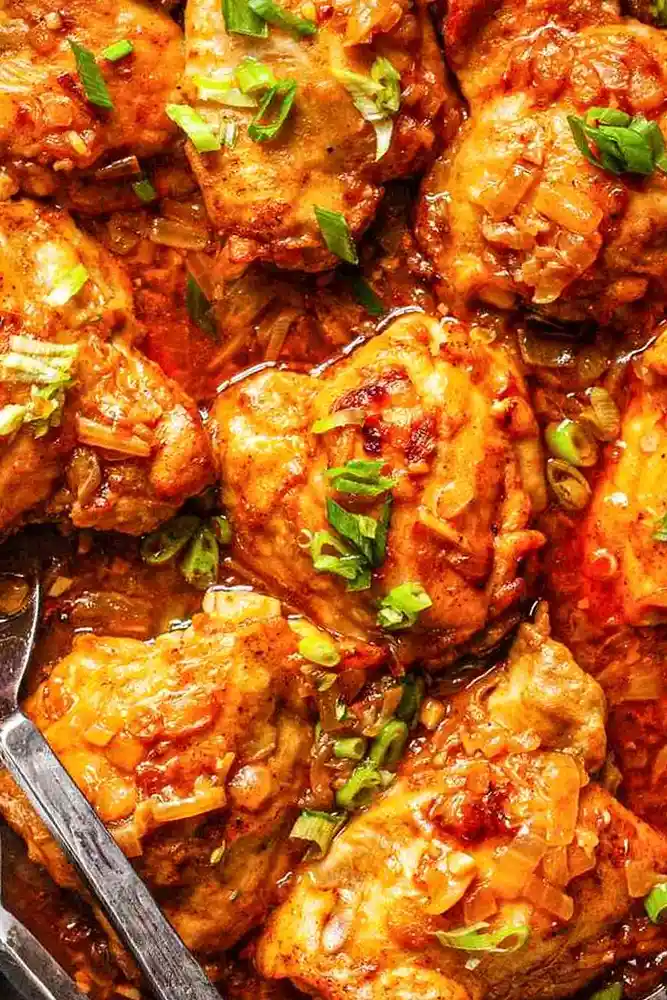
This recipe delivers a comforting meal of tender chicken thighs simmered in a savory, rich onion sauce. It utilizes a simple braising technique to ensure deep flavor and juicy meat in every bite.
List of ingredients
- 2 tablespoons unbleached all-purpose flour – used for dredging and thickening the gravy.
- 1 teaspoon onion powder – adds a concentrated savory depth.
- 1 teaspoon smoked paprika – provides a subtle woody and smoky flavor.
- 1/4 teaspoon cayenne pepper – adds a hint of warmth; adjust to your spice preference.
- 1/2 teaspoon kosher salt – divided for seasoning the flour and the onions.
- 1/2 teaspoon freshly ground black pepper – divided for seasoning the flour and the onions.
- 1 tablespoon pure olive oil – for searing the chicken.
- 8 (3 pounds) bone-in chicken thighs, skin removed – skinless for a lighter version of the classic.
- 2 large sweet onions, chopped – creates the base for the smothered gravy.
- 3 garlic cloves, minced – adds aromatic punch to the sauce.
- 3/4 cup homemade chicken stock or reduced-fat, low-sodium chicken broth – the liquid base for the gravy; keep extra on hand for thinning.
- 2 sprigs fresh thyme – adds an earthy, herbal note.
- 1 bay leaf – provides a subtle aromatic background.
- 1 green onion, thinly sliced – used as a fresh garnish for color and taste.
step-by-step instructions
- Prepare the Oven: Preheat your oven to 350°F to ensure it is ready for the final braising stage.
- Mix the Seasoned Flour: In a large shallow dish, whisk together the flour, onion powder, smoked paprika, and cayenne pepper. Stir in 1/4 teaspoon of salt and 1/4 teaspoon of black pepper until well combined.
- Heat the Pan: Place a large ovenproof skillet over medium-high heat and add the olive oil. Wait until the oil is shimmering before adding the chicken.
- Sear the Chicken: Pat the chicken thighs dry with paper towels. Coat each thigh in the flour-spice mixture, shaking off any excess, but keep the remaining seasoned flour in the dish for later. Sear the chicken in batches to avoid crowding, cooking for 1 to 2 minutes per side until golden brown. Remove chicken to a plate.
- Sauté the Aromatics: Lower the heat to medium and add the chopped onions to the skillet. Season with the remaining 1/4 teaspoon of salt and 1/4 teaspoon of pepper, cooking for 5 to 7 minutes until golden. Stir in the minced garlic and cook for another 45 to 60 seconds until fragrant.
- Build the Gravy: Stir the reserved seasoned flour into the sautéed onions until thoroughly coated. Pour in the chicken stock and stir constantly. Increase heat to medium-high to bring the mixture to a boil, then reduce heat to low to simmer.
- Combine Ingredients: Return the seared chicken thighs and any pan juices to the skillet. Add the thyme sprigs and the bay leaf, nestling the thighs into the onions and coating them with the gravy.
- Bake until Tender: Transfer the uncovered skillet to the oven. Cook for 20 to 25 minutes, or until a thermometer reads 165°F and juices run clear. If the gravy thickens too much, remove chicken and stir in a bit more chicken stock.
- Final Touch: Taste the sauce and adjust with additional salt or pepper if needed. Garnish with sliced green onions and serve immediately.
Mastering the Braising Process
The Importance of Drying the Meat
Always pat the chicken thighs completely dry with paper towels before applying the flour. Excess surface moisture creates steam in the pan, which prevents the meat from developing a proper golden-brown sear. A dry surface ensures the Maillard reaction occurs, locking in flavor and providing a better texture.
Avoiding Pan Overcrowding
Sear the chicken in batches rather than adding all eight thighs at once. Overcrowding the skillet drops the oil temperature and releases too much moisture, causing the chicken to steam rather than brown. Working in two batches keeps the heat high and the crust crisp.
Proper Deglazing Technique
Adding the chicken stock to the browned onion and flour mixture serves as a deglazing process. As the liquid boils, it lifts the browned bits of chicken and onion from the bottom of the pan. These caramelized particles are essential for creating a rich, deep-flavored gravy.
Alternative Ingredient Options
Using Bone-In Chicken Breasts
If you prefer breasts over thighs, use four bone-in, skinless chicken breasts for this recipe. Because breasts are leaner and different in size, reduce the oven cooking time to approximately 15 to 20 minutes. Be careful not to overcook them, as they can dry out faster than thighs.
Gluten-Free Flour Alternatives
To make this dish gluten-free, replace the all-purpose flour with chickpea flour or fava bean flour. These legume-based flours act as excellent thickeners for savory gravies and provide a slightly earthier taste. Use the same measurements as the original recipe for a similar consistency.
Replacing Smoked Paprika
If you do not have smoked paprika, regular sweet paprika is a suitable substitute. While you will lose the subtle smokiness, the color and basic pepper flavor will remain. You can add a tiny drop of liquid smoke to the broth if you want to replicate that campfire aroma.
Selecting the Right Onions
Sweet onions like Vidalia or Walla Walla are ideal for this recipe because they caramelize beautifully. If you only have yellow or white onions, they will still work, though they have a sharper bite. Sauté them a few minutes longer to ensure the natural sugars are fully released.
Best Side Dish Pairings
Complementary Grain Options
Serve this smothered chicken over a bed of fluffy white rice or quinoa to soak up the rich gravy. Mashed potatoes are another classic pairing that complements the savory onion flavors perfectly. For a healthier twist, try cauliflower mash or polenta.
Ideal Vegetable Pairings
Steamed green beans or roasted broccoli provide a fresh, crisp contrast to the richness of the gravy. Sautéed spinach or glazed carrots also work well to balance the meal. Choose vegetables with a slight bitterness or acidity to cut through the savory sauce.
Creating a Complete Platter
For a family-style presentation, place the chicken and gravy on a large platter surrounded by steamed vegetables. Garnish the entire dish with fresh parsley or extra sliced green onions. This creates a visually appealing meal that highlights the rustic nature of the braise.
Storage and Reheating Guide
Proper Refrigeration
Transfer any leftovers into an airtight, sealable container once the chicken has cooled slightly. Store the container in the refrigerator for up to four days. Ensure the chicken remains fully submerged in the gravy to prevent the meat from drying out during storage.
The Best Reheating Method
Avoid the microwave if possible, as it can make the chicken rubbery and separate the gravy. Instead, place the chicken and sauce in a skillet over medium heat. Add a splash of chicken stock or water to loosen the gravy as it warms through.
Freezing Instructions
While the gravy can be frozen, the texture of the chicken may change slightly upon thawing. If you choose to freeze, place the dish in a freezer-safe container for up to two months. Thaw completely in the refrigerator before reheating on the stovetop.
Troubleshooting Your Gravy
Fixing Gravy That is Too Thick
If the sauce becomes too thick during the oven stage, remove the chicken to a plate immediately. Place the skillet back on the stove over medium heat and whisk in chicken stock one tablespoon at a time. Continue until the sauce is thick enough to coat a spoon but still pourable.
Correcting Thin or Watery Sauce
If the gravy is too thin after cooking, remove the chicken and simmer the sauce on the stovetop. The heat will evaporate the excess liquid and concentrate the flavors. Avoid adding more flour at this stage, as it may leave a raw taste in the finished sauce.
Preventing the Flour from Burning
When adding the reserved flour to the onions, stir constantly for a minute before adding the liquid. If the flour browns too quickly, it can become bitter. The addition of chicken stock should happen immediately after the flour is incorporated to stop the browning process.
Timing and Prep Advice
Preparing Ingredients in Advance
You can chop the onions and mince the garlic several hours before you begin cooking. Store them in separate containers in the fridge to speed up the process. This allows you to focus on the searing and braising stages without interruptions.
Managing the Searing Stage
Keep a close eye on the oil temperature to avoid burning the flour coating. If the oil begins to smoke, remove the pan from the heat for a minute to cool down. A gentle shimmer is the ideal state for achieving a golden brown crust without scorching.
Checking for Doneness
Always use a meat thermometer to verify that the chicken has reached an internal temperature of 165°F. Relying on the color of the juices can sometimes be misleading. Checking the thickest part of the thigh ensures the meat is safe and juicy.
Frequently Asked Questions
Can I use boneless skinless thighs?
Yes, you can use boneless thighs, but the cooking time in the oven will decrease to about 10 to 15 minutes. Be aware that the gravy may not thicken as much because the chicken cooks faster. The meat will still be tender, but the flavor is often deeper when cooked on the bone.
What is the best oil for searing?
Olive oil works well, but any oil with a high smoke point, such as avocado oil or grapeseed oil, is a great choice. Avoid using butter for the initial sear as it can burn at the high temperatures needed for browning. You can stir in a knob of butter at the end for extra richness if desired.
Can I make this in a slow cooker?
This recipe is designed for a skillet and oven to achieve a proper sear and reduction. While you can put the ingredients in a crockpot, you will miss the caramelized flavor from the browning process. If using a slow cooker, sear the chicken and onions in a pan first before transferring them.
How do I adjust the spice level?
The cayenne pepper provides a mild heat that can be easily adjusted. For a spicier dish, increase the cayenne to 1/2 teaspoon or add a pinch of crushed red pepper flakes during the onion sauté. For a milder version, omit the cayenne entirely and rely on the smoked paprika.
Is it possible to use a different broth?
Vegetable broth is an excellent alternative to chicken stock and will still produce a savory result. Ensure the broth is low-sodium to prevent the gravy from becoming too salty. Avoid using beef broth, as the flavor is too dominant for this specific chicken dish.
Print
Smothered Chicken Thighs in Onion Gravy
- Total Time: 55 minutes
- Yield: 8 servings 1x
- Diet: General
Description
A lightened-up take on smothered chicken thighs in savory gravy. One bite and you’ll fall in love.
Ingredients
- 2 tablespoons unbleached all-purpose flour
- 1 teaspoon onion powder
- 1 teaspoon smoked paprika
- 1/4 teaspoon cayenne pepper, or to taste
- 1/2 teaspoon kosher salt, to taste
- 1/2 teaspoon freshly ground black pepper
- 1 tablespoon pure olive oil
- 8 (3 pounds) bone-in chicken thighs, skin removed
- 2 large sweet onions, chopped
- 3 garlic cloves, minced
- 3/4 cup homemade chicken stock or reduced-fat, low-sodium chicken broth, plus more if needed
- 2 sprigs fresh thyme
- 1 bay leaf
- 1 green onion, thinly sliced, for garnish
Instructions
- Preheat: Preheat the oven to 350°F.
- Season Flour: In a large shallow dish, combine the flour, onion powder, paprika, and cayenne pepper. Season with 1/4 teaspoon salt and 1/4 teaspoon pepper and stir to combine.
- Heat Oil: In a large ovenproof skillet over medium-high heat, heat the oil until shimmering.
- Sear Chicken: Pat the chicken thighs dry using a paper towel. Place chicken in the flour-spice mixture to coat on both sides. Shake off the excess flour (and make sure to set the flour aside, you’ll need it to make the gravy). Add the coated thighs to the pan without crowding and sear in two batches (if necessary) until golden brown, 1 to 2 minutes per side. Set chicken aside on a plate.
- Cook Aromatics: Add the onions to the skillet and decrease the heat to medium. Season with the remaining 1/4 teaspoon salt and 1/4 teaspoon pepper. Cook, stirring occasionally, until the onions are golden brown, 5 to 7 minutes. Add garlic and cook until fragrant, 45 to 60 seconds.
- Make Gravy: Add the remaining flour-spice mixture to the onions and stir to coat and combine. Add the chicken stock to the onion flour mixture. Stir to combine. Increase the heat to medium-high. Bring the mixture to a boil. Decrease the heat to low and simmer.
- Combine: Add to the skillet the reserved chicken thighs with any accumulated juices, thyme sprigs, and the bay leaf. Nestle the thighs into the onions and turn to coat all sides in the gravy.
- Bake: Transfer the skillet to the oven, uncovered, and cook until the juices of the chicken run clear when pierced with a knife and the temperature reads 165°F when inserted with an instant-read thermometer, 20 to 25 minutes. If the gravy seems too thick, remove the chicken thighs to a serving plate and add chicken stock a little at a time.
- Finish: Taste and adjust for seasoning with salt and pepper. Serve immediately.
Notes
Bone-in chicken breasts can be used instead of thighs; use 4 breasts and cook for 15 to 20 minutes. For a gluten-free version, chickpea or fava bean flour can be used as a substitute for all-purpose flour.
- Prep Time: 30 minutes
- Cook Time: 25 minutes
- Category: Dinner
- Method: Braising
- Cuisine: American
Nutrition
- Serving Size: 1 serving
- Calories: 423 kcal
- Sugar: 4 g
- Sodium: 412 mg
- Fat: 26 g
- Saturated Fat: 7 g
- Unsaturated Fat: 19 g
- Trans Fat: 0 g
- Carbohydrates: 9 g
- Fiber: 1 g
- Protein: 42 g
- Cholesterol: 218 mg