This roasting method provides a reliable way to cook juicy chicken thighs with a crisp exterior. It works equally well for bone-in or boneless cuts using a high-heat oven technique.
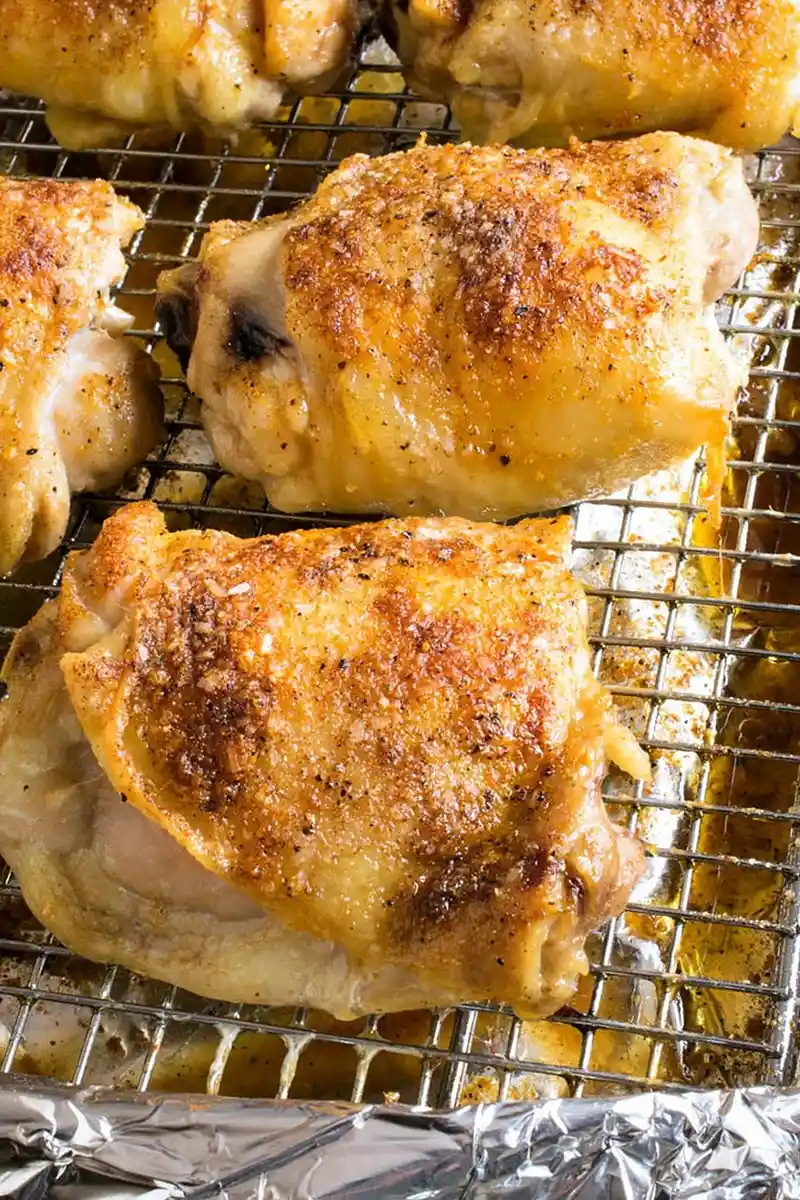
List of ingredients
- 8-12 bone-in, skin-on chicken thighs OR 8-12 boneless, skinless chicken thighs – the primary protein source.
- 3 tablespoons extra virgin olive oil – used to bind seasonings and crisp the skin.
- 1 ½ teaspoons kosher salt – essential for flavor enhancement and moisture retention.
- 1 teaspoon freshly ground black pepper – adds a subtle spicy depth.
- 1 teaspoon garlic powder – provides a consistent savory garlic flavor.
- 1 teaspoon paprika – adds color and a mild sweetness to the crust.
step-by-step instructions
- Prepare the pan: Line a sheet tray with aluminum foil and place a wire rack over the top to ensure airflow and easy cleanup.
- Preheat the oven: Set your oven to 400 degrees F to ensure a high-heat environment for browning.
- Tidy the meat: Smooth out the skin on each thigh and wrap any excess skin underneath the meat for a neat appearance.
- Arrange the chicken: Spray the wire rack with non-stick cooking spray and place the thighs on the rack without letting them touch.
- Prep the surface: Pat the tops of the chicken dry with paper towels and brush them evenly with olive oil.
- Apply seasonings: Combine salt, pepper, garlic powder, and paprika in a small bowl, then sprinkle the mix over the chicken from a height for even coverage.
- Roast: Place the tray in the center of the oven and roast for 30 minutes if using boneless thighs, or 40 minutes for bone-in thighs.
- Verify doneness: Use a probe thermometer to ensure the internal temperature has reached 160 degrees F.
- Serve: Remove from the oven and serve the chicken immediately.
- Optional crisping: For an extra-crispy finish, place the pan under the broiler for one to two minutes.
Practical Roasting Techniques
Using a Wire Cooling Rack
Placing the chicken on a rack prevents the meat from sitting in its own rendered fat. This allow heat to circulate entirely around the thigh, ensuring the bottom doesn’t get soggy. It results in a more uniform cook and a crispier texture on all sides.
The Importance of Patting Skin Dry
Excess moisture on the surface of the chicken creates steam when it hits the heat. Steam prevents the skin from browning and crisping effectively. Patting the skin dry with paper towels ensures the oil and spices adhere better and the Maillard reaction occurs quickly.
Achieving Uniform Seasoning
Sprinkling the spice mix from a height of several inches helps distribute the grains more evenly across the surface. This prevents clumps of salt or paprika from concentrating in one spot. Even seasoning ensures every bite has a balanced flavor profile.
Monitoring Internal Temperature
Using a digital probe thermometer is the only way to guarantee the chicken is cooked safely without overdoing it. Insert the probe into the thickest part of the thigh, avoiding the bone. Removing the meat at 160 degrees F allows for carry-over cooking to reach safe levels while keeping the meat juicy.
Customizing Your Seasoning Blend
Adding Smoky Flavor with Smoked Paprika
Replacing standard paprika with smoked paprika introduces a deep, woody aroma to the dish. This gives the roasted chicken a flavor reminiscent of grilling or smoking. It pairs particularly well with the richness of the dark meat.
Increasing Garlic Intensity
If you prefer a stronger garlic presence, you can increase the garlic powder to two teaspoons. Avoid using fresh minced garlic for this high-heat roast, as fresh garlic burns quickly at 400 degrees F. Powder provides a consistent taste without the risk of bitter burnt bits.
Substituting Salt Types
Kosher salt is preferred due to its larger grain size, which makes it easier to distribute evenly. If using fine table salt, reduce the measurement by about one-third to avoid over-salting. Diamond Crystal and Morton salts also have different densities, so taste-test your blend.
Introducing Herbal Notes
Dried thyme, oregano, or rosemary can be added to the spice mix for an earthy profile. Use about a half-teaspoon of your chosen herb for every four thighs. These herbs complement the garlic and pepper well, adding a classic roasted aroma.
Cooking Variations and Substitutions
Using Different Fats
While extra virgin olive oil is standard, avocado oil is a great alternative due to its higher smoke point. Ghee or melted unsalted butter can also be used to add a richer, nuttier flavor to the skin. Ensure the fat is liquid and easy to brush for the best results.
Cooking Boneless vs Bone-In Thighs
Bone-in thighs take longer to cook because the bone acts as an insulator, slowing the heat transfer to the center. However, they generally remain more moist and flavorful. Boneless thighs cook faster and are more convenient for meal prep or slicing.
Adjusting Oven Temperature
If your oven runs hot, you can lower the temperature to 375 degrees F, though you will need to increase the cooking time. A lower temperature may result in slightly softer skin. Stick to 400 degrees F for the best balance of internal juiciness and external crunch.
Air Fryer Alternative
For smaller batches, you can use an air fryer at 380 degrees F. Cook bone-in thighs for about 20-25 minutes, flipping halfway through. The air fryer mimics the convection of the oven rack, providing very crispy skin in a shorter timeframe.
Side Dish Recommendations
Roasted Root Vegetables
Carrots, parsnips, and rutabaga can be roasted on a separate tray at the same temperature. Toss them in olive oil, salt, and pepper. These vegetables provide a natural sweetness that balances the savory spices of the chicken.
Fresh Green Salads
A crisp garden salad with a lemon-vinaigrette helps cut through the richness of the chicken thighs. Use mixed greens, cucumbers, and radishes for a refreshing contrast. The acidity in the dressing cleanses the palate between bites.
Grain-Based Side Dishes
Wild rice pilaf or quinoa cooked in vegetable broth adds a hearty element to the meal. These grains absorb the juices from the chicken when served together on a plate. Add sautéed onions and celery to the grains for extra depth.
Creamy Purees
Cauliflower puree or mashed potatoes provide a smooth, creamy texture that complements the crispy chicken. Season the puree with a touch of white pepper and a splash of cream. This creates a restaurant-style presentation and flavor balance.
Storage and Preservation
Refrigeration Timelines
Store leftover chicken thighs in an airtight container in the refrigerator for up to four days. Ensure the chicken has cooled slightly before sealing the lid to prevent excessive condensation. Condensation can make the skin soggy during storage.
Freezing Cooked Chicken
Cooked thighs can be frozen for up to three months. Wrap each piece tightly in foil or place them in a vacuum-sealed bag to prevent freezer burn. Label the bags with the date and the original seasonings used.
Restoring Crispiness When Reheating
Avoid the microwave for reheating if you want to keep the skin crisp. Instead, place the thighs back in a 350 degree F oven for 10-15 minutes. This evaporates surface moisture and restores the crunch of the exterior.
Safe Reheating Temperatures
When reheating, ensure the internal temperature of the chicken reaches 165 degrees F. This ensures that any bacteria introduced during storage are destroyed. Use a meat thermometer to check the thickest part of the thigh.
Make-Ahead Strategy
Preparing the Seasoning Mix
You can mix the salt, pepper, garlic powder, and paprika in bulk and store it in a glass jar. This saves time during the actual cooking process. Simply scoop out the required amount for the number of thighs you are preparing.
Pre-seasoning the Meat
For deeper flavor, you can apply the oil and seasonings to the chicken 2-4 hours before roasting. Keep the prepared chicken in the refrigerator on a tray. This acts as a dry brine, allowing the salt to penetrate the meat more deeply.
Planning for Batch Cooking
If you are cooking for a large crowd, use multiple sheet trays but avoid overcrowding them. Overcrowding blocks the airflow and prevents the skin from crisping. Rotate the trays between the top and bottom racks halfway through the cooking time.
Troubleshooting the Bake
Handling Rubbery or Soggy Skin
Soggy skin usually occurs if the oven temperature was too low or if the chicken was overcrowded. Ensure there is at least an inch of space between each thigh. Also, double-check that you patted the skin completely dry before applying oil.
Preventing Overcooking
Dark meat is forgiving, but overcooking can still lead to a stringy texture. Start checking the internal temperature 5 minutes before the suggested time ends. Remove the chicken immediately once it hits 160 degrees F.
Dealing with Uneven Browning
Uneven browning is often caused by oven hotspots. If some pieces are darker than others, rotate the pan 180 degrees halfway through the roast. Using a convection setting on your oven can also help distribute heat more evenly.
Frequently Asked Questions
Can I use chicken breasts instead?
Yes, but breasts cook much faster and dry out easily. Reduce the roasting time to 20-25 minutes and remove them as soon as they reach 165 degrees F. You may need to use slightly more oil to keep them moist.
Why use 160 degrees instead of 165?
The chicken continues to cook after being removed from the oven, a process called carry-over cooking. Removing it at 160 degrees F allows the temperature to rise to the safety standard of 165 degrees F while resting. This prevents the meat from becoming overcooked.
Do I need to sear the chicken first?
Searing is not necessary with this method because the 400 degree F oven and the wire rack achieve a similar effect. The high heat and airflow crisp the skin effectively without the need for a skillet. This makes the process easier and less messy.
How do I prevent the pan from smoking?
Smoke usually occurs when oil drips onto the bottom of the pan and burns. Lining the pan with foil helps, but you can also add a small amount of water to the bottom of the foil. This prevents the drippings from reaching the smoking point.
Print
Simple Oven-Roasted Chicken Thighs
- Total Time: 45 minutes
- Yield: 6 servings 1x
- Diet: General
Description
Follow this easy Oven Baked Chicken Thighs recipe for bone-in or boneless chicken thighs.
Ingredients
- 8–12 bone-in, skin-on chicken thighs OR 8-12 boneless, skinless chicken thighs
- 3 tablespoons extra virgin olive oil
- 1 ½ teaspoons kosher salt
- 1 teaspoon freshly ground black pepper
- 1 teaspoon garlic powder
- 1 teaspoon paprika
Instructions
- Step 1: Line a sheet tray with foil and place a rack over the foil.
- Step 2: Preheat the oven to 400 degrees F.
- Step 3: Prepare the thighs by smoothing out the skin and wrapping any extra skin under the thigh.
- Step 4: Spray the rack with kitchen pan spray and arrange each thigh on the rack, not touching each other.
- Step 5: Pat the tops dry with paper towels and then brush on the olive oil.
- Step 6: In a small bowl, mix the salt, pepper, garlic powder and paprika and then sprinkle over each piece.
- Step 7: Place in the center of the oven and roast 30 minutes for boneless and 40 minutes for bone-in.
- Step 8: Verify internal temperature is 160 degrees F when a probe thermometer is inserted.
- Step 9: Serve immediately.
- Step 10: If you prefer extra crispy, place the pan under the broiler for a minute or two.
Notes
Bone-in-skin-on chicken thighs require ten extra minutes of cooking time compared to boneless-skinless.
- Prep Time: 5 minutes
- Cook Time: 40 minutes
- Category: entree
- Method: Baked
- Cuisine: American
Nutrition
- Serving Size: 1 serving
- Calories: 380 kcal
- Sugar: 1 g
- Sodium: 580 mg
- Fat: 24 g
- Saturated Fat: 7 g
- Unsaturated Fat: 15 g
- Trans Fat: 0 g
- Carbohydrates: 3 g
- Fiber: 1 g
- Protein: 32 g
- Cholesterol: 120 mg