This method creates a satisfying crunch and melted cheese without the mess of frying. It is an efficient way to prepare a large batch of tacos for a family meal.
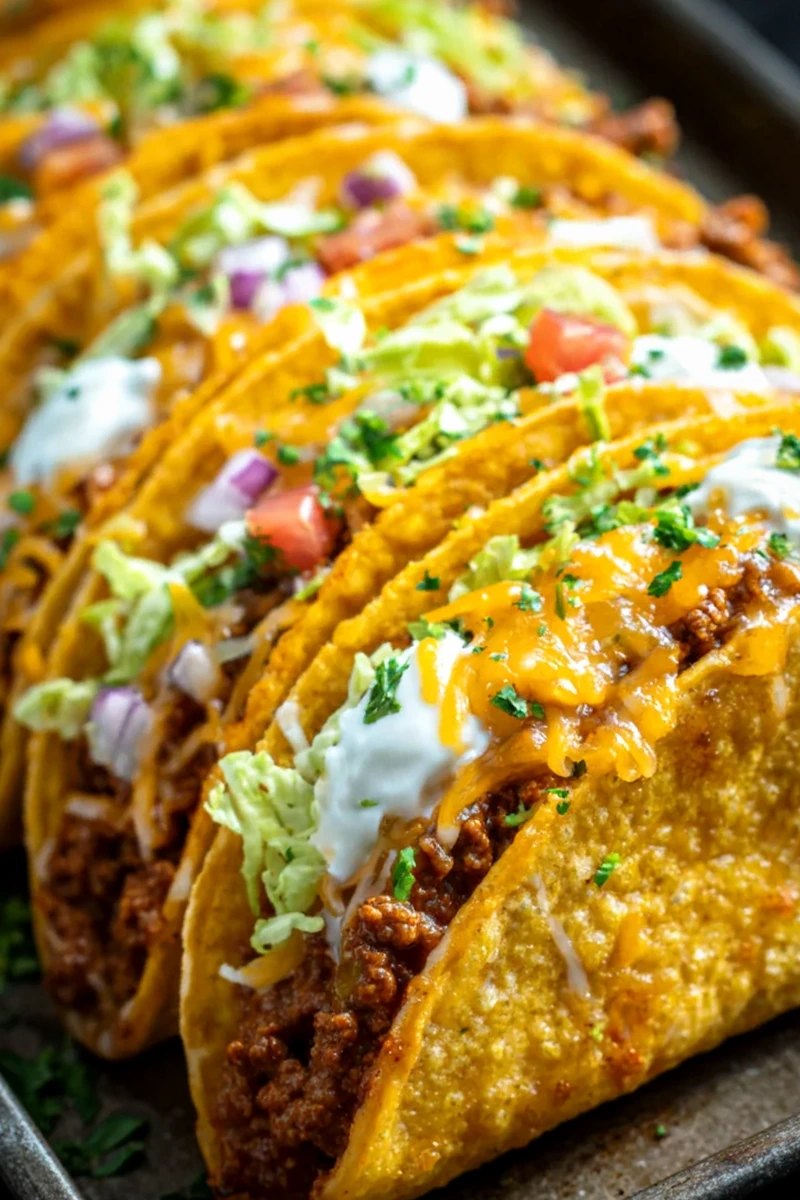
List of ingredients
- 1 lb ground beef – lean or medium grade.
- 1 tablespoon olive oil – for sautéing the meat.
- 1 small onion, finely diced – adds aromatic sweetness.
- 2 cloves garlic, minced – for depth of flavor.
- 1 packet taco seasoning – or a custom blend of cumin, paprika, and chili powder.
- ½ cup tomato sauce – thickens the meat mixture.
- 10 small taco shells – hard corn shells are recommended.
- 2 cups shredded cheddar cheese – for the melted topping.
- 1 cup shredded lettuce – for a cool contrast.
- ½ cup diced tomatoes – fresh garnish.
- ½ cup diced red onion – provides a sharp bite.
- ¼ cup fresh cilantro, chopped – herbaceous finish.
- Salt and freshly ground black pepper, to taste.
step-by-step instructions
- Prepare Meat: Preheat oven to 375°F (190°C). Heat olive oil in a large skillet over medium-high heat, brown the ground beef, and drain excess grease. Sauté diced onion for 3-4 minutes until soft, then stir in minced garlic for 1 minute.
- Simmer Filling: Stir in taco seasoning until the meat is well coated. Add tomato sauce and bring to a simmer. Reduce heat to low and cook uncovered for 5-7 minutes until thickened, then season with salt and pepper.
- Fill Shells: Arrange slightly warmed taco shells on a baking sheet. Spoon the beef mixture generously into each shell.
- Add Cheese: Sprinkle shredded cheddar cheese over the beef filling in each taco, ensuring the cheese covers the surface.
- Bake: Bake for 8-10 minutes until the cheese is bubbly and the shells are golden brown.
- Garnish and Serve: Remove from oven and top with shredded lettuce, diced tomatoes, red onion, and cilantro. Serve immediately with optional sides like sour cream or guacamole.
Technical Tips for Texture and Crispness
Warming Shells for Better Flexibility
Warming the taco shells before filling prevents them from cracking. Wrap shells in a damp paper towel and microwave for 30 seconds, or place them in a 300°F oven for 2-3 minutes. This makes the corn more pliable during assembly.
Managing Grease for a Cleaner Flavor
Draining excess fat after browning the beef is essential to prevent the tacos from becoming greasy. Use a colander or a spoon to remove oil before adding the onions. This ensures the taco seasoning adheres better to the meat.
Using Parchment Paper for Easy Cleanup
Line your baking sheet with parchment paper or a silicone mat. This prevents the melted cheese from sticking to the pan. It also makes the cleanup process much faster after the tacos are removed.
Preventing Shell Sogginess
Do not overfill the shells with tomato sauce-based filling. Ensure the beef mixture is simmered until thick and the liquid has reduced. This prevents moisture from seeping into the shell and making it soft during baking.
Filling Substitutions and Variations
Using Ground Turkey or Chicken
Replace the ground beef with lean ground turkey or chicken for a lighter protein option. Since poultry is leaner, you may need to add an extra teaspoon of olive oil to prevent the meat from sticking to the skillet.
Swapping Tomato Sauce for Salsa
Substitute the tomato sauce with a chunky salsa to add more texture and acidity. This change introduces small pieces of onion and pepper into the filling. Adjust the salt levels, as store-bought salsa often contains high sodium.
Adding Black Beans for Bulk
Stir in a half-cup of rinsed and drained black beans to the beef mixture. This increases the fiber content and adds a different texture. It is a practical way to stretch the meal to feed more people.
Incorporating Sweet Corn
Add drained canned corn or frozen corn kernels to the meat during the simmering stage. The sweetness of the corn balances the savory spices of the taco seasoning. Ensure the corn is well-drained to maintain the thickness of the sauce.
Cheese Selection and Melting Tips
Choosing High-Melt Cheeses
Cheddar is a classic choice, but Monterey Jack or Pepper Jack provides a smoother melt. For the best results, use a blend of both for a balance of sharp flavor and gooey consistency.
Grating Cheese from a Block
Grate your cheese fresh from a block rather than using pre-shredded bags. Pre-shredded cheese is coated in cellulose or potato starch to prevent clumping, which can interfere with the melting process in the oven.
Preventing Cheese from Burning
Monitor the tacos closely during the final two minutes of baking. If the cheese begins to brown too quickly, lower the oven temperature slightly. The goal is melted and bubbly cheese, not a hard crust.
Serving and Pairing Recommendations
Creating a Custom Topping Station
Arrange the lettuce, tomatoes, onions, and cilantro in separate bowls on the table. This allows family members to customize their tacos based on personal preference. It also keeps the fresh vegetables crisp until the moment of serving.
Pairing with Cilantro Lime Rice
Serve these tacos with a side of long-grain white rice tossed with lime juice and fresh cilantro. The brightness of the lime complements the richness of the cheesy beef. This provides a complete, filling meal.
Adding Creamy Elements
Complement the crunch of the shells with a dollop of sour cream or homemade guacamole. The fat in these toppings balances the spice of the taco seasoning. Sliced avocado is a simpler alternative for a creamy texture.
Selecting a Side Salad
A simple cabbage slaw with a vinegar-based dressing works well. The acidity of the vinegar cleanses the palate between bites of cheesy beef. Avoid creamy dressings that might overlap with the cheese flavor.
Storage and Preservation
Storing the Beef Filling
Store leftover cooked beef filling in an airtight container in the refrigerator for up to four days. Keep the filling separate from the shells and fresh toppings. This preserves the flavor and prevents contamination.
Freezing Prepared Meat
The seasoned beef mixture can be frozen for up to three months. Place it in a freezer-safe bag and squeeze out all the air. Thaw it in the refrigerator overnight before reheating.
Handling Leftover Shells
Keep unused taco shells in a sealed plastic bag or an airtight container. Store them in a cool, dry place to prevent them from becoming stale. Avoid storing them in the refrigerator, as moisture can make them soft.
Reheating Instructions
Oven Reheating for Maximum Crunch
To reheat baked tacos, place them on a baking sheet at 350°F for 5-7 minutes. This restores the crispness of the shell and remelts the cheese. Avoid the microwave, as it often makes the shells chewy or soggy.
Using an Air Fryer for Speed
Place a single taco in an air fryer at 350°F for 2-3 minutes. This is the fastest way to achieve a professional-level crunch. Be careful not to overcrowd the basket to ensure airflow.
Microwave Precautions for Filling
If reheating only the meat filling, use a microwave-safe bowl and cover it with a damp paper towel. Heat in 30-second intervals, stirring in between. This prevents the meat from drying out.
Troubleshooting Common Issues
Solving Over-Browned Shells
If the edges of the shells brown too quickly, shield them with a piece of aluminum foil. This allows the cheese to finish melting without burning the corn. Ensure the oven rack is in the center position.
Fixing a Watery Filling
If the meat mixture is too liquid, simmer it for an additional 3-5 minutes without a lid. The evaporation process thickens the sauce, ensuring it stays inside the shell. You can also add a small amount of cornstarch slurry if necessary.
Adjusting Over-Seasoned Meat
If the taco seasoning makes the meat too salty, stir in a tablespoon of unsalted tomato sauce or a splash of water. Adding a pinch of sugar or a squeeze of lime can also balance the saltiness. Always taste before adding additional salt.
Frequently Asked Questions
Can I use soft tortillas instead of hard shells?
Yes, but the result will be different. Soft tortillas will not get the same crunch in the oven; instead, they will become warm and slightly toasted. You may want to lightly oil them for a crispier edge.
Is it possible to make this recipe vegetarian?
You can replace the ground beef with cooked lentils, crumbled tempeh, or a plant-based meat substitute. Follow the same seasoning and baking steps to achieve the same cheesy, crispy result.
How do I prevent the taco shells from cracking during filling?
Ensure you warm the shells before filling. Use a spoon to press the meat firmly into the bottom of the shell rather than dropping it from a height. This reduces the pressure on the walls of the shell.
What is the best way to store assembled tacos?
Assembled tacos are best eaten immediately. If you must store them, keep them in a single layer in a container and reheat them in the oven. Do not add fresh toppings like lettuce until after reheating.
Can I use a different type of taco seasoning?
Yes, you can use any brand or a homemade mix of chili powder, cumin, garlic powder, and onion powder. If using a homemade mix, adjust the salt carefully as store-bought packets have high sodium levels.
Print
Oven Baked Crispy Cheesy Beef Tacos
- Total Time: 40 minutes
- Yield: 10 tacos 1x
- Diet: General
Description
An easy and delicious recipe for oven-baked beef tacos, featuring crispy shells, a savory seasoned beef filling, and plenty of melted cheese, finished with fresh toppings.
Ingredients
- 1 lb ground beef
- 1 tablespoon olive oil
- 1 small onion, finely diced
- 2 cloves garlic, minced
- 1 packet taco seasoning
- ½ cup tomato sauce
- 10 small taco shells
- 2 cups shredded cheddar cheese
- 1 cup shredded lettuce
- ½ cup diced tomatoes
- ½ cup diced red onion
- ¼ cup fresh cilantro, chopped
- Salt and freshly ground black pepper, to taste
Instructions
- Step 1: Preheat oven to 375°F (190°C). In a large skillet, heat olive oil over medium-high heat. Add ground beef and cook until browned, then drain excess grease. Add diced onion and cook until softened, about 3-4 minutes. Stir in minced garlic and cook for 1 minute until fragrant.
- Step 2: Sprinkle taco seasoning over the meat and onion mixture. Stir to coat. Pour in tomato sauce and stir until combined. Bring to a simmer, then reduce heat to low and cook uncovered for 5-7 minutes until slightly thickened. Season with salt and pepper to taste.
- Step 3: Arrange slightly warmed taco shells on a baking sheet. Fill each shell generously with the seasoned beef mixture.
- Step 4: Sprinkle shredded cheddar cheese generously over the meat in each taco shell, ensuring good coverage.
- Step 5: Bake in the preheated oven for 8-10 minutes, or until the cheese is completely melted and bubbly, and the taco shells are golden and slightly crispy.
- Step 6: Carefully remove tacos from the baking sheet. Top each with shredded lettuce, diced tomatoes, diced red onion, and chopped cilantro. Serve immediately.
Notes
Warming taco shells beforehand makes them more pliable and less likely to crack. You can substitute ground beef with ground turkey or chicken for a lighter option.
- Prep Time: 15 minutes
- Cook Time: 25 minutes
- Category: Dinner
- Method: Baking
- Cuisine: Mexican-American
Nutrition
- Serving Size: 1 taco
- Calories: 320 kcal
- Sugar: 4 g
- Sodium: 650 mg
- Fat: 18 g
- Saturated Fat: 8 g
- Unsaturated Fat: 10 g
- Trans Fat: 0 g
- Carbohydrates: 18 g
- Fiber: 3 g
- Protein: 20 g
- Cholesterol: 60 mg