This garlic butter chicken thigh recipe provides a fast and savory meal ideal for any evening dinner. It combines perfectly crisped skin with a rich, herb-infused butter sauce.
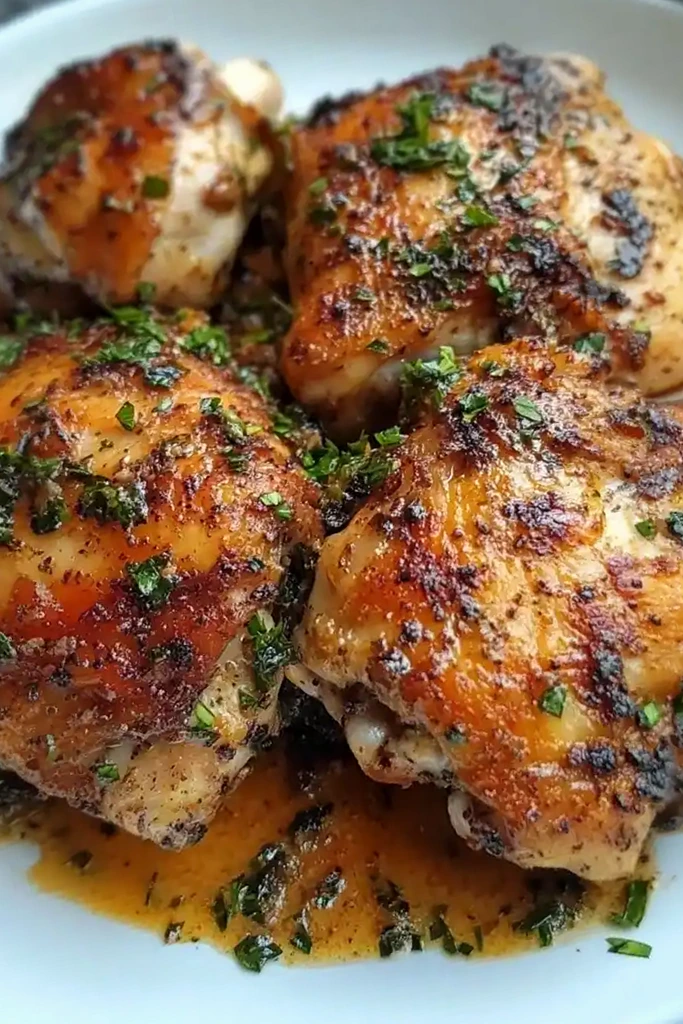
List of ingredients
- 4 bone-in, skin-on chicken thighs – provides the best flavor and texture.
- 2 tablespoons unsalted butter – used for the rich garlic sauce.
- 1 tablespoon olive oil – prevents sticking and helps with searing.
- 4 cloves garlic, minced – adds a pungent, aromatic base.
- 1 tablespoon fresh rosemary, chopped – adds earthy pine notes.
- 1 tablespoon fresh thyme, chopped – provides a subtle minty flavor.
- Salt and pepper to taste – basic seasoning for the meat.
- 1 teaspoon paprika – gives the skin a deep golden color.
- 1 tablespoon lemon juice – cuts through the richness of the butter.
- Freshly grated Parmesan cheese – optional garnish for added saltiness.
step-by-step instructions
- Prepare the Chicken Thighs: Pat the chicken thighs dry with paper towels to ensure the skin crisps. Season the meat generously with salt, pepper, and paprika on all sides.
- Sear the Chicken Thighs: Heat olive oil in a large skillet over medium-high heat. Place thighs skin-side down and cook for 5-7 minutes until golden brown. Flip and cook for another 4-5 minutes, then remove the chicken from the skillet and set aside.
- Make the Garlic Butter Sauce: Reduce the skillet heat to medium-low and melt the butter. Stir in the minced garlic and cook for about 1 minute until fragrant. Add the chopped rosemary and thyme, stirring to infuse the butter.
- Combine Chicken and Sauce: Place the chicken thighs back into the skillet, skin-side up. Spoon the garlic butter over the chicken and simmer for 10-15 minutes until the internal temperature reaches 165°F.
- Serve and Enjoy: Plate the chicken with preferred side dishes. Drizzle the remaining garlic butter from the pan over the meat and garnish with Parmesan cheese.
Mastering the Searing Process
Patting the Skin Dry for Maximum Crispiness
Moisture on the surface of the chicken creates steam, which prevents the skin from browning. Use paper towels to thoroughly dry every part of the skin before adding seasonings. This ensures a hard sear and a crunchier texture.
Maintaining Medium-High Heat for Searing
Using a temperature that is too low will cause the chicken to leak juices and boil rather than sear. Medium-high heat allows the fat in the skin to render quickly. This creates a golden-brown crust through the Maillard reaction.
Avoiding Pan Crowding to Prevent Steaming
Leaving enough space between the chicken thighs prevents the pan temperature from dropping too sharply. If the pan is too full, the meat will release moisture that cannot evaporate, resulting in pale, soggy skin. Work in batches if your skillet is small.
Using a Meat Thermometer for Precise Doneness
Chicken thighs are safe to eat at 165°F, but they often taste better and more tender around 175°F. A digital meat thermometer is the only way to ensure the meat is cooked through without overdoing it. Insert the probe into the thickest part of the thigh.
Ingredient Substitutions and Alternatives
Substituting Chicken Breasts for Leaner Meat
You can use boneless, skinless chicken breasts if you prefer a leaner protein. Be aware that breasts cook much faster than thighs and can dry out easily. Reduce the final simmering time to about 5-8 minutes depending on the thickness.
Using Dried Herbs Instead of Fresh
If fresh herbs are unavailable, you can use dried rosemary and thyme. Use a ratio of one-third the amount of dried herbs compared to fresh. Add dried herbs to the butter slightly earlier to allow them to rehydrate and release oils.
Replacing Butter with Plant-Based Alternatives
To make this recipe dairy-free, substitute the unsalted butter with a high-quality plant-based butter stick. Most vegan butter alternatives melt and brown similarly to dairy butter. The flavor profile will remain rich and savory.
Swapping Olive Oil for Avocado Oil
Avocado oil has a higher smoke point than olive oil, making it safer for very high-heat searing. This prevents the oil from smoking or tasting burnt during the initial browning phase. Either oil works well, but avocado oil is more stable.
Customizing the Flavor Profile
Incorporating Red Pepper Flakes for Heat
For those who prefer a spicy kick, add a pinch of red pepper flakes when sautéing the garlic. This infuses the butter with a gentle heat that complements the richness of the chicken. Adjust the amount based on your spice tolerance.
Adding Lemon Zest for Enhanced Brightness
While lemon juice is added at the end, grating fresh lemon zest into the butter sauce adds a deeper citrus aroma. The zest contains oils that provide a floral, bright contrast to the heavy butter. Use a microplane for the finest zest.
Using Sage and Oregano as Herb Alternatives
If you dislike rosemary or thyme, fresh sage and oregano are excellent alternatives. Sage provides a warm, autumnal flavor that pairs perfectly with butter. Oregano adds a Mediterranean touch that works well with the Parmesan garnish.
Adding Honey for a Sweet and Savory Glaze
Whisking one teaspoon of honey into the garlic butter creates a glaze-like consistency. The sugars in the honey caramelize slightly during the final simmer, adding a sweet contrast to the salty paprika. This is particularly appealing to children.
Recommended Side Dish Pairings
Serving with Garlic Mashed Potatoes
Creamy mashed potatoes are ideal for soaking up the excess garlic butter sauce. Use Yukon Gold potatoes for a naturally buttery texture and flavor. Mash them with a bit of milk and salt for a classic pairing.
Pairing with Sautéed Spinach or Kale
A bitter green like spinach or kale balances the richness of the butter sauce. Sauté the greens in a separate pan with a touch of olive oil and salt. The freshness of the greens cuts through the fat of the chicken skin.
Using Quinoa or Brown Rice as a Base
Whole grains like quinoa or brown rice provide a nutty flavor and a healthy contrast to the dish. These grains act as a sponge for the pan sauce, ensuring none of the garlic butter goes to waste. Cook them in vegetable broth for extra flavor.
Combining with Roasted Carrots and Parsnips
Root vegetables roasted with olive oil and thyme mirror the flavors in the chicken sauce. Roast them at 400°F until caramelized. The sweetness of the roasted carrots complements the savory garlic butter.
Storage and Preservation Methods
Refrigerating Chicken in Airtight Containers
Store leftover chicken thighs in a shallow, airtight container to prevent them from absorbing other fridge odors. They will remain fresh and safe to eat for 3 to 4 days. Ensure the chicken is cooled slightly before sealing the lid to avoid excess condensation.
Freezing Cooked Thighs for Long-Term Storage
Cooked chicken can be frozen for up to three months. Wrap the thighs individually in foil and place them in a heavy-duty freezer bag to prevent freezer burn. Thaw them in the refrigerator overnight before reheating.
Storing the Extra Butter Sauce Separately
If you have leftover butter sauce, store it in a small glass jar. Since it is primarily fat, it will solidify in the fridge. Gently melt it in a pan or microwave when you are ready to use it for other proteins or vegetables.
Managing Condensation During Cooling
Avoid putting hot chicken directly into a sealed container. This creates steam that drips back onto the skin, making it soggy. Let the meat rest on a wire rack for 15 minutes before transferring it to storage.
Reheating Techniques for Quality
Using the Oven to Reheat Skin Crispiness
To restore the crispy skin, reheat the chicken in an oven or toaster oven at 350°F. Place the thighs on a baking sheet and heat for 10 minutes. This evaporates surface moisture and re-renders the fat in the skin.
Using an Air Fryer for Fast Results
An air fryer is the most efficient tool for reheating this dish. Set the temperature to 375°F and heat for 3-5 minutes. This provides a convection-style heat that crisps the skin almost as well as the original sear.
Microwaving Meat Without Drying it Out
Microwaving is the least ideal method as it makes the skin rubbery. If you must use it, cover the chicken with a damp paper towel. Use medium power and heat in 30-second intervals to avoid overcooking the meat.
Warming the Butter Sauce Individually
If the sauce has separated during storage, reheat it slowly in a small saucepan over low heat. Stir constantly to emulsify the butter and garlic again. Avoid boiling the sauce, as this can burn the garlic particles.
Preparation and Make-Ahead Tips
Marinating the Chicken in Advance
You can season the chicken with salt, pepper, and paprika several hours before cooking. This allows the salt to penetrate deeper into the meat, enhancing the overall flavor. Store the seasoned chicken in the fridge until you are ready to sear.
Pre-mixing the Garlic Butter Aromatics
Mince the garlic and chop the rosemary and thyme ahead of time. Store them together in a small container with a bit of olive oil to keep them fresh. This reduces active prep time when you are ready to cook the sauce.
Using a Cast Iron Skillet for Better Heat
If you have one, use a cast iron skillet instead of stainless steel. Cast iron retains heat much better, which is critical for maintaining a steady sear. It also distributes heat more evenly across the bottom of the pan.
Partial Cooking for Busy Schedules
You can sear the chicken and make the sauce, but stop before the final simmering step. Store the seared meat and the sauce separately in the fridge. When ready to eat, combine them in the skillet and simmer until the internal temperature is 165°F.
Troubleshooting Common Cooking Errors
Preventing Garlic from Burning in the Pan
Garlic burns quickly and becomes bitter if the heat is too high. Always reduce the heat to medium-low before adding the butter and garlic. If the garlic turns dark brown, it is best to wipe the pan and start the sauce over.
Handling Meat that Sticks to the Skillet
If the chicken skin sticks to the pan, do not force it off. Meat naturally releases from the pan once a proper crust has formed. If it is still sticking, wait another minute before attempting to flip it.
Managing Excessive Fat During Searing
Chicken thighs can release a significant amount of rendered fat. If the pan becomes too greasy, carefully spoon out some of the excess oil before adding the butter. Too much fat can make the final sauce feel oily rather than creamy.
Adjusting Cook Time for Larger Thighs
Not all chicken thighs are the same size. If you are using jumbo thighs, increase the final simmering time by 5 minutes. Always rely on the internal temperature of 165°F rather than the clock to determine doneness.
Frequently Asked Questions
Can I use chicken breasts instead of thighs?
Yes, but chicken breasts cook faster and are leaner, meaning they can dry out. Reduce the simmering time and check the temperature more frequently.
Can I make this recipe in advance?
You can prep the ingredients and sear the meat ahead of time, but for the best results, perform the final simmering and serving steps fresh to keep the skin crispy.
How do I make the skin extra crispy?
Ensure the chicken is completely dry before seasoning and use medium-high heat without moving the meat too often during the initial sear.
What are the best side dishes for this meal?
Garlic mashed potatoes, steamed broccoli, roasted carrots, or a fresh garden salad pair excellently with the rich butter sauce.
How long can I store these in the fridge?
Cooked chicken thighs can be stored in an airtight container in the refrigerator for 3 to 4 days.
Can I make this in an oven instead of a skillet?
You can roast the chicken in the oven, but you will lose the specific sear and pan-sauce emulsion that comes from the skillet method.
Print
Garlic Butter Chicken Thighs Recipe
- Total Time: 30 minutes
- Yield: 4 servings 1x
- Diet: General
Description
This Garlic Butter Chicken Thighs recipe offers a quick and flavorful meal that’s perfect for weeknights or special occasions. With crispy skin, tender meat, and a rich garlic butter sauce, it’s a dish your whole family will enjoy.
Ingredients
- 4 bone-in skin-on chicken thighs
- 2 tablespoons unsalted butter
- 1 tablespoon olive oil
- 4 cloves garlic, minced
- 1 tablespoon fresh rosemary, chopped
- 1 tablespoon fresh thyme, chopped
- Salt to taste
- Pepper to taste
- 1 teaspoon paprika
- 1 tablespoon lemon juice
- Microbial-rennet Parmesan cheese, for serving
Instructions
- Prepare the Chicken Thighs: Start by patting the chicken thighs dry with paper towels. Once dry, season the chicken thighs generously with salt, pepper, and paprika.
- Sear the Chicken Thighs: In a large skillet, heat a tablespoon of olive oil over medium-high heat. Once the oil is hot, place the chicken thighs in the pan, skin-side down. Cook for about 5-7 minutes until the skin is crispy and golden brown. Flip the chicken thighs over and cook for an additional 4-5 minutes. Remove them from the skillet and set aside.
- Make the Garlic Butter Sauce: In the same skillet, reduce the heat to medium-low and add the butter. Once the butter is melted, add the minced garlic and cook for about 1 minute until fragrant. Add fresh rosemary and thyme, stirring to infuse the butter with their flavors.
- Combine Chicken and Sauce: Return the chicken thighs to the skillet, skin-side up. Spoon some of the garlic butter sauce over the chicken, and allow it to simmer for another 10-15 minutes until the chicken is fully cooked through (internal temperature of 165°F).
- Serve and Enjoy!: Serve the garlic butter chicken thighs with your favorite side dishes, such as roasted vegetables, mashed potatoes, or rice. Drizzle some of that delicious garlic butter sauce over everything!
Notes
To get the skin nice and crispy, make sure the chicken is dry before cooking. Avoid moving the chicken around in the pan while it’s searing to ensure a perfect golden crust.
- Prep Time: 10 minutes
- Cook Time: 20 minutes
- Category: Main Course
- Method: Searing
- Cuisine: American
Nutrition
- Serving Size: 1 serving
- Calories: 325 kcal
- Sugar: 3 g
- Sodium: 580 mg
- Fat: 22 g
- Saturated Fat: 9 g
- Unsaturated Fat: 11 g
- Trans Fat: 0 g
- Carbohydrates: 6 g
- Fiber: 1 g
- Protein: 26 g
- Cholesterol: 125 mg