Garlic Brown Sugar Chicken is a reliable, crowd-pleasing dish that combines deep savory notes with a touch of sweetness. The glaze caramelizes beautifully, ensuring that every bite of chicken remains juicy and flavorful. It is an ideal solution for busy weeknights when you want a meal that tastes like it took hours of preparation without actually requiring a massive time commitment.
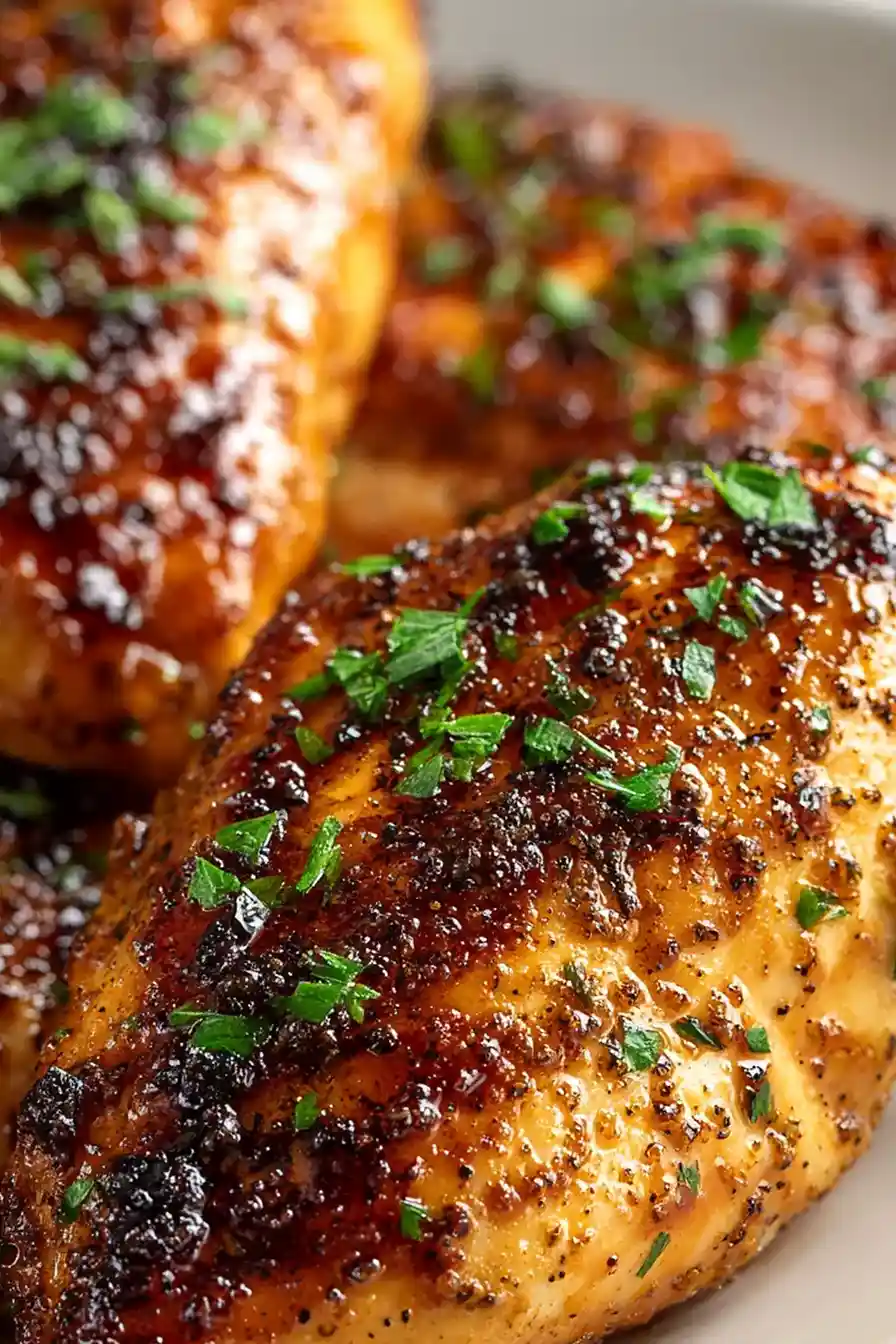
List of ingredients
- 4 boneless, skinless chicken breasts (or thighs)
- 3 tablespoons olive oil
- 5 cloves garlic, finely minced
- 1/3 cup light brown sugar, packed
- 2 tablespoons soy sauce
- 1 tablespoon apple cider vinegar
- 1 teaspoon smoked paprika
- 1/2 teaspoon salt
- 1/2 teaspoon black pepper
- 1/2 teaspoon onion powder
- 1/4 teaspoon crushed red pepper flakes (optional)
- 1 tablespoon unsalted butter
- Fresh parsley, chopped (for garnish)
step-by-step instructions
- Prepare the Chicken: Pat the chicken dry with paper towels. Season both sides evenly with salt, pepper, smoked paprika, and onion powder.
- Sauté the Garlic: Heat olive oil in a large skillet over medium heat. Add the minced garlic and cook for 30–45 seconds, just until fragrant. Do not brown.
- Build the Sauce: Stir the brown sugar, soy sauce, and apple cider vinegar into the skillet. Allow the mixture to gently bubble and dissolve into a smooth sauce.
- Cook the Chicken: Place the chicken into the skillet. Cook for 5–6 minutes per side, spooning the sauce over the chicken as it cooks, until fully cooked through and the internal temperature reaches 165°F (74°C).
- Finish the Glaze: Add the butter to the pan and spoon the thickened, glossy sauce over the chicken for 1–2 minutes until rich and shiny.
- Serve: Remove from heat. Garnish with fresh parsley if desired and serve immediately with extra sauce spooned over the top.
Culinary Techniques for Better Results
Maintaining Pan Temperature During Sautéing
To avoid scorching the garlic, ensure your skillet is preheated properly before adding the fat. If the pan gets too hot, the garlic will turn bitter almost instantly, which ruins the foundation of your sauce. Keep the heat at a steady medium and move the garlic around the pan constantly to ensure even cooking.
Achieving the Perfect Glaze Consistency
The secret to a sticky glaze is patience during the reduction phase. If the sauce looks too watery after adding the sugar and soy sauce, allow it to bubble for an extra minute or two before adding the chicken. The goal is a syrup-like consistency that coats the back of a spoon cleanly.
Effective Ingredient Substitutions
Using Alternative Proteins
While chicken breasts are a popular choice, chicken thighs are excellent for this recipe because their higher fat content makes them more forgiving during the glazing process. If you decide to use bone-in pieces, ensure you extend the cooking time significantly and use a meat thermometer to verify doneness near the bone, as these take longer to heat through than boneless cuts.
Sweetener Variations
If you prefer a different sweetness profile, you can swap the light brown sugar for dark brown sugar. The increased molasses content in dark brown sugar provides a richer, more complex flavor profile that pairs exceptionally well with the smokiness of the paprika. Be aware that the darker sugar will result in a deeper, more mahogany-colored glaze.
Storage and Reheating Advice
Managing Leftover Glazed Chicken
Proper storage is essential to keep the chicken from drying out. Place any leftover pieces in an airtight glass or plastic container and store them in the refrigerator for up to four days. Pouring the extra sauce from the skillet over the stored chicken acts as a protective barrier that keeps the meat moist until you are ready to eat it again.
Gentle Reheating Strategies
Avoid high heat when reheating this dish, as the high sugar content in the glaze can cause it to burn or become rubbery if over-nuked in a microwave. Use a low-heat setting in the microwave or place the chicken in a small skillet with a splash of water, covering it with a lid to allow steam to warm the meat gently without drying it out.
Commonly Asked Questions
Can I prepare the chicken in advance for a busy weeknight?
You can certainly season the chicken and mince your garlic ahead of time to shave minutes off your prep. However, it is best to cook the sauce fresh during the actual meal preparation, as the sugars can crystallize if they sit in the fridge for too long after being cooked into a sauce.
Why is my garlic browning too quickly during the first step?
Garlic has a high sugar content that burns easily when exposed to direct heat. Always ensure your oil is hot before adding the garlic, but never let it sizzle too violently; if it starts to turn golden-brown before you have added the liquids, take the pan off the heat immediately to prevent it from turning acrid.
Is it possible to make this dish in a slow cooker?
While this recipe is optimized for stovetop cooking to get the perfect glaze, you can adapt it for a slow cooker by placing the chicken in the base, pouring the sauce ingredients over it, and cooking on low for 3 to 4 hours. You will likely need to finish the sauce in a separate pan at the end to thicken it properly.
Optimizing Side Dish Pairings
Choosing the Right Starch
Because the glaze is quite rich and flavorful, choose neutral-tasting sides to balance the meal. Fluffy steamed white rice, quinoa, or buttered mashed potatoes are ideal because they act as a canvas for the extra sauce, ensuring that none of that flavor goes to waste.
Incorporating Fresh Vegetables
Adding a green vegetable is essential to round out the nutritional profile of this dinner. Steamed broccoli, blanched asparagus, or snap peas provide a crisp texture that contrasts nicely with the tender, glazed chicken. For a one-pan approach, you can toss chopped carrots into the skillet during the final ten minutes of cooking so they absorb some of the garlic sugar glaze.
Troubleshooting Common Glazing Issues
Addressing Thin or Runny Sauce
If your sauce fails to coat the chicken adequately, it is usually because the sugar has not had enough time to reduce or the heat was too low. Increase the heat slightly to medium-high during the final stage of cooking to evaporate excess moisture. The butter added at the end should act as a thickening agent, but the reduction is what provides the primary consistency.
Fixing Over-Seasoned Glazes
If the sauce tastes too salty, this is likely because it has reduced too much or the soy sauce was slightly over-measured. You can correct this by adding a small splash of water or a tiny amount of additional brown sugar to re-balance the ratios. Never add more salt to the mixture; the soy sauce already provides the necessary sodium levels to season the protein fully.
Print
Garlic Brown Sugar Chicken
- Total Time: PT40M
- Yield: 6 servings 1x
- Diet: Nut-free
Description
This Garlic Brown Sugar Chicken is the perfect balance of sweet, savory, and garlicky goodness! Tender, juicy chicken is coated in a sticky brown sugar glaze with plenty of rich garlic flavor, then cooked until caramelized and irresistible. Easy, comforting, and packed with flavor — it’s a weeknight dinner the whole family will rave about!
Ingredients
- 4 boneless, skinless chicken breasts (or thighs)
- 3 tablespoons olive oil
- 5 cloves garlic, finely minced
- 1/3 cup light brown sugar, packed
- 2 tablespoons soy sauce
- 1 tablespoon apple cider vinegar
- 1 teaspoon smoked paprika
- 1/2 teaspoon salt
- 1/2 teaspoon black pepper
- 1/2 teaspoon onion powder
- 1/4 teaspoon crushed red pepper flakes (optional)
- 1 tablespoon unsalted butter
- Fresh parsley, chopped (for garnish)
Instructions
- Prepare the Chicken: Pat the chicken dry with paper towels. Season both sides evenly with salt, pepper, smoked paprika, and onion powder.
- Sauté the Garlic: Heat olive oil in a large skillet over medium heat. Add the minced garlic and cook for 30–45 seconds, just until fragrant. Do not brown.
- Build the Sauce: Stir the brown sugar, soy sauce, and apple cider vinegar into the skillet. Allow the mixture to gently bubble and dissolve into a smooth sauce.
- Cook the Chicken: Place the chicken into the skillet. Cook for 5–6 minutes per side, spooning the sauce over the chicken as it cooks, until fully cooked through and the internal temperature reaches 165°F (74°C).
- Finish the Glaze: Add the butter to the pan and spoon the thickened, glossy sauce over the chicken for 1–2 minutes until rich and shiny.
- Serve: Remove from heat. Garnish with fresh parsley if desired and serve immediately with extra sauce spooned over the top.
Notes
Boneless, skinless chicken thighs can be used for extra juiciness. If using very thick chicken breasts, slice them in half horizontally for even cooking.
- Prep Time: PT15M
- Cook Time: PT25M
- Category: Main Course
- Method: Stovetop
- Cuisine: American
Nutrition
- Serving Size: 1 breast
- Calories: 320 kcal
- Sugar: 12 g
- Sodium: 480 mg
- Fat: 11 g
- Saturated Fat: 3 g
- Unsaturated Fat: 7 g
- Trans Fat: 0 g
- Carbohydrates: 15 g
- Fiber: 0.5 g
- Protein: 38 g
- Cholesterol: 115 mg