This recipe delivers a smoky and sweet chicken dish with a subtle spicy kick. It is a fast oven-baked meal that works perfectly for busy weeknight dinners.
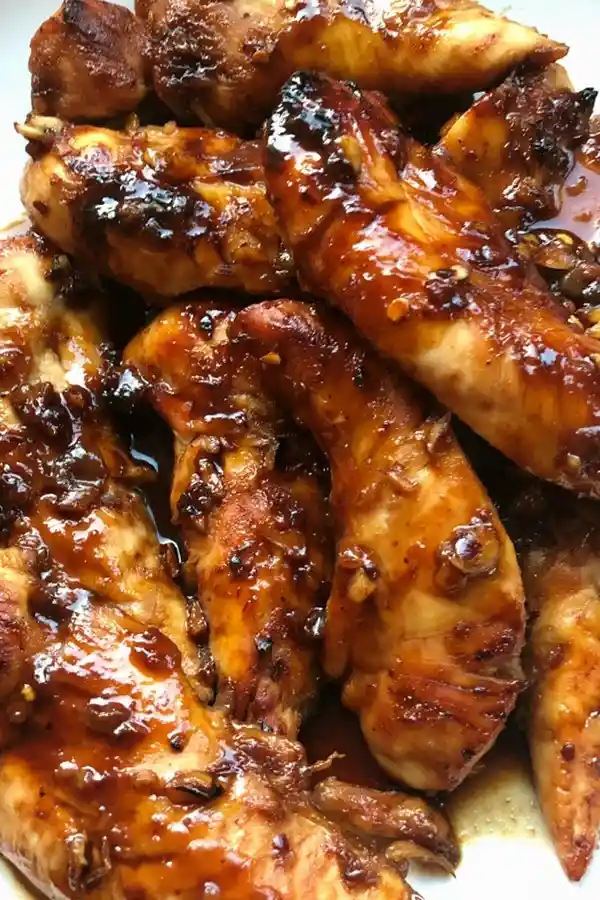
List of ingredients
- 10 chicken tenders or 1 lb chicken breasts cut into strips – the primary protein source.
- 1/2 cup BBQ sauce – provides the smoky and tangy base.
- 3 large cloves garlic, minced – adds a pungent and aromatic depth.
- 4 tbsp brown sugar – creates a sweet, caramelized exterior.
- 1/2 tsp red pepper flakes – provides a hint of heat, adjustable to preference.
step-by-step instructions
- Prepare the Oven: Preheat your oven to 400 degrees and line a baking sheet with aluminum foil to prevent sticking and simplify cleanup.
- Create the Glaze: In a small mixing bowl, combine the brown sugar, red pepper flakes, BBQ sauce, and minced garlic, stirring until the sugar is mostly dissolved.
- Coat the Chicken: Dip each chicken tender or breast strip into the sauce mixture, ensuring all sides are evenly coated, then place them on the baking sheet.
- Initial Bake: Bake the chicken for 10 to 14 minutes, depending on the thickness of the meat, being careful not to overcook to avoid dryness.
- Broil and Finish: Turn on the oven broiler, flip the chicken tenders over, and broil for another 3 to 5 minutes until the glaze is bubbly and caramelized.
Ways to Customize the Flavor Profile
Use Honey BBQ Sauce for Added Sweetness
Substituting standard BBQ sauce with a honey-based variety increases the sweetness of the glaze. This creates a thicker, stickier coating that caramelizes more quickly under the broiler. It pairs well with the garlic and red pepper flakes.
Create an Asian-Inspired Variation
Replace the BBQ sauce with a high-quality teriyaki sauce and add one teaspoon of ground ginger to the mixture. This shift changes the smoky profile to a salty and savory one. Maintain the brown sugar to ensure the desired caramelized texture.
Increase the Heat Level
For those who prefer a spicier dish, add a few splashes of hot sauce or an extra quarter teaspoon of red pepper flakes. You can also add a pinch of cayenne pepper for a deeper, more lingering heat. Adjust the spice level based on the heat tolerance of your guests.
Incorporate Roasted Vegetables
Add diced potatoes, broccoli florets, cauliflower, or asparagus to the baking sheet alongside the chicken. Toss the vegetables in a bit of oil and salt before adding them to the pan. Ensure the vegetables are cut into sizes that allow them to cook within the same 15-20 minute window.
Professional Cooking Techniques for Better Results
Use a Meat Thermometer for Precision
To prevent the chicken from becoming dry, use an instant-read meat thermometer to check the internal temperature. The chicken is safely cooked and most juicy when it reaches 165 degrees Fahrenheit. Remove the meat from the oven immediately once this temperature is hit.
Master the Broiling Process
Broiling uses direct high heat from the top element to create the Maillard reaction, which browns the sugars in the sauce. Stay by the oven during the final 3-5 minutes, as the glaze can go from caramelized to burnt very quickly. Flip the chicken carefully using tongs to avoid tearing the meat.
Avoid Overcrowding the Baking Sheet
Place the chicken tenders in a single layer with at least a half-inch of space between each piece. Overcrowding causes the chicken to steam rather than roast, which prevents the edges from crisping. This ensures the heat circulates evenly around every piece of meat.
Allow the Meat to Rest
Once the chicken is removed from the oven, let it rest on the pan for 5 to 10 minutes before serving. This allows the juices to redistribute throughout the muscle fibers. Resting prevents the juices from leaking out immediately upon slicing, keeping the meat tender.
Choosing and Preparing the Best Ingredients
Selecting Chicken Tenders vs. Breasts
Chicken tenders are naturally more tender and cook faster than full breasts. If using breasts, slice them against the grain into strips of uniform thickness. Uniform strips ensure that all pieces finish cooking at the same time, preventing some from drying out while others remain raw.
Using Fresh Garlic for Maximum Flavor
Freshly minced garlic provides a sharp, pungent flavor that jarred garlic cannot replicate. To prevent the garlic from burning during the broiling phase, ensure it is finely minced and well-incorporated into the sauce. This distributes the garlic evenly across the surface of the meat.
Alternative Sweeteners for the Glaze
If you do not have brown sugar, you can use coconut sugar or maple syrup as a substitute. Coconut sugar provides a similar molasses-like depth, while maple syrup adds a distinct woody sweetness. Note that liquid sweeteners may make the sauce thinner, requiring a slightly longer broiling time.
Selecting the Right BBQ Sauce
A tomato-based BBQ sauce with a balance of vinegar and sugar works best for this recipe. Avoid sauces that are overly creamy or contain mayonnaise, as these will not caramelize under the broiler. Check the ingredient list to ensure the sauce complements the garlic and red pepper.
Serving Suggestions and Side Pairings
Fresh Green Salads for Balance
Serve the sweet and smoky chicken with a crisp garden salad tossed in a lemon vinaigrette. The acidity of the lemon and the freshness of the greens cut through the richness of the brown sugar glaze. Include cucumber and radishes for added crunch.
Hearty Starch Accompaniments
Pair the dish with garlic mashed potatoes or a side of wild rice pilaf. The starches absorb the extra glaze from the chicken, creating a cohesive meal. Roasted sweet potato wedges also complement the smoky notes of the BBQ sauce.
Grilled Corn on the Cob
Fresh corn on the cob, grilled or boiled, adds a seasonal sweetness that pairs well with garlic chicken. Brush the corn with a small amount of butter and a pinch of salt. The charred kernels of grilled corn mirror the caramelized exterior of the chicken.
Creamy Coleslaw Contrast
A chilled, creamy coleslaw provides a temperature and texture contrast to the hot, sticky chicken. The vinegar and cream in the slaw cleanse the palate between bites of the sweet glaze. Use a mix of red and green cabbage for visual appeal.
Storage and Food Safety Guidelines
Proper Refrigeration Methods
Store leftover chicken in a BPA-free airtight glass container to maintain the integrity of the sauce. Ensure the chicken has cooled to room temperature before sealing the lid to prevent excess moisture buildup. These leftovers will remain safe to eat for 3 to 4 days in the refrigerator.
Freezing and Long-Term Preservation
You can freeze cooked chicken tenders for up to 3 months. Wrap each piece individually in parchment paper before placing them in a heavy-duty freezer bag to prevent ice crystals from forming. This method preserves the flavor and prevents the meat from freezer burn.
Safe Thawing Procedures
Always thaw frozen chicken in the refrigerator overnight rather than on the counter. This gradual warming process keeps the meat out of the danger zone where bacteria grow quickly. Once thawed, the chicken can be reheated using the methods described below.
Effective Reheating Instructions
Oven Reheating for Best Texture
To maintain the caramelized crust, reheat the chicken in the oven at 325 degrees Fahrenheit. Cover the baking dish with aluminum foil to trap moisture and prevent the sugar in the sauce from burning. Heat for 10 to 15 minutes or until the center is warmed through.
Quick Microwave Reheating
For a faster option, place the chicken on a microwave-safe plate and cover it with a damp paper towel. Heat in short 30-second bursts, flipping the chicken between intervals. This prevents the meat from becoming rubbery and keeps the sauce from drying out.
Air Fryer Method for Crispiness
An air fryer is excellent for restoring the texture of the glaze. Heat the air fryer to 350 degrees and place the chicken inside for 3 to 5 minutes. This quickly caramelizes the surface again while heating the interior efficiently.
Make-Ahead and Meal Prep Advice
Optimizing Marination Time
You can prepare the sauce and coat the chicken 12 to 24 hours before you plan to bake it. Store the coated chicken in a sealed container or a zip-top bag in the refrigerator. This extended marination allows the garlic and red pepper flavors to penetrate deeper into the meat.
Preparing Sauce in Batches
The BBQ glaze can be made in a larger batch and stored in a jar in the refrigerator for up to a week. This saves time during the weeknight prep process. Simply stir the sauce well before using it to redistribute the brown sugar and spices.
Batch Cooking for the Week
Cook several pounds of chicken at once to use for lunches throughout the week. Divide the cooked tenders into individual portion containers with a side of vegetables. This ensures you have a protein-rich meal ready to go without needing to cook daily.
Common Cooking Challenges and Solutions
Preventing the Sauce from Burning
If you notice the sauce browning too quickly under the broiler, move the oven rack to a lower position. The closer the meat is to the heating element, the faster the sugar burns. Watching the chicken continuously during the broil phase is the best way to avoid charred meat.
Fixing Dry Chicken Tenders
If the chicken turns out dry, it is likely due to overcooking or using too high a temperature for too long. To fix this in future batches, reduce the initial bake time by 2 minutes. You can also brush a small amount of melted butter over the chicken before reheating.
Dealing with Sauce Separation
Sometimes the brown sugar and BBQ sauce may separate slightly if they sit too long. Stir the glaze vigorously before dipping the chicken to ensure a smooth consistency. If the sauce is too thick, add a teaspoon of water or apple cider vinegar to thin it out.
Frequently Asked Questions
Can I use frozen chicken tenders?
You must allow frozen chicken tenders to thaw completely in the refrigerator before applying the sauce. Cooking from frozen prevents the glaze from adhering to the meat and often results in unevenly cooked chicken that is burnt on the outside and raw inside.
How can I make this recipe healthier?
To reduce the sugar content, use a low-sugar or sugar-free BBQ sauce and substitute the brown sugar with a monk fruit or stevia-based brown sugar alternative. You can also serve the chicken with steamed greens instead of starches to lower the overall caloric density.
Can I make these chicken tenders ahead of time?
Yes, you can marinate the chicken for 12 to 24 hours in advance. Once marinated, keep them refrigerated until you are ready to bake. This not only saves time but also improves the overall flavor profile of the dish.
} Print
Garlic Brown Sugar BBQ Baked Chicken
- Total Time: 28 minutes
- Yield: 4 servings 1x
- Diet: General
Description
Barbecue Garlic Brown Sugar Chicken is a smoky, slightly sweet chicken with just a bit of spice. The flavors are perfect together and complement each other amazingly well.
Ingredients
- 10 chicken tenders or 1 lb chicken breasts cut into strips
- 1/2 cup BBQ sauce
- 3 large cloves garlic, minced
- 4 tbsp brown sugar
- 1/2 tsp red pepper flakes
Instructions
- Prepare: Preheat oven to 400 degrees and line a baking sheet with foil.
- Mix Sauce: Mix brown sugar, red pepper flakes, barbeque sauce and garlic in a small bowl.
- Coat: Dip each chicken tender in sauce and place chicken on the baking sheet.
- Bake: Bake chicken for about 10 – 14 minutes depending on the thickness of your chicken.
- Broil: Turn on the broiler, flip chicken tender over and broil for another 3-5 minutes.
Notes
Trim chicken of any fat or skin. Marinating the chicken longer adds more flavor. Do not overcrowd the pan to ensure even cooking. Allow the chicken to rest for 5-10 minutes before eating to prevent drying out.
- Prep Time: 10 minutes
- Cook Time: 18 minutes
- Category: Chicken
- Method: Baking
- Cuisine: American
Nutrition
- Serving Size: 2-3 tenders
- Calories: 310 kcal
- Sugar: 18 g
- Sodium: 620 mg
- Fat: 7 g
- Saturated Fat: 2 g
- Unsaturated Fat: 5 g
- Trans Fat: 0 g
- Carbohydrates: 22 g
- Fiber: 1 g
- Protein: 34 g
- Cholesterol: 85 mg