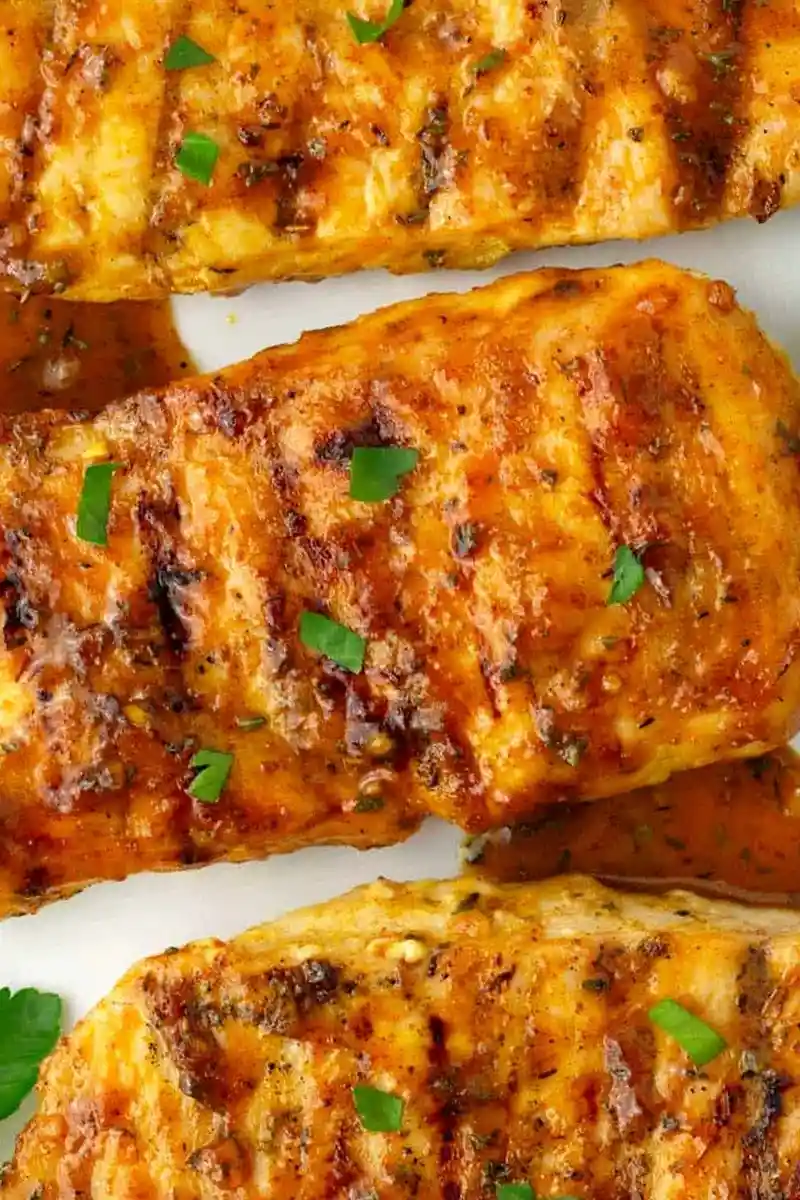
This grilled honey mustard chicken delivers big, bold flavors with a simple homemade sauce that takes just minutes to prepare. By skipping the long marinade process, you get a tender, juicy meal on the table in under half an hour. It is the perfect solution for busy weeknights when you want restaurant-quality results with minimal effort.
List of ingredients
- 3 chicken breasts (trimmed and cut in half horizontally)
- 1 tsp kosher salt
- ⅓ cup honey
- 3 tbsp yellow mustard
- 3 tbsp dijon mustard (or stone ground or spicy brown mustard)
- 1½ tsp garlic (minced)
- 1 tsp onion powder
- 1 tsp paprika
- 1 tsp dried parsley
- 1 tsp dried thyme
- 1 tbsp olive oil
step-by-step instructions
- Step: Heat your grill to medium-high heat and allow to get hot.
- Step: While heating, sprinkle kosher salt evenly on both sides of chicken breasts, then set aside for 5 minutes.
- Step: In a small bowl, combine all the sauce ingredients together.
- Step: Once hot, place the chicken on the grill and cook without moving for 5-6 minutes, or until the edges begin to change color and become dry.
- Step: Generously brush ⅓ of the sauce onto the chicken. Flip and brush with another ⅓ of the sauce, then allow to cook for 4-5 minutes more, or until it reaches 160°F.
- Step: Once cooked, flip the chicken one last time and brush with remaining sauce. Remove from the grill and serve immediately.
Refining Your Grilling Technique
Managing Direct and Indirect Heat
Setting up a two-zone fire is one of the most effective ways to avoid burning the exterior of your chicken while the middle cooks through. By keeping one side of your grill on high heat and the other on low, you can easily slide the breasts to the cooler area if they start browning too quickly. This ensures that the sugars in your honey-based glaze caramelize to a deep golden color rather than turning charred or bitter.
Achieving Distinct Grill Marks
Many home cooks struggle with achieving those professional-looking char marks on their protein. The secret is to place the chicken on the hot grates and strictly avoid moving it until the natural release point is reached. Once the protein has seared enough, it will lift easily from the grate, leaving behind a clean and attractive pattern.
Selecting the Ideal Mustard Profiles
The character of this dish relies heavily on your choice of mustard. Mixing the bright, acidic punch of yellow mustard with the more complex, sinus-clearing heat of a spicy brown or dijon creates a balanced sauce. Feel free to experiment with whole-grain varieties if you enjoy a more rustic mouthfeel and visible texture in your glaze.
Practical Adjustments and Variations
Alternative Cuts of Poultry
While this recipe focuses on chicken breasts, you can easily substitute with boneless, skinless chicken thighs or chicken tenders. Thighs are naturally more forgiving and less likely to dry out, making them an excellent choice for beginner grillers. If using tenders, reduce the cooking time by approximately two to three minutes per side to prevent overcooking.
Adjusting the Flavor Profile
If you prefer a bolder flavor, consider adding a pinch of red pepper flakes or a dash of cayenne to the sauce for a subtle heat that cuts through the honey’s sweetness. Alternatively, using fresh herbs like rosemary or thyme instead of dried versions can add a vibrant, aromatic lift. Remember to finely chop fresh herbs so they integrate smoothly into the thick sauce.
Enhancing the Sweetness
If you find that standard honey is too mild, swapping in a store-bought or homemade hot honey can transform the dish into a sweet-and-spicy experience. This is particularly popular for summer gatherings where guests enjoy a more complex, layered flavor profile. Just ensure the heat level of your honey is appropriate for everyone at the table.
Serving Suggestions
Pairing with Starchy Sides
Because the chicken is coated in a sticky, savory glaze, it pairs beautifully with neutral starches like garlic-infused rice or crispy roasted potatoes. For a lighter touch, a side of lemon orzo pasta salad adds an acidic brightness that cleanses the palate between bites of the sweet and tangy chicken. Hasselback potatoes, with their crispy edges and soft centers, also provide a satisfying contrast to the tender breast meat.
Incorporating Fresh Vegetable Sides
Green beans almondine or simple grilled vegetable packets filled with summer squash and bell peppers complement the poultry perfectly. A crisp spinach and avocado salad or a classic apple coleslaw can bring a necessary crunch to your plate. These sides help round out the meal without overwhelming the star flavor of the honey-mustard glaze.
Storage and Reheating Guidelines
Safely Storing Leftover Chicken
Leftover chicken should be cooled to room temperature before being moved into an airtight container. When stored properly in the refrigerator, it will remain safe and flavorful for up to five days. Avoid leaving the chicken out on the counter for more than two hours after cooking to maintain strict safety standards.
Reheating for Maximum Moisture
The biggest challenge when reheating cooked chicken breast is preventing it from drying out. Use your microwave on a medium power setting rather than high, and consider adding a tablespoon of water or broth to the container to create a gentle steaming effect. This helps keep the meat succulent and prevents the honey-based glaze from becoming rubbery or burnt.
Frequently Asked Questions
Why must I slice the chicken breasts in half?
Slicing the breasts horizontally creates thin cutlets that have a uniform thickness. This ensures that the entire piece cooks at the same rate, preventing the thinner tail end from becoming dry while waiting for the thicker part to reach the required internal temperature.
How do I know the chicken is safely cooked?
The only reliable way to check for doneness is to use an instant-read meat thermometer inserted into the thickest part of the breast. Aim for 160°F; the temperature will rise slightly to the recommended 165°F during the short resting period after you pull it off the grill. This method avoids the common mistake of overcooking meat based on visual cues alone.
Can I prepare the sauce in advance?
Yes, the sauce can be mixed and stored in a sealed jar in the refrigerator for up to 48 hours before you plan to grill. This actually allows the dried herbs and garlic to rehydrate and infuse the mustard base more effectively. Simply give the sauce a quick stir or a shake before using it to brush onto your chicken during the cooking process.
Print
Easy Grilled Honey Mustard Chicken (No marinade!)
- Total Time: 22 minutes
- Yield: 6 servings 1x
- Diet: Gluten-Free
Description
This Grilled Honey Mustard Chicken is loaded with bold, mouthwatering flavor—thanks to a super easy homemade honey mustard sauce you can whip up in under 5 minutes! No marinade needed, just sweet, tangy, finger-licking goodness. And with a couple of simple tips, you’ll have juicy, tender chicken every single time!
Ingredients
- 3 chicken breasts (trimmed and cut in half horizontally)
- 1 tsp kosher salt
- ⅓ cup honey
- 3 tbsp yellow mustard
- 3 tbsp dijon mustard (or stone ground or spicy brown mustard)
- 1½ tsp garlic (minced)
- 1 tsp onion powder
- 1 tsp paprika
- 1 tsp dried parsley
- 1 tsp dried thyme
- 1 tbsp olive oil
Instructions
- Step: Heat your grill to medium-high heat and allow to get hot.
- Step: While heating, sprinkle kosher salt evenly on both sides of chicken breasts, then set aside for 5 minutes.
- Step: In a small bowl, combine all the sauce ingredients together.
- Step: Once hot, place the chicken on the grill and cook without moving for 5-6 minutes, or until the edges begin to change color and become dry.
- Step: Generously brush ⅓ of the sauce onto the chicken. Flip and brush with another ⅓ of the sauce, then allow to cook for 4-5 minutes more, or until it reaches 160°F.
- Step: Once cooked, flip the chicken one last time and brush with remaining sauce. Remove from the grill and serve immediately.
Notes
For moist chicken, sprinkle each side with kosher salt and allow to sit for 5-10 minutes before cooking. Don’t overcook the chicken; if they start to brown too soon, move them to the unheated side of the grill. For pretty grill lines, resist the urge to move the chicken once you set them on the grates.
- Prep Time: 10 minutes
- Cook Time: 12 minutes
- Category: Dinner
- Method: Grilling
- Cuisine: American
Nutrition
- Serving Size: 1 breast
- Calories: 220 kcal
- Sugar: 16 g
- Sodium: 690 mg
- Fat: 6 g
- Saturated Fat: 1 g
- Unsaturated Fat: 4 g
- Trans Fat: 0 g
- Carbohydrates: 17 g
- Fiber: 1 g
- Protein: 25 g
- Cholesterol: 72 mg