These classic beef tacos feature a tender, seasoned filling inside crunchy corn shells. They are a quick and reliable meal for family gatherings or weeknight dinners.
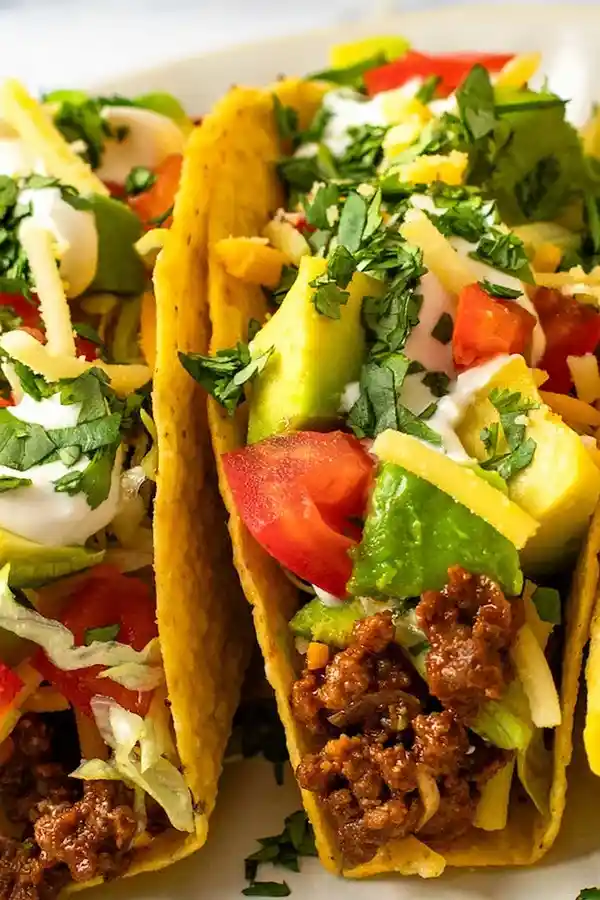
List of ingredients
- 2 lbs 90% lean ground beef – provides a hearty base with minimal excess fat.
- ½ teaspoon baking soda – tenderizes the meat by adjusting pH levels.
- 1 teaspoon salt – enhances all the savory flavors.
- 1½ tablespoons vegetable oil – used for sautéing the aromatic vegetables.
- 1 large yellow onion, finely chopped – adds sweetness and depth.
- 5 cloves garlic, minced – provides a pungent, aromatic foundation.
- ¼ cup chili powder – the primary source of classic taco flavor.
- 2 teaspoons ground cumin – adds an earthy, nutty aroma.
- 2 teaspoons ground coriander – brings a slight citrusy note.
- 1 teaspoon smoked paprika – adds a subtle wood-smoke flavor.
- 1 teaspoon dried oregano – adds an herbal, savory quality.
- ½ teaspoon cayenne pepper – provides a touch of spicy heat.
- 1 (8-oz) can tomato sauce – creates a thick, cohesive sauce for the beef.
- 1 cup water – helps simmer the spices and keep the meat moist.
- 1 teaspoon sugar – balances the acidity of the tomato sauce.
- 2 tablespoons lime juice (from 1 lime) – adds brightness and a fresh finish.
- 16 Taco Shells – warmed according to package instructions for optimal crunch.
- Optional: shredded Mexican blend cheese, shredded iceberg lettuce, diced tomatoes, sour cream, diced avocados, diced onions, and chopped fresh cilantro for topping.
step-by-step instructions
- Prepare the beef: In a medium bowl, mash the beef with the baking soda and salt. Let it sit for at least 15 minutes or up to 1 hour to improve the texture.
- Sauté aromatics: Heat the oil in a large nonstick skillet over medium heat until it is shimmering. Add the chopped onion and cook, stirring occasionally, until softened (about 4 minutes), then add the minced garlic and cook for 1 more minute without browning.
- Brown the meat: Add the beef, chili powder, cumin, coriander, paprika, oregano, and cayenne pepper to the skillet. Cook while stirring constantly and breaking the meat up with a wooden spoon until it is no longer pink, which takes about 5 minutes.
- Simmer the sauce: Stir in the tomato sauce, water, sugar, and lime juice, then bring the mixture to a simmer. Reduce the heat to medium-low and cook uncovered, stirring frequently, until the liquid has reduced and thickened (10 to 15 minutes), ensuring the meat is not completely dry.
- Final adjustments: Taste the beef filling and adjust seasonings if necessary to match your preference.
- Assemble and serve: Using a wide, shallow spoon, divide the filling evenly among the warmed taco shells. Place two or three tacos per plate and serve immediately with the optional toppings on the side.
Pro Tips for Maximum Meat Tenderness
Apply the Baking Soda Technique
Mixing baking soda into the raw beef is a technique used to raise the pH level of the meat. This prevents the proteins from bonding too tightly during cooking, which results in a much softer and juicier texture. It is particularly effective for leaner cuts of beef that can otherwise become tough.
Allow Proper Resting Time
For the baking soda to work effectively, the meat must sit for at least 15 minutes. During this window, the alkaline solution penetrates the muscle fibers. If you have more time, letting it rest for up to an hour will maximize the tenderness of the final product.
Use a Nonstick Skillet
A large nonstick skillet allows you to stir the meat and spices constantly without the filling sticking to the bottom. This ensures an even distribution of heat and makes it easier to break up large clumps of beef. It also simplifies the cleanup process after the sauce reduces.
Advanced Flavor Enhancement Strategies
Bloom Your Spices in Oil
Adding the dry spices to the pan while the beef is browning allows the heat and fat to ‘bloom’ the spices. This process releases the essential oils within the chili powder, cumin, and paprika, intensifying their flavor. Cooking them directly with the meat creates a deeper, more integrated taste than adding them later.
Balance Acidity with Sugar
Tomato sauce and lime juice provide necessary acidity, but too much can make the filling taste sharp. A small amount of sugar neutralizes this acidity without making the meat taste sweet. This creates a balanced, rounded flavor profile typical of professional Tex-Mex cooking.
Prevent Garlic from Burning
Garlic burns much faster than onions and can become bitter if overcooked. By adding it only after the onions have softened and cooking it for just 60 seconds, you retain its aromatic qualities. Ensure the heat is at a steady medium to avoid scorching the garlic.
Ingredient Substitutions and Alternatives
Swap Lean Beef for Other Proteins
If you prefer turkey or chicken, use ground turkey or ground chicken in the same quantity. Since these meats are leaner than beef, you may need to add an extra tablespoon of oil to prevent the meat from sticking. The spice blend remains identical for these proteins.
Adjust the Heat Level
To make a milder version, reduce the cayenne pepper to a pinch or omit it entirely. For those who prefer a spicier taco, increase the cayenne to a full teaspoon or add diced fresh jalapeños during the onion sauté phase. This allows the heat to infuse into the oil and the meat.
Alternative to Canned Tomato Sauce
If tomato sauce is unavailable, you can use tomato puree or crushed tomatoes. Tomato puree provides a similar consistency, while crushed tomatoes add a chunkier texture. If using crushed tomatoes, you may need to simmer the mixture for an additional 5 minutes to achieve the desired thickness.
Creative Taco Variations
Switch to Soft Tortillas
While crispy shells are traditional for this recipe, you can use soft corn or flour tortillas. Lightly toast the tortillas in a dry skillet for 30 seconds per side until they are pliable and warm. This offers a softer bite and is more traditional for street-style tacos.
Incorporate Fresh Vegetables
Add finely diced bell peppers or carrots to the onion sauté to increase the nutritional value and texture. These vegetables blend well with the savory beef and add a slight natural sweetness. Cook them until they are tender before adding the beef to the pan.
Create a Cheesy Taco Bake
For a different presentation, place the filled shells in a baking dish and top them with shredded cheese. Broil them in the oven for 2 to 3 minutes until the cheese is melted and bubbly. This fuses the filling to the shell and adds a rich, gooey element to the dish.
Serving and Pairing Suggestions
Set Up a DIY Toppings Bar
Arrange toppings in individual bowls to let guests customize their tacos. Include shredded iceberg lettuce for crunch, diced tomatoes for freshness, and sour cream to cool the spice. This approach is practical for large groups and caters to different dietary preferences.
Pair with Authentic Sides
Serve these tacos with Mexican red rice or cilantro-lime rice for a complete meal. Adding a side of black beans or pinto beans provides additional protein and fiber. A side of corn chips and salsa also complements the flavors of the beef filling.
Utilize Fresh Avocado
Freshly diced avocado or a smooth guacamole adds a creamy texture that balances the crunch of the shells. The healthy fats in the avocado help carry the flavors of the cumin and smoked paprika. Squeeze a little extra lime juice over the avocado to prevent browning.
Storage and Reheating Guidelines
Store Filling in Airtight Containers
Leftover taco meat can be stored in an airtight container in the refrigerator for up to 3 days. Keep the meat separate from the shells and toppings to prevent the shells from becoming soggy. Ensure the meat has cooled slightly before sealing the container to avoid excessive condensation.
Freeze for Long-Term Use
This beef filling freezes exceptionally well for up to 3 months. Place the cooled meat in a freezer-safe zip-top bag and squeeze out as much air as possible. This makes it an excellent option for meal prepping or having a quick dinner on hand.
Reheat Using a Skillet
To reheat, place the frozen or refrigerated meat in a skillet over medium heat. Add a splash of water or beef broth to loosen the sauce and restore the original moisture. Stir occasionally until the filling is heated through and bubbling.
Troubleshooting Common Issues
Fixing Watery Taco Meat
If the filling is too liquid after the simmering stage, continue cooking uncovered over medium heat. Stir frequently to encourage evaporation while preventing the meat from burning. The goal is a thick sauce that clings to the beef rather than pooling at the bottom of the shell.
Correcting Overly Salty Filling
If the meat tastes too salty, stir in an extra tablespoon of lime juice or a small amount of unsweetened tomato sauce. The acidity and volume will help dilute the saltiness. You can also add more cooked vegetables, like diced zucchini, to absorb some of the excess salt.
Preventing Shell Breakage
Taco shells can crack if they are cold or over-baked. Always warm them in the oven according to the package instructions, which usually takes only a few minutes. Warming them makes the corn slightly more flexible and enhances the toasted flavor.
Frequently Asked Questions
Can I use 80% lean ground beef instead of 90%?
Yes, you can use 80% lean beef, but you should drain the excess grease after browning the meat and before adding the tomato sauce. If you do not drain the fat, the sauce may separate and the tacos will be overly oily.
Do I really need to let the meat sit with baking soda?
While the recipe will still work without this step, the meat will be firmer and more granular. The resting period is what creates the professional, tender ‘restaurant-style’ texture that distinguishes this recipe from basic ground beef.
What is the best way to warm the shells?
The oven is the most reliable method for warming shells as it provides even heat. Avoid the microwave for hard shells, as it can make them chewy or cause them to explode if overheated. A toaster oven also works well for smaller batches.
Can this filling be used for other dishes?
Absolutely. This seasoned beef is perfect for filling burritos, topping nachos, or layering into enchiladas. It also works well as a base for a taco salad when served over a bed of romaine lettuce.
Print
Classic Ground Beef Tacos with Crispy Shells
- Total Time: 45 minutes
- Yield: 8 servings 1x
- Diet: General
Description
Whip up a family favorite: old-school Tex-Mex beef tacos with crispy shells, juicy seasoned beef, and everyone’s favorite toppings!
Ingredients
- 2 lbs 90% lean ground beef
- ½ teaspoon baking soda
- 1 teaspoon salt
- 1½ tablespoons vegetable oil
- 1 large yellow onion, finely chopped
- 5 cloves garlic, minced
- ¼ cup chili powder
- 2 teaspoons ground cumin
- 2 teaspoons ground coriander
- 1 teaspoon smoked paprika
- 1 teaspoon dried oregano
- ½ teaspoon cayenne pepper
- 1 (8-oz) can tomato sauce
- 1 cup water
- 1 teaspoon sugar
- 2 tablespoons lime juice
- 16 Taco Shells, warmed
- Optional: shredded Mexican blend cheese, shredded iceberg lettuce, diced tomatoes, sour cream, diced avocados, diced onions, chopped fresh cilantro
Instructions
- Step: In a medium bowl, mash the beef with the baking soda and salt. Let sit for at least 15 minutes or up to 1 hour.
- Step: Heat the oil in a large nonstick skillet over medium heat until hot and shimmering. Add the onion and cook, stirring occasionally, until softened, about 4 minutes. Add the garlic and cook 1 minute more.
- Step: Add the beef, chili powder, cumin, coriander, paprika, oregano, and cayenne pepper and cook, stirring constantly and breaking meat up with a wooden spoon, until the beef is no longer pink, about 5 minutes.
- Step: Add the tomato sauce, water, sugar, and lime juice; bring to a simmer.
- Step: Reduce the heat to medium-low and cook, uncovered, stirring frequently and breaking up the meat, until the liquid has reduced and thickened, 10 to 15 minutes. Taste and adjust seasonings if necessary.
- Step: Using a wide, shallow spoon, divide the filling evenly among the taco shells; place two or three tacos on individual plates. Serve immediately, passing the toppings separately.
Notes
The taco meat mixture can be prepared up to 3 days in advance and stored in an airtight container in the refrigerator, or frozen for up to 3 months.
- Prep Time: 20 minutes
- Cook Time: 25 minutes
- Category: Main Course
- Method: Stovetop
- Cuisine: Tex-Mex
Nutrition
- Serving Size: 2 tacos
- Calories: 380 kcal
- Sugar: 3 g
- Sodium: 535 mg
- Fat: 20 g
- Saturated Fat: 7 g
- Unsaturated Fat: 13 g
- Trans Fat: 0 g
- Carbohydrates: 24 g
- Fiber: 4 g
- Protein: 26 g
- Cholesterol: 74 mg