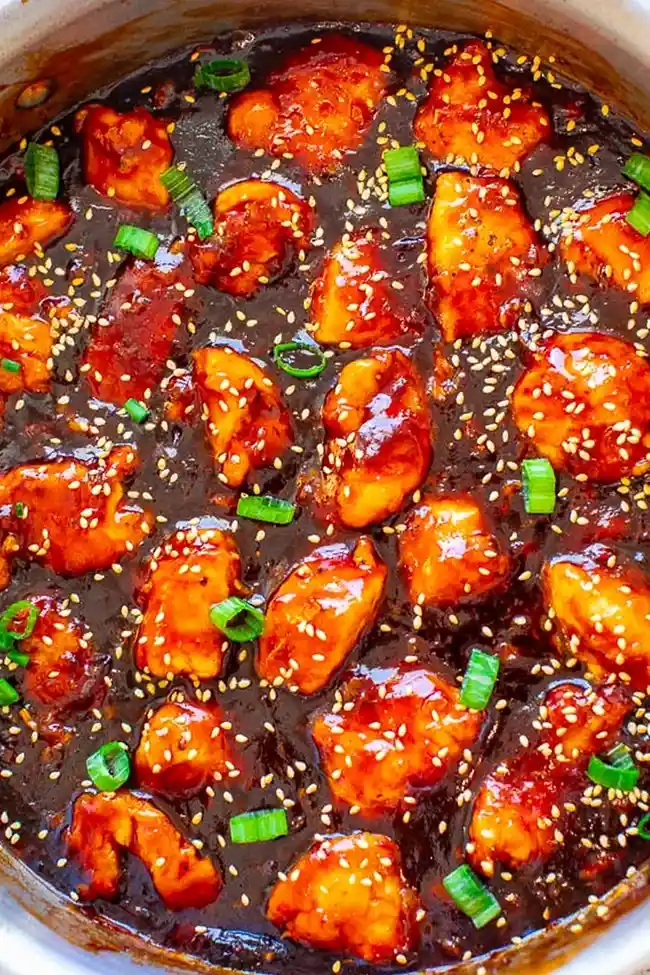
Skip the mall food court and delivery apps by creating this high-impact, restaurant-quality sticky chicken right in your own kitchen in under twenty minutes. This dish features bite-sized pieces of tender chicken breast coated in a glossy, sweet, and spicy glaze that rivals anything you have tasted at a specialized Asian-style bistro. It is the ultimate quick-fix dinner solution that relies on simple pantry staples to produce bold, complex flavors without any of the heavy, deep-fried grease found in takeout alternatives.
List of ingredients
- 1/2 to 2/3 cup honey
- 1/2 cup ketchup
- 1/4 cup apple cider vinegar
- 1/4 cup soy sauce
- 1/4 cup brown sugar
- 2 tablespoons granulated sugar
- 1 to 4 tablespoons chili garlic sauce
- 1 large egg, lightly beaten
- 1/2 cup all-purpose flour
- 1/3 cup corn starch
- 1.25 to 1.50 pound boneless skinless chicken breast, cut into bite-sized pieces
- 3 to 4 tablespoons olive oil
- 1 1/2 tablespoons cornstarch
- 2 tablespoons cold water
- green onions, sliced thin (optional)
- sesame seeds (optional)
step-by-step instructions
- Sauce: In a medium bowl, whisk together honey, ketchup, vinegar, soy sauce, brown sugar, granulated sugar, and chili garlic sauce; set aside.
- Preparation: Place beaten egg in a small bowl. Place flour in one shallow bowl and 1/3 cup corn starch in another.
- Dredge: Dip chicken pieces into egg, then coat in flour, and finally coat in the 1/3 cup corn starch.
- Sear: Heat olive oil in a large skillet over medium to medium-high heat. Add chicken and cook for about 7 minutes until browned and cooked through.
- Combine: Reduce heat to medium. Pour the sauce mixture into the skillet.
- Thicken: Whisk 1 1/2 tablespoons cornstarch with cold water to create a slurry. Add to the skillet.
- Finish: Stir continuously for about 5 minutes until the sauce is thick and sticky. Garnish with green onions and sesame seeds before serving.
Practical tips for cooking success
Managing the heat during the glaze process
When you add the sugar-heavy sauce to the hot skillet, keep a close watch on the burner temperature. Since honey and sugars caramelize very quickly, maintaining a steady medium heat is better than a high flame. If the bubbles become too intense or the sauce seems to be darkening too rapidly, lower the heat slightly to ensure the sugars don’t burn, which would impart a bitter taste rather than a sweet, savory balance.
Ensuring uniform coating on chicken pieces
To avoid a messy or uneven crust, shake off any excess flour before moving the chicken into the cornstarch. If the coating is too thick, it may absorb too much sauce and become gummy rather than crispy. Aim for a thin, even layer of starch, which is the secret to getting that perfect “better-than-takeout” texture that grips the sauce without becoming overly heavy.
The importance of the slurry
Always mix your cornstarch and water in a separate small bowl before adding it to the skillet. Never pour dry cornstarch directly into a hot liquid, as it will clump instantly and become impossible to smooth out. Using a cold water slurry ensures the starch incorporates gradually and smoothly, creating a professional-looking, velvety sauce that clings perfectly to every piece of chicken.
Customizing your sticky chicken
Adjusting the spice profile
If you enjoy a very spicy profile, consider adding a pinch of crushed red pepper flakes during the last minute of cooking. Conversely, if you prefer a milder version, start with a single teaspoon of chili garlic sauce and taste the mixture before adding more. The balance of sweetness from the honey can mask the heat, so it is always safer to build the spice level incrementally.
Adding fresh vegetables
This recipe is highly versatile and can easily handle the addition of fresh, crisp-tender vegetables. Consider tossing in some broccoli florets, sliced bell peppers, or snow peas during the final three minutes of the sauce thickening phase. These vegetables soak up the flavorful sauce perfectly and provide a satisfying crunch that rounds out the meal, making it even more nutritious without sacrificing that signature sticky glaze.
Swapping out the chicken
While chicken breast works beautifully, boneless skinless chicken thighs are an excellent alternative if you prefer a richer, more succulent bite. The fat content in thighs remains stable during the quick searing process, ensuring the meat stays moist even if you happen to cook it for an extra minute. If you choose to use thighs, ensure you cut them into sizes similar to the breast portions to maintain uniform cooking times across the board.
Serving and storage strategies
Ideal accompaniments for a complete meal
Because the sauce is quite rich and flavorful, it pairs best with neutral bases like steamed jasmine rice, brown rice, or even cooked quinoa. For a lower-carb option, serve the sticky chicken over a bed of cauliflower rice or stir-fried cabbage, which will help soak up the excess sauce. Adding a side of steamed snap peas or cucumber salad provides a cooling contrast to the intensity of the glaze.
Effective reheating methods
To reheat leftovers without losing the texture of the sauce, place the chicken in a skillet over low-to-medium heat with a tiny splash of water. Cover the pan for a minute or two to create steam, then remove the lid and stir until the sauce returns to a glossy consistency. Avoid the microwave if possible, as it tends to make the crispy coating turn slightly chewy, though it remains a fine option if you are in a time crunch.
Managing leftovers
This dish is excellent for meal prep because the flavors actually deepen after sitting in the refrigerator overnight. Store your chicken in an airtight glass container to prevent any flavor absorption from other items in the fridge. When stored properly, it remains fresh for up to five days, making it an ideal candidate for lunch throughout the work week. Simply keep the rice and chicken in separate containers until the moment you are ready to eat to maintain the best quality of both components.
Frequently asked questions
Can I double this recipe for a larger group?
Yes, you can easily scale this recipe up, but ensure you use a very large skillet or work in two separate batches. Crowding the pan is the primary enemy of a good sear, so if you have more than one pound of chicken, cooking in two rounds is the most effective way to maintain the crispy crust on the meat. Just make sure to adjust your sauce quantity accordingly to keep the same ratio of liquid to chicken.
Why does the sauce seem to thicken so fast?
The cornstarch slurry acts as a potent thickening agent once it hits a boiling liquid. Because this sauce contains a significant amount of sugar, it will continue to tighten up even after you take it off the heat. If it becomes thicker than you would like, simply whisk in an additional tablespoon of water or a small splash of chicken broth to loosen the consistency back to your preference.
Can I use different types of vinegar?
Apple cider vinegar is recommended for its mild sweetness, but rice vinegar is a fantastic substitute if you want a more authentic, subtle flavor. Avoid using highly potent white distilled vinegar unless you cut the quantity in half, as its sharpness can easily overpower the honey and ketchup base. Regardless of the type chosen, the acid is essential to ensure the dish doesn’t feel one-dimensional or overly sugary.
Print
Better-Than-Takeout Sticky Chicken
- Total Time: PT20M
- Yield: 5 servings 1x
- Diet: Dairy-Free
Description
Stop calling for takeout and make this amazing sticky chicken at home in 15 minutes. This recipe is easy, fast, and features a perfect balance of sweet and spicy with plenty of sticky sauce.
Ingredients
- 1/2 to 2/3 cup honey
- 1/2 cup ketchup
- 1/4 cup apple cider vinegar
- 1/4 cup soy sauce
- 1/4 cup brown sugar
- 2 tablespoons granulated sugar
- 1 to 4 tablespoons chili garlic sauce
- 1 large egg, lightly beaten
- 1/2 cup all-purpose flour
- 1/3 cup corn starch
- 1.25 to 1.50 pound boneless skinless chicken breast, cut into bite-sized pieces
- 3 to 4 tablespoons olive oil
- 1 1/2 tablespoons cornstarch
- 2 tablespoons cold water
- green onions, sliced thin (optional)
- sesame seeds (optional)
Instructions
- Sauce: In a medium bowl, whisk together honey, ketchup, vinegar, soy sauce, brown sugar, granulated sugar, and chili garlic sauce; set aside.
- Preparation: Place beaten egg in a small bowl. Place flour in one shallow bowl and 1/3 cup corn starch in another.
- Dredge: Dip chicken pieces into egg, then coat in flour, and finally coat in the 1/3 cup corn starch.
- Sear: Heat olive oil in a large skillet over medium to medium-high heat. Add chicken and cook for about 7 minutes until browned and cooked through.
- Combine: Reduce heat to medium. Pour the sauce mixture into the skillet.
- Thicken: Whisk 1 1/2 tablespoons cornstarch with cold water to create a slurry. Add to the skillet.
- Finish: Stir continuously for about 5 minutes until the sauce is thick and sticky. Garnish with green onions and sesame seeds before serving.
Notes
This recipe yields a generous amount of sauce. If you prefer less sauce, feel free to halve the sauce ingredients. Ensure the sauce reaches a gentle boil while stirring to activate the cornstarch thickener.
- Prep Time: PT5M
- Cook Time: PT15M
- Category: 30-Minute Meals
- Method: Stovetop
- Cuisine: Asian
Nutrition
- Serving Size: 1 serving
- Calories: 561 kcal
- Sugar: 49 g
- Sodium: 1240 mg
- Fat: 16 g
- Saturated Fat: 3 g
- Unsaturated Fat: 11 g
- Trans Fat: 0 g
- Carbohydrates: 71 g
- Fiber: 1 g
- Protein: 33 g
- Cholesterol: 253 mg