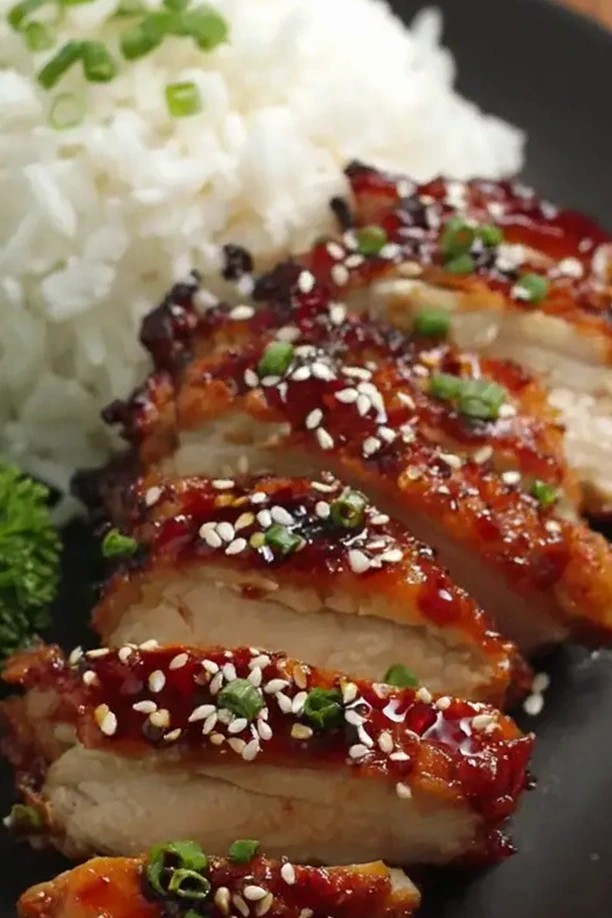
This recipe delivers tender, juicy chicken thighs coated in a thick, savory-sweet glaze. It is a fast weeknight meal that produces restaurant-quality results in about 30 minutes. Perfect for serving over rice with a side of steamed vegetables.
List of ingredients
- 4 boneless, skinless chicken thighs – provides the best moisture and flavor.
- 1 tbsp neutral oil – use canola or vegetable oil for a high smoke point.
- 2 tbsp water mixed with 1 tsp apple cider vinegar – a non-alcoholic alternative to sake.
- 2 tbsp honey – provides the sweetness and viscosity of mirin.
- 2 tbsp soy sauce – use regular or usukuchi for a lighter color.
- 1 tbsp sugar – helps with caramelization.
- 1 tsp freshly grated ginger – adds a bright, zingy punch.
- 1 small clove garlic – finely minced for aromatic depth.
- 1 tsp cornstarch – optional, for a thicker restaurant-style glaze.
- 1 tbsp water – used to create the cornstarch slurry.
- Toasted sesame seeds – for garnish and texture.
- Sliced green onion – for color and fresh flavor.
step-by-step instructions
- Prepare the chicken and sauce: Pat the chicken thighs completely dry with paper towels to ensure a proper sear. Make small slits along thicker edges for even cooking and season lightly with a pinch of salt. In a small bowl, whisk together the water/vinegar mix, honey, soy sauce, sugar, grated ginger, and minced garlic.
- Sear the meat: Heat neutral oil in a large skillet over medium-high heat until shimmering. Place chicken thighs presentation-side down and cook undisturbed for 5-7 minutes until a deep golden-brown crust forms. Flip the thighs and cook for another 4-5 minutes on the second side.
- Add the glaze: Pour off any excess fat from the pan and reduce the heat to medium-low. Pour the prepared teriyaki sauce directly over and around the chicken. Spoon the simmering liquid over the chicken pieces as it heats up.
- Reduce the sauce: Continue cooking for 5-7 minutes while frequently spooning the sauce over the meat. The sauce will reduce, becoming thicker and glossier as the sugars caramelize. Wait until the bubbles become larger and slower.
- Thicken and finish: Check for doneness by piercing the thickest part of the thigh; juices should run clear. For a thicker glaze, mix cornstarch with 1 tbsp water, push chicken to the side, and stir the slurry into the sauce for 30 seconds.
- Rest and serve: Remove from heat and let the chicken rest on a cutting board for a few minutes. Slice against the grain, place on a plate, and pour the remaining pan glaze over the top. Garnish with toasted sesame seeds and sliced green onions.
Advanced Searing and Cooking Techniques
Achieving the Perfect Golden Crust
Patting the chicken dry is the most critical step for a successful sear. Moisture on the surface of the meat creates steam, which prevents the Maillard reaction from occurring. Use heavy-duty paper towels to remove all surface water before the meat hits the oil.
Controlling Pan Temperature
Use medium-high heat for the initial sear but transition to medium-low immediately after adding the sauce. High heat can cause the sugars in the honey and soy sauce to burn, resulting in a bitter taste. A gentle simmer allows the glaze to thicken without scorching.
The Art of Basting
Frequently spooning the sauce over the chicken is called basting. This process ensures the meat is evenly coated and absorbs the flavor of the glaze. It also helps the sauce reduce more efficiently by exposing it to the heat of the pan.
Determining Internal Doneness
Chicken thighs are more forgiving than breasts, but they still require a safe internal temperature of 165°F. Using an instant-read thermometer is the most accurate method. If you do not have one, ensure the juices run completely clear when pierced.
Ingredient Substitutions and Adaptations
Using Chicken Breasts
If you prefer lean meat, you can use chicken breasts, but you must adjust the timing. Pound them to an even thickness so they cook uniformly. Reduce the initial sear to 3-4 minutes per side and shorten the simmering time to avoid drying out the meat.
Making the Dish Gluten-Free
Standard soy sauce contains wheat, which is not suitable for gluten-free diets. Replace the soy sauce with an equal amount of certified gluten-free tamari or coconut aminos. The rest of the ingredients in this recipe are naturally gluten-free.
Reducing Sodium Levels
To lower the salt content, use a low-sodium soy sauce. You can also increase the amount of grated ginger and garlic to maintain a bold flavor profile without relying on salt. Avoid adding extra salt during the seasoning phase.
Alternative Sweeteners
If you do not have honey, you can use maple syrup or brown sugar. Brown sugar adds a deeper, molasses-like flavor that complements the soy sauce well. Maple syrup provides a slightly different floral note but maintains the necessary thickness.
Complementary Serving Ideas
Traditional Grain Pairings
Steamed Japanese short-grain rice is the ideal base for teriyaki chicken. The sticky texture of the rice helps capture the extra glaze from the pan. You can also use brown rice or quinoa for a nuttier flavor and more fiber.
Refreshing Vegetable Sides
A cucumber sunomono salad provides a vinegary contrast that cuts through the richness of the glaze. Steamed broccoli, bok choy, or snap peas are also excellent choices. These vegetables add color and nutritional balance to the plate.
Adding a Fresh Crunch
In addition to green onions, you can garnish the dish with shredded carrots or sliced radishes. These additions provide a textural contrast to the tender chicken. A sprinkle of toasted white sesame seeds adds a subtle nuttiness.
Recommended Beverage Pairings
Cold green tea or sencha complements the umami flavors of the soy and ginger. For a sparkling option, yuzu-flavored sparkling water offers a citrusy zing. These drinks cleanse the palate between savory bites.
Storage and Reheating Guidelines
Refrigeration and Shelf Life
Store leftover teriyaki chicken in an airtight glass or plastic container. It will remain fresh and safe to eat for 3 to 4 days in the refrigerator. The flavors often meld and improve after a day of chilling.
Freezing Instructions
This dish can be frozen for up to 2 months. Place the sliced chicken and sauce in a freezer-safe bag, squeezing out as much air as possible. Label the bag with the date to ensure quality.
Best Reheating Methods
Reheating in a skillet is the best way to preserve the texture. Add a tablespoon of water to the pan to loosen the thickened glaze and heat over medium heat until warmed through. Avoid high microwave settings, which can make the chicken rubbery.
Using Leftovers in Other Meals
Sliced leftover teriyaki chicken is perfect for bento boxes or grain bowls. You can also chop the meat into smaller pieces and toss it into a stir-fry. It also works well as a protein topping for a fresh garden salad.
Troubleshooting Common Issues
Preventing the Sauce from Burning
If the sauce begins to thicken too quickly or looks like it is scorching, add a tablespoon of water immediately. This lowers the temperature and thins the glaze. Always keep the heat at medium-low once the sugar-based sauce is in the pan.
Fixing a Thin Sauce
If your sauce is too watery after simmering, increase the heat slightly to encourage further reduction. If you are short on time, use the cornstarch slurry method. Whisk 1 tsp of cornstarch into 1 tbsp of cold water and stir it into the simmering sauce.
Stopping Chicken from Sticking
Chicken often sticks to the pan if it is moved too early during the searing process. Wait until the meat naturally releases from the surface, which indicates the crust has formed. Ensure the oil is shimmering hot before adding the chicken.
Managing Overly Salty Glaze
If the final sauce tastes too salty, you can balance it by adding a teaspoon of honey or brown sugar. A squeeze of fresh lime juice also helps brighten the flavor and neutralize excess salt. Always taste the sauce before the final plating.
Make-Ahead Strategies
Preparing the Sauce in Advance
You can mix the honey, soy sauce, vinegar, sugar, ginger, and garlic up to a week in advance. Store the mixture in a sealed jar in the refrigerator. Shake the jar well before using to redistribute the ingredients.
Pre-Marinating the Meat
For deeper flavor, marinate the chicken in half of the sauce for 30 minutes before cooking. If you do this, make sure to pat the chicken dry again before searing. Searing marinated meat can be trickier, so use a non-stick skillet.
Pre-Cutting Vegetables
To save time during dinner prep, chop your green onions and grate your ginger ahead of time. Store the ginger in a small container with a damp paper towel to keep it fresh. This reduces the active prep time to just a few minutes.
Planning Your Mise en Place
Have all ingredients measured and ready before you turn on the stove. Because the searing and glazing process happens quickly, you won’t have time to chop garlic while the chicken is browning. Organizing your workspace prevents burning the meat.
Frequently Asked Questions
Can I use a different cut of meat?
Yes, you can use pork loin or salmon fillets using the same glaze. Salmon cooks much faster, so reduce the searing time to 3 minutes per side. Pork loin may require a longer simmer to ensure it is cooked through.
Why is my glaze not glossy?
A glossy finish comes from the reduction of sugars and the addition of cornstarch. If your sauce looks matte, it likely hasn’t reduced enough. Continue simmering and spooning the sauce over the meat until it reaches a syrupy consistency.
Is this recipe suitable for meal prep?
Absolutely, as teriyaki chicken holds up very well when reheated. Portion the chicken and rice into separate containers to keep the rice from becoming mushy. Store the extra sauce separately and drizzle it over the meat after reheating.
What if I don’t have fresh ginger?
Fresh ginger is preferred for its zing, but ground ginger powder can be used in a pinch. Use about 1/4 teaspoon of ground ginger for every 1 teaspoon of fresh ginger. Be aware that the flavor will be more concentrated and less bright.
Print
Authentic Japanese Teriyaki Chicken Thighs
- Total Time: 25 minutes
- Yield: 2 servings 1x
- Diet: General
Description
Make perfect Japanese Teriyaki Chicken with a sticky, glossy glaze. This easy recipe uses simple ingredients for authentic flavor.
Ingredients
- 4 boneless, skinless chicken thighs
- 1 tbsp neutral oil
- 2 tbsp alcohol-free sake substitute
- 2 tbsp alcohol-free mirin substitute
- 2 tbsp soy sauce
- 1 tbsp sugar
- 1 tsp freshly grated ginger
- 1 small clove garlic
- 1 tsp cornstarch
- 1 tbsp water
- Toasted sesame seeds
- Sliced green onion
Instructions
- Step: Start by prepping your chicken. Pat the thighs completely dry with paper towels. If they are very large or uneven, make a few small slits along any thicker edges. Season lightly with a tiny pinch of salt. In a small bowl, whisk together the alcohol-free sake substitute, alcohol-free mirin substitute, soy sauce, sugar, grated ginger, and minced garlic.
- Step: Heat the oil in your large skillet over medium-high heat. Once the oil is shimmering, carefully add the chicken thighs, presentation-side down. Let them cook for about 5-7 minutes, until a deep golden-brown crust forms on the first side. Flip them over and cook for another 4-5 minutes on the second side.
- Step: Pour off any excess fat from the pan. Reduce the heat to medium-low. Pour your pre-mixed teriyaki sauce directly over and around the chicken. Spoon the sauce over the top of the chicken pieces.
- Step: Continue to cook, frequently spooning the sauce over the chicken, for about 5-7 minutes until the sauce reduces, becoming thicker and glossier.
- Step: To check for doneness, pierce the thickest part of a thigh; the juices should run clear. For a thicker glaze, mix the cornstarch with the water to create a slurry, pour it into the simmering sauce for 30 seconds until it thickens, then coat the chicken again.
- Step: Remove the pan from the heat. Transfer the chicken to a cutting board and let it rest for a couple of minutes. Slice it against the grain, arrange on a plate, and pour any remaining glaze from the pan over the top. Finish with toasted sesame seeds and sliced green onions.
Notes
Store in an airtight container in the fridge for 3-4 days or freeze for up to 2 months. Reheat gently in a skillet with a splash of water to loosen the glaze.
- Prep Time: 10 minutes
- Cook Time: 15 minutes
- Category: Chicken Recipes
- Method: Sautéing
- Cuisine: Japanese
Nutrition
- Serving Size: 1 serving
- Calories: 320 kcal
- Sugar: 12 g
- Sodium: 940 mg
- Fat: 16 g
- Saturated Fat: 4 g
- Unsaturated Fat: 12 g
- Trans Fat: 0 g
- Carbohydrates: 10 g
- Fiber: 0.5 g
- Protein: 28 g
- Cholesterol: 85 mg