Recreate the signature taste of a restaurant favorite right in your own kitchen with this simple 30-minute chicken recipe. By combining a golden panko crust with the deep, savory notes of Romano cheese, you can achieve that perfect crunch and tender interior without needing to dine out. This dish is an excellent choice for a busy weeknight meal that feels special enough for guests yet remains approachable for family dinners.
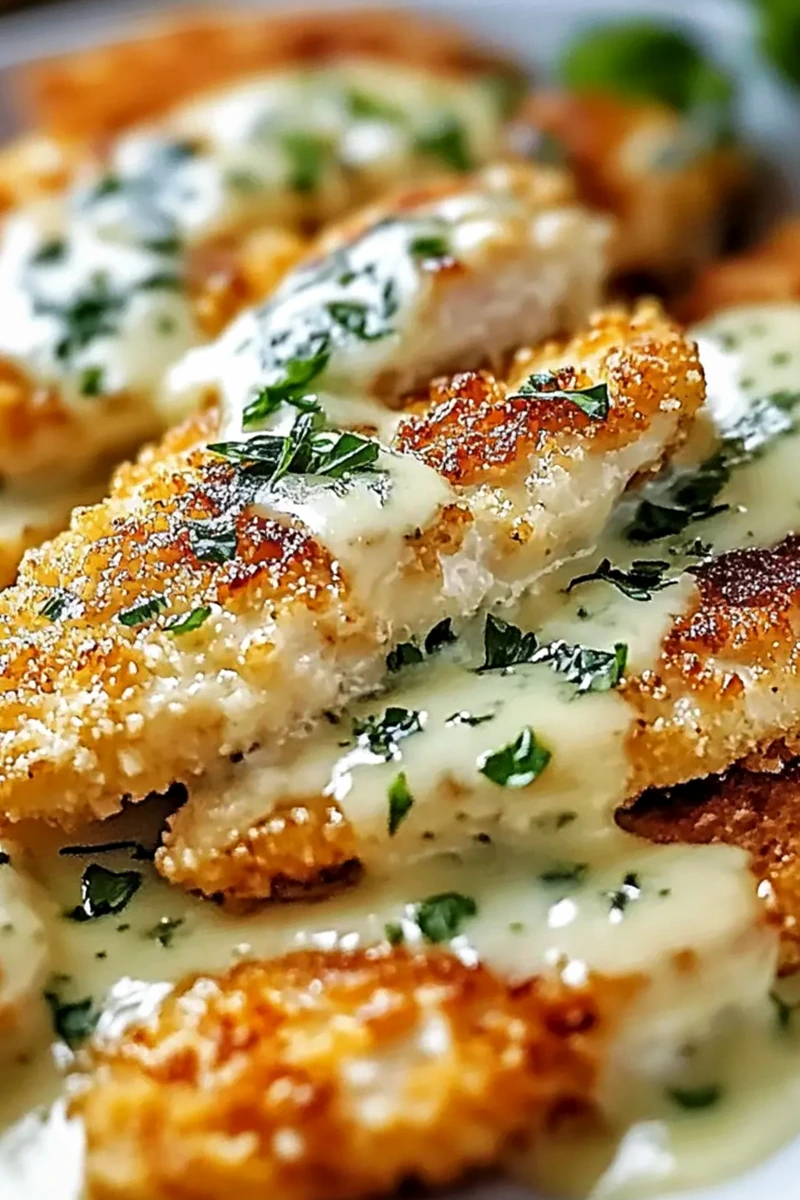
List of ingredients
- 2 pieces chicken breasts
- to taste salt
- to taste pepper
- 1 cup all-purpose flour
- 1 large egg
- 1 cup panko bread crumbs
- 1/2 cup grated Romano cheese
- 1/4 cup fresh parsley
- 1 tablespoon lemon zest
- 3 tablespoons avocado oil
- 1 cup shredded mozzarella cheese
step-by-step instructions
- Step: Sprinkle both sides of the chicken breasts with salt and pepper.
- Step: Create a dredging station: place flour in one bowl, beat the egg in a second, and combine panko breadcrumbs with grated Romano cheese in a third bowl.
- Step: Coat each chicken breast first in flour, then dip into the beaten egg, and finally cover with the panko and cheese mixture.
- Step: Pour avocado oil into a large skillet and heat over medium.
- Step: Add the coated chicken breasts to the skillet and fry for about 5-7 minutes per side, or until golden brown and cooked through.
- Step: Optional: Sprinkle lemon zest and chopped parsley over the chicken before serving.
Keys to Achieving a Perfect Crust
Managing Heat Levels for Golden Results
The secret to a restaurant-style crust is maintaining steady heat throughout the cooking process. If the flame is too high, the panko will burn before the interior of the chicken is cooked, but if the heat is too low, the breading will absorb the oil and become soggy. Aim for a medium setting that allows the panko to brown gradually while the chicken stays juicy.
Selecting the Right Breadcrumbs
Panko breadcrumbs are essential for this recipe because they are lighter and airier than traditional breadcrumbs, which prevents the coating from becoming dense or oily. These Japanese-style flakes create a jagged, crunchy texture that mimics professional frying techniques. If you find your local store is out of stock, look for coarse-cut breadcrumbs, but avoid the powdery, fine-dust variety.
Refining Your Ingredient Selection
The Role of Romano Cheese
Romano cheese is a sheep’s milk cheese that provides a sharper and saltier profile compared to standard Parmesan. Its intensity ensures that every bite has a bold, savory punch that cuts through the mild flavor of the chicken. When grating your own cheese, try to get a fine, fluffy texture so that it integrates evenly with the panko rather than clumping in pockets.
Choosing High-Quality Chicken Breasts
When selecting your protein, look for breasts that are uniform in thickness to ensure they cook at the same rate. If your chicken breasts are very thick on one end, use a meat mallet to pound them to an even half-inch thickness. This step not only speeds up the cooking time but also ensures that you do not end up with a dry piece of meat on one side and an undercooked portion on the other.
Practical Serving Suggestions
Balancing the Plate with Sides
Because the chicken is fried and rich with cheese, serving it alongside lighter, acidic, or herbaceous sides creates a balanced meal. A bright citrus vinaigrette over mixed garden greens provides a refreshing counterpoint to the savory crust. Alternatively, roasted asparagus or steamed broccoli with a hint of garlic can add necessary fiber and texture to the plate.
Creative Toppings and Finishes
While the recipe suggests lemon zest and parsley, you can personalize the finish based on what is in your pantry. A drizzle of high-quality balsamic reduction can add a complex, sweet-and-sour dimension to the dish. If you enjoy a slight aromatic element, a light dusting of dried oregano or fresh basil ribbons can also enhance the Italian-inspired theme of the meal.
Storage and Freshness Advice
Managing Leftover Chicken
If you have extra portions, the best way to maintain quality is to store them in a glass airtight container in the refrigerator. Try to avoid stacking the pieces directly on top of each other, as the weight can cause the crust to soften from the trapped moisture. When stored properly, your leftovers will remain tasty for up to three days.
Freezing for Later Use
You can successfully freeze this chicken for up to two months, provided it is stored correctly. Wrap each cooled chicken breast individually in parchment paper or plastic wrap, then place them inside a freezer-safe bag to prevent freezer burn. When you are ready to use them, thaw the chicken in the refrigerator overnight to ensure the texture stays consistent during the final heating stage.
FAQs
How can I keep the crust from falling off?
The most common reason for breading separation is excess moisture on the surface of the chicken. Make sure to pat the breasts dry with a paper towel before starting the dredging process. Additionally, ensure the chicken is coated in a thin, even layer of flour, which provides the necessary dry base for the egg and breading to cling to firmly.
What should I do if my breading is browning too fast?
If your crust turns dark before the middle of the chicken is finished, your heat is likely set too high. Reduce the heat immediately and use a pair of tongs to flip the chicken more frequently to distribute the warmth evenly. If it still darkens too quickly, you can transfer the chicken to a 350-degree oven for 5 minutes to finish cooking the interior without further browning the exterior.
Can I bake this instead of frying it?
While frying provides the authentic crunch, you can achieve a similar result by baking at 400 degrees Fahrenheit on a wire rack set over a baking sheet. This allows hot air to circulate underneath the chicken, crisping the bottom without needing to turn it. Lightly spray the top of the breaded chicken with avocado oil before putting it in the oven to help it achieve a golden color.
Is there a way to make this more nutritious?
To increase the nutritional value, focus on serving it with a large portion of roasted vegetables or a substantial salad. You can also incorporate whole-grain flour in place of all-purpose flour for added fiber. Since the chicken itself is a lean source of protein, the balance of the overall meal depends on the volume and type of sides you choose to serve alongside it.
How can I ensure the cheese doesn’t burn?
Romano cheese has a lower melting point than some other varieties and can scorch if left in a very hot pan for too long. Ensure your oil is heated properly before adding the chicken so the cooking process is efficient. If you notice the cheese browning aggressively, lower the temperature and use a splatter screen to keep the oil clean and prevent the bits of cheese from burning in the bottom of the pan.
Should I wash the chicken before cooking?
Food safety experts recommend against washing raw chicken, as it can spread bacteria around your workspace. Instead, simply pat the exterior of the meat dry with paper towels to ensure it is clean and ready for seasoning. This also helps ensure that your flour coating sticks properly, as moisture is the enemy of a crisp, professional-looking breaded exterior.
Print
Crispy Copycat Cheesecake Factory Chicken Romano Made Easy
- Total Time: PT30M
- Yield: 4 servings 1x
- Diet: High Protein
Description
Enjoy a homemade version of Cheesecake Factory Chicken Romano, a family favorite with crispy panko and savory Romano cheese.
Ingredients
- 2 pieces chicken breasts
- to taste salt
- to taste pepper
- 1 cup all-purpose flour
- 1 large egg
- 1 cup panko bread crumbs
- 1/2 cup grated Romano cheese
- 1/4 cup fresh parsley
- 1 tablespoon lemon zest
- 3 tablespoons avocado oil
- 1 cup shredded mozzarella cheese
Instructions
- Step: Sprinkle both sides of the chicken breasts with salt and pepper.
- Step: Create a dredging station: place flour in one bowl, beat the egg in a second, and combine panko breadcrumbs with grated Romano cheese in a third bowl.
- Step: Coat each chicken breast first in flour, then dip into the beaten egg, and finally cover with the panko and cheese mixture.
- Step: Pour avocado oil into a large skillet and heat over medium.
- Step: Add the coated chicken breasts to the skillet and fry for about 5-7 minutes per side, or until golden brown and cooked through.
- Step: Optional: Sprinkle lemon zest and chopped parsley over the chicken before serving.
Notes
Serve with a side of pasta or a fresh garden salad.
- Prep Time: PT15M
- Cook Time: PT15M
- Category: Dinner
- Method: Frying
- Cuisine: Italian
Nutrition
- Serving Size: 1 serving
- Calories: 480 kcal
- Sugar: 2 g
- Sodium: 450 mg
- Fat: 18 g
- Saturated Fat: 6 g
- Unsaturated Fat: 12 g
- Trans Fat: 0 g
- Carbohydrates: 30 g
- Fiber: 2 g
- Protein: 35 g
- Cholesterol: 120 mg