Experience the perfect balance of golden-brown, crackling skin and succulent, flavorful meat with this simple air fryer dinner. This recipe transforms standard chicken thighs into a restaurant-quality meal using a savory garlic and Parmesan crust that comes together in mere minutes. It is an ideal solution for busy weeknights when you want a high-impact, low-effort protein that satisfies the whole family.
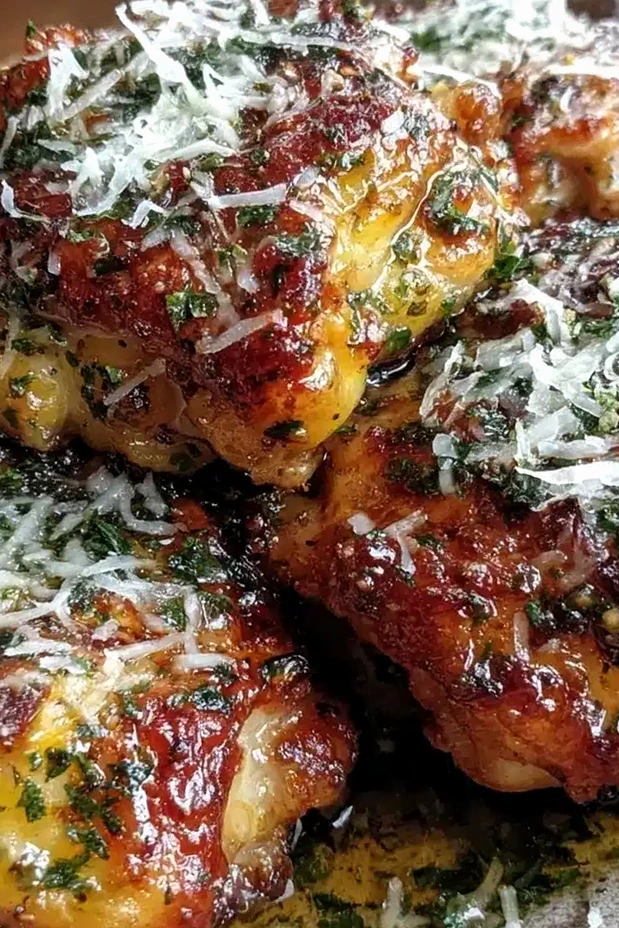
List of ingredients
- 4 bone-in, skin-on chicken thighs (about 1.5 pounds or 700 grams)
- 3-4 garlic cloves, minced
- ½ cup grated Parmesan cheese (about 50 grams)
- 2 tablespoons olive oil
- 1 teaspoon Italian seasoning
- 1 teaspoon salt
- ½ teaspoon freshly ground black pepper
- ½ teaspoon paprika
- 1 teaspoon lemon zest
step-by-step instructions
- Step: Pat the chicken thighs dry with paper towels.
- Step: In a mixing bowl, combine minced garlic, grated Parmesan, olive oil, Italian seasoning, salt, pepper, paprika, and lemon zest if using. Stir until it forms a thick paste.
- Step: Add the chicken thighs to the bowl and toss well, making sure each piece is evenly coated with the garlic Parmesan mixture.
- Step: Preheat the air fryer to 400°F (200°C) for about 3 minutes.
- Step: Place the thighs skin-side down in the air fryer basket in a single layer, leaving space for air circulation.
- Step: Air fry for 12 minutes at 400°F (200°C) until the skin starts turning golden and crisp.
- Step: Flip the thighs skin-side up using tongs and cook for an additional 8-10 minutes until the internal temperature reaches 165°F (74°C) and skin is crispy.
- Step: Let the chicken rest for 5 minutes outside the air fryer before serving.
Techniques for achieving the perfect crunch
Ensuring bone-dry skin surface
The moisture content on the exterior of the chicken is the primary enemy of a successful crust. Even after using paper towels, letting the chicken sit uncovered in the refrigerator for 20 minutes can further dehydrate the skin. This extra step guarantees that the heat from the air fryer works directly on the skin rather than evaporating water, leading to a much more satisfying crunch.
Applying the coating with pressure
Instead of merely tossing the chicken in the mixture, use your fingers to press the garlic and Parmesan paste into the crevices of the skin. This physical contact creates a much better bond, preventing the loose bits of cheese and garlic from detaching while the air circulates in the basket. Think of this process as creating a protective, flavorful shell that holds the juices inside the meat.
Managing the air fryer capacity
Overcrowding is a frequent cause of soggy chicken skin in compact appliances. If you notice your basket is crowded, it is far better to cook in two smaller batches rather than forcing all the pieces in at once. Sufficient space allows the convection effect to hit every surface of the chicken, ensuring uniform browning rather than localized steaming.
Refining flavors and ingredient adjustments
Utilizing high-quality aged cheese
While standard pre-grated Parmesan works, choosing an aged, freshly grated variety provides a much better texture. Aged Parmesan contains less moisture and a more intense, crystalline structure that browns more effectively when exposed to high heat. This creates a crust that is more structurally sound and flavorful compared to softer, processed alternatives found in pre-packaged bags.
Balancing seasoning and salt levels
Parmesan cheese is inherently salty, so it is crucial to taste your specific brand before adding the full teaspoon of salt. Start with a smaller amount of salt in your paste and taste a tiny bit of the mixture if you are unsure of your cheese’s sodium content. You can always sprinkle a final pinch of finishing salt over the chicken once it comes out of the air fryer if you find it needs more flavor.
Enhancing the aromatic profile
If you find that fresh garlic burns too quickly at high temperatures, consider using a high-quality roasted garlic paste instead. Roasted garlic offers a mellow, sweet, and deep flavor that stands up well to the intense heat of the air fryer without the bitterness that can sometimes accompany scorched fresh garlic. You can also mix in a teaspoon of onion powder to add an extra layer of savory complexity to the crust.
Practical storage and reheating methods
Maintaining texture during storage
If you have leftovers, place them in an airtight container once they have cooled to room temperature. Storing them while still steaming will introduce condensation into the container, which will turn the crispy crust soft very quickly. Once cooled, place them in the refrigerator, where they will remain safe for up to three days.
Restoring crispness after refrigeration
Avoid using the microwave to reheat this chicken, as it will inevitably result in soft, rubbery skin. To regain the original texture, place the cold chicken back into the air fryer at 350°F (175°C) for 5 to 7 minutes. This brief period of high heat will re-crisp the Parmesan crust and warm the center of the meat without overcooking the protein.
Planning for future meals
You can successfully prep this dish by applying the garlic-cheese coating to the chicken hours in advance and storing the raw, coated pieces in the refrigerator. This marination time allows the garlic and herb flavors to penetrate deeper into the skin and flesh. Simply remove the chicken from the fridge 15 minutes before air frying to ensure more even cooking throughout the thickness of the thigh.
Frequently asked questions
Can I successfully use chicken breasts with this recipe?
While you can use chicken breasts, they are much leaner than thighs and will dry out faster in the air fryer. If you choose to use breasts, reduce the cooking time by approximately 30 percent and monitor the internal temperature closely, pulling them out the moment they hit 165°F (74°C).
What is the most effective way to clean the basket after cheesy recipes?
If the Parmesan crust sticks to your air fryer basket, soak the basket in warm, soapy water for at least 15 minutes before scrubbing. The moisture will soften the residual cheese and oils, making it significantly easier to remove without damaging the non-stick coating with abrasive tools.
Is it necessary to use oil if the skin is fatty?
Even though chicken thighs are naturally rich, the olive oil in this recipe acts as a critical binding agent for the seasoning mixture. Without the oil, the Parmesan and garlic will simply fall off the skin during the first few minutes of air circulation. Stick to the requested amount for the best results in both adhesion and final color.
Should I remove the skin if I want a healthier option?
Removing the skin significantly changes the nature of this dish, as the crust relies on the skin’s fat content to brown properly. If you prefer not to eat the skin, consider using skinless chicken thighs and increasing the amount of olive oil slightly to help the seasonings adhere to the meat, though you will lose the signature crispy texture that defines this recipe.
Print
Crispy Air Fryer Garlic Parmesan Chicken Thighs
- Total Time: PT37M
- Yield: 4 servings 1x
- Diet: Gluten-free
Description
A quick and easy 30-minute recipe for crispy, juicy chicken thighs coated in a flavorful garlic Parmesan crust, perfect for busy weeknights.
Ingredients
- 4 bone-in, skin-on chicken thighs (about 1.5 pounds or 700 grams)
- 3–4 garlic cloves, minced
- ½ cup grated Parmesan cheese (about 50 grams)
- 2 tablespoons olive oil
- 1 teaspoon Italian seasoning
- 1 teaspoon salt
- ½ teaspoon freshly ground black pepper
- ½ teaspoon paprika
- 1 teaspoon lemon zest
Instructions
- Step: Pat the chicken thighs dry with paper towels.
- Step: In a mixing bowl, combine minced garlic, grated Parmesan, olive oil, Italian seasoning, salt, pepper, paprika, and lemon zest if using. Stir until it forms a thick paste.
- Step: Add the chicken thighs to the bowl and toss well, making sure each piece is evenly coated with the garlic Parmesan mixture.
- Step: Preheat the air fryer to 400°F (200°C) for about 3 minutes.
- Step: Place the thighs skin-side down in the air fryer basket in a single layer, leaving space for air circulation.
- Step: Air fry for 12 minutes at 400°F (200°C) until the skin starts turning golden and crisp.
- Step: Flip the thighs skin-side up using tongs and cook for an additional 8-10 minutes until the internal temperature reaches 165°F (74°C) and skin is crispy.
- Step: Let the chicken rest for 5 minutes outside the air fryer before serving.
Notes
Pat chicken dry for best crispiness. Press Parmesan mixture firmly onto skin to prevent falling off. Avoid overcrowding the air fryer basket. Use an instant-read thermometer to ensure chicken reaches 165°F. If garlic browns too fast, lower temperature to 375°F and add cooking time. Leftovers reheat best in air fryer at 350°F for 5-7 minutes to maintain crispiness.
- Prep Time: PT15M
- Cook Time: PT22M
- Category: Main Course
- Method: Air Frying
- Cuisine: American
Nutrition
- Serving Size: 1 chicken thigh
- Calories: 280 kcal
- Sugar: 1 g
- Sodium: 650 mg
- Fat: 20 g
- Saturated Fat: 6 g
- Unsaturated Fat: 12 g
- Trans Fat: 0 g
- Carbohydrates: 3 g
- Fiber: 0 g
- Protein: 18 g
- Cholesterol: 85 mg