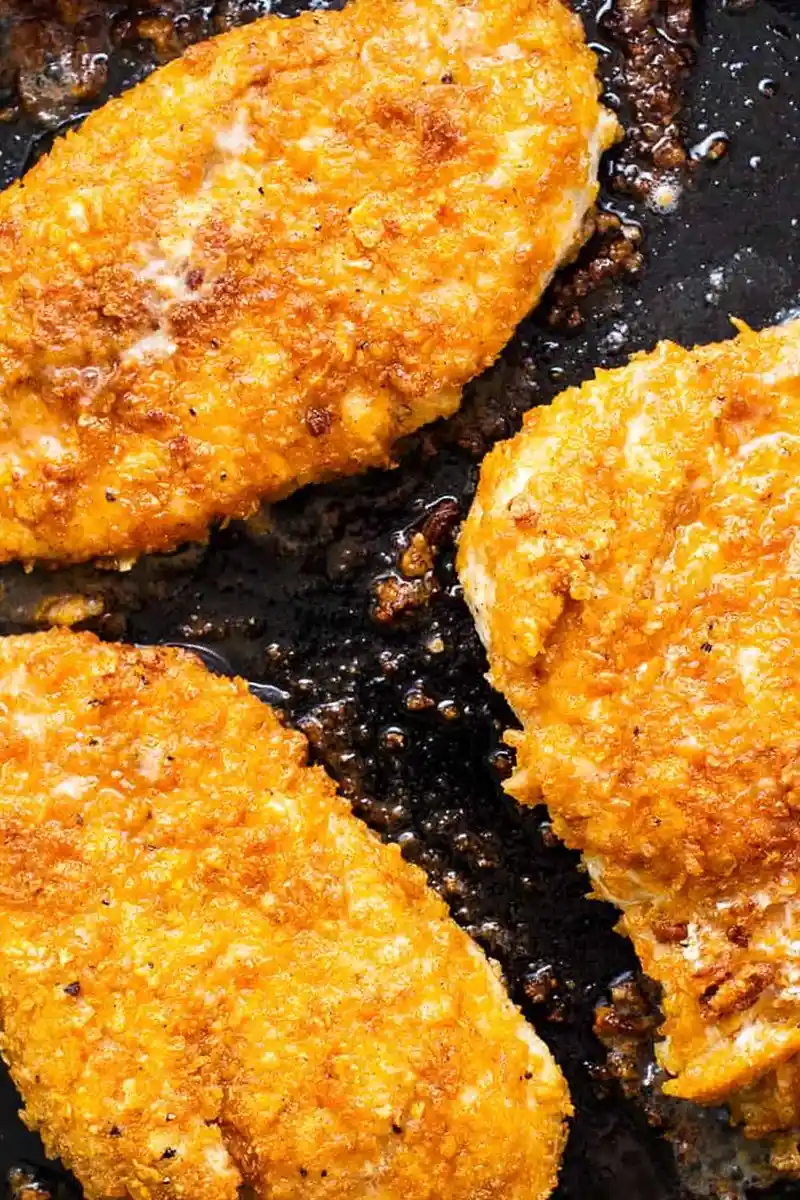
Achieving that elusive balance of a golden, ultra-crunchy exterior and a succulent, tender interior is simple with this stovetop method. By using a unique cornflake breading, you create a satisfying texture that stands up beautifully to pan-frying. This recipe is designed for busy evenings, delivering restaurant-quality results in less than thirty minutes from start to finish.
List of ingredients
- 1.5 lbs. chicken breast
- 1.5 teaspoons kosher salt (separated)
- 1 teaspoon ground black pepper (separated)
- 3 large eggs
- 4 cups cornflakes
- 1/2 cup all-purpose flour
- 1 teaspoon garlic powder
- 1/2 teaspoon paprika
- 1/4 cup avocado oil or olive oil
- 1 teaspoon flakey salt
step-by-step instructions
- Step: Place the chicken breast on a lined cutting board and then cover it with parchment paper. Use a meat tenderizer and pound the chicken until all the chicken is pounded to about 3/4 – 1-inch thick. Season the chicken with 1/2 teaspoon of salt and 1/2 teaspoon of pepper.
- Step: Crack the eggs into a large bowl and whisk the eggs together.
- Step: In a separate bowl, add the cornflakes, flour, garlic powder, paprika, pepper, and kosher salt. Use your hands to crush the cornflakes and mix all the ingredients.
- Step: Dredge a chicken breast through the egg wash, allowing any excess egg to drip from the chicken breast. Next, dredge the chicken through the cornflake mixture. Flip the chicken over in the cornflake mixture and use your hands to firmly press the coating into the chicken breast. Repeat until all the chicken breasts are coated.
- Step: Heat the oil in a large skillet over medium/high heat. When the oil is hot, add the chicken breasts to the skillet. Semi-cover the skillet to avoid oil splatter. Do not overcrowd the pan, you may need to cook the chicken in batches. Cook each chicken for 4-5 minutes on each side or until golden brown or the internal temperature of the chicken is 165ºF.
- Step: Remove the chicken from the pan and immediately season the chicken with the flakey salt. Let the chicken rest for 5 minutes and serve immediately.
Refining Your Technique for Superior Crunch
Maintaining Even Thickness
Pounding your chicken breast is not merely a task for tenderizing; it is the most critical step for consistency. When the chicken is uneven, the thin parts will dry out while the thick parts remain undercooked. Aiming for an exact one-inch thickness throughout allows the center to hit the safety temperature exactly when the exterior reaches the desired crispness.
Selecting the Right Frying Fat
Using an oil with a higher smoke point, such as avocado oil, is beneficial when pan-frying at medium-high heat. While olive oil imparts a lovely flavor, avocado oil is more stable and prevents the breading from tasting scorched. Ensure the oil is properly preheated before the chicken touches the pan, as cold oil will result in a greasy, soggy crust rather than a crispy one.
The Role of the Resting Period
Never skip the five-minute rest period after removing the chicken from the skillet. Resting allows the heat to distribute evenly throughout the fibers, which stabilizes the moisture content inside. It also provides a moment for the crunchy crust to settle and adhere more firmly to the surface, preventing the breading from sliding off when you begin to slice the meat.
Creative Ingredient Substitutions
Finding Suitable Breading Alternatives
If you find your pantry is missing specific items, there are several ways to pivot without losing that essential texture. Rice crispies can serve as a direct replacement for cornflakes, offering a slightly lighter but equally crispy finish. If you need a gluten-free flour option, a high-quality all-purpose gluten-free blend will perform just as effectively as wheat-based flour.
Enhancing the Dry Mix
The garlic powder and paprika serve as the foundation, but you can customize the flavor profile of the breading to suit your specific meal theme. Adding a pinch of dried oregano or thyme can shift the profile toward a Mediterranean flavor, while a small amount of cayenne pepper will add a gentle, lingering heat. Always keep the salt content in mind if you decide to add additional dried herb blends to the mix.
Serving Ideas and Meal Planning
Pairing Suggestions
This chicken is exceptionally versatile, making it the perfect focal point for a wide variety of meals. Serve it over a crisp Caesar salad or a bed of mixed greens with a bright vinaigrette to highlight the contrast between the cold vegetables and the hot, crunchy coating. Alternatively, place the sliced chicken over a bowl of lemon-herb pasta or a stack of roasted root vegetables for a heartier dinner.
Planning for Busy Schedules
While this dish is best served fresh for optimal crunch, you can prepare the breading mix in advance and store it in an airtight container. Keep the chicken raw until you are ready to cook, as the breading will soften if left on the meat for too long. If you are hosting, you can set up a dredging station ahead of time to make the assembly process move quickly when your guests arrive.
Storage and Troubleshooting
Storing Leftovers Correctly
Place any remaining chicken in an airtight container once it has cooled to room temperature. It will stay safe in the refrigerator for up to three days. To maintain as much crispness as possible, do not seal the container while the chicken is still steaming, as the trapped condensation will cause the crust to lose its texture.
Restoring the Crisp Texture
Avoid the microwave at all costs when reheating this chicken, as the steam will turn the breading into a soft, unappealing layer. The most effective way to reheat is to place the chicken in an oven or a toaster oven set to 350ºF until it is heated through. This dry heat helps pull moisture out of the coating, effectively reviving the original texture.
Frequently Asked Questions
Why did my coating fall off the chicken during frying?
This usually happens if the chicken surface was too wet before dredging or if the oil was not hot enough. Pat the chicken breast dry with paper towels before dipping into the egg wash, and ensure your oil is shimmering and hot before adding the meat to the skillet.
Can I prepare this in an oven instead of a skillet?
Yes, you can bake the chicken at 400ºF on a wire rack set over a baking sheet for about 20-25 minutes. While the stovetop method provides a more intense crunch, the oven approach is a cleaner, easier alternative if you are cooking for a larger group and need to avoid oil splatter.
How do I know if the chicken is fully cooked without a thermometer?
We strongly advise using a digital meat thermometer for accuracy. However, if you do not have one, you can check for doneness by pressing the thickest part of the breast; it should feel firm and offer slight resistance. Additionally, the juices that run from the meat when pierced with a knife should be clear, not cloudy or pink.
Can I use milk instead of eggs for the dredge?
While you can use milk, it acts as a thinner liquid than egg and may result in a much thinner coating that does not hold the cornflakes as securely. Eggs are the preferred binder because their protein structure sets as it heats, locking the crust onto the chicken.
Print
Crunchy Pan Fried Chicken Breast
- Total Time: 30 minutes
- Yield: 4 servings 1x
- Diet: Dairy-Free
Description
Perfectly crunchy pan fried chicken breast is ready to go in less than 30 minutes with chicken breast and a crispy cornflake topping!
Ingredients
- 1.5 lbs. chicken breast
- 1.5 teaspoons kosher salt (separated)
- 1 teaspoon ground black pepper (separated)
- 3 large eggs
- 4 cups cornflakes
- 1/2 cup all-purpose flour
- 1 teaspoon garlic powder
- 1/2 teaspoon paprika
- 1/4 cup avocado oil or olive oil
- 1 teaspoon flakey salt
Instructions
- Step: Place the chicken breast on a lined cutting board and then cover it with parchment paper. Use a meat tenderizer and pound the chicken until all the chicken is pounded to about 3/4 – 1-inch thick. Season the chicken with 1/2 teaspoon of salt and 1/2 teaspoon of pepper.
- Step: Crack the eggs into a large bowl and whisk the eggs together.
- Step: In a separate bowl, add the cornflakes, flour, garlic powder, paprika, pepper, and kosher salt. Use your hands to crush the cornflakes and mix all the ingredients.
- Step: Dredge a chicken breast through the egg wash, allowing any excess egg to drip from the chicken breast. Next, dredge the chicken through the cornflake mixture. Flip the chicken over in the cornflake mixture and use your hands to firmly press the coating into the chicken breast. Repeat until all the chicken breasts are coated.
- Step: Heat the oil in a large skillet over medium/high heat. When the oil is hot, add the chicken breasts to the skillet. Semi-cover the skillet to avoid oil splatter. Do not overcrowd the pan, you may need to cook the chicken in batches. Cook each chicken for 4-5 minutes on each side or until golden brown or the internal temperature of the chicken is 165ºF.
- Step: Remove the chicken from the pan and immediately season the chicken with the flakey salt. Let the chicken rest for 5 minutes and serve immediately.
Notes
If you do not want to use your hands, place all of the breading ingredients into a food processor and process until it forms a crumble, not a powder. If you don’t have cornflakes you can use rice crispies. If you run out of eggs, feel free to crack another egg into the bowl.
- Prep Time: 20 minutes
- Cook Time: 10 minutes
- Category: Main Meal
- Method: Pan Frying
- Cuisine: American
Nutrition
- Serving Size: 1 breast
- Calories: 380 kcal
- Sugar: 2 g
- Sodium: 750 mg
- Fat: 16 g
- Saturated Fat: 3 g
- Unsaturated Fat: 11 g
- Trans Fat: 0 g
- Carbohydrates: 24 g
- Fiber: 1 g
- Protein: 34 g
- Cholesterol: 165 mg