This quick recipe delivers succulent shrimp with beautifully caramelized edges in just 15 minutes. It is an ideal high-protein option for appetizers or as a main course protein.
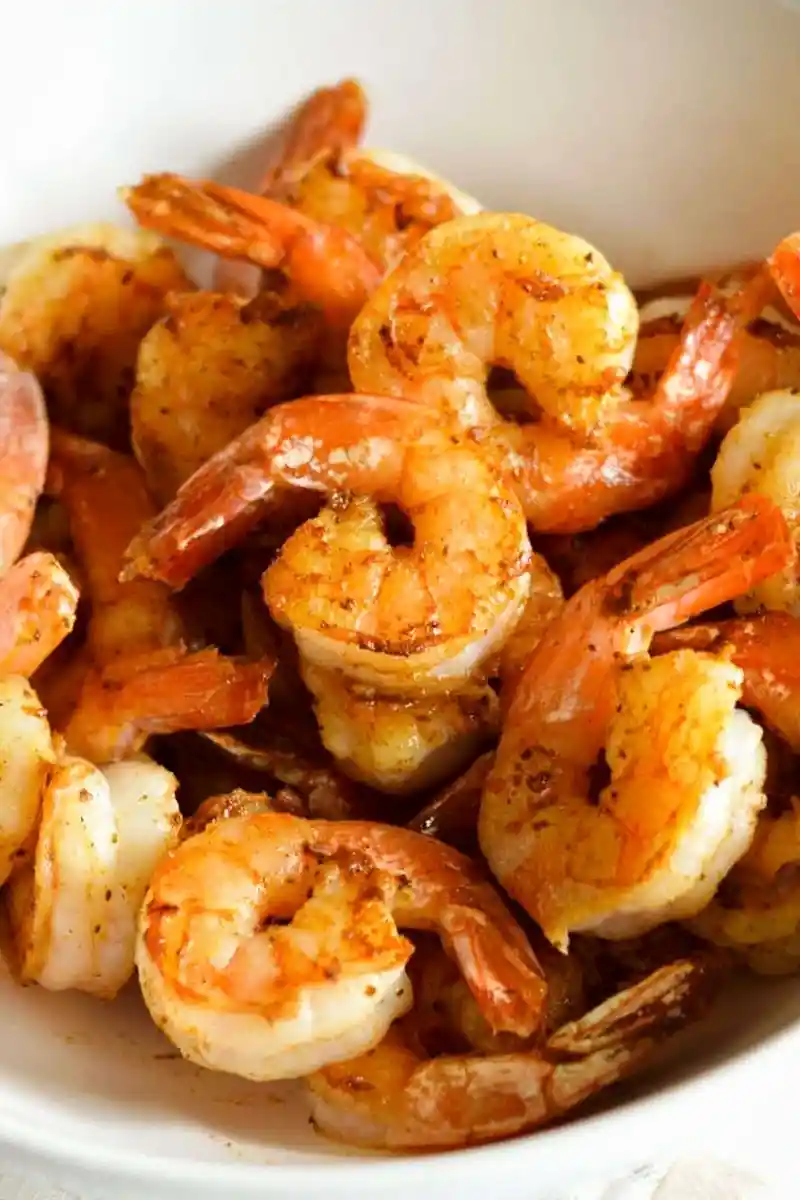
List of ingredients
- 1 pound large shrimp (21/30), peeled and deveined – ensure they are uniform in size for even cooking.
- 1 tablespoon unsalted butter – provides a rich, nutty flavor to the sear.
- 1 tablespoon olive oil – raises the smoke point to prevent the butter from burning.
- 1 ½ teaspoon Old Bay seasoning – a classic blend of paprika, celery salt, and pepper.
- Pinch of kosher salt – enhances the overall flavor profile of the seasoning.
step-by-step instructions
- Dry the shrimp: Use a paper towel or a clean hand towel to carefully pat both sides of the shrimp. Removing surface moisture is essential for achieving a proper sear rather than steaming the meat.
- Season the protein: Place the dried shrimp in a large mixing bowl. Add the Old Bay seasoning and a pinch of kosher salt, stirring gently to ensure every shrimp is evenly coated.
- Prepare the pan: Heat a large stainless steel skillet over medium-high heat. Add the butter and olive oil, allowing the butter to melt and the mixture to become shimmering hot.
- Sear the first batch: Add half of the shrimp to the skillet in a single, even layer. Cook undisturbed for 1 ½ minutes to allow the edges to caramelize.
- Flip and finish: Carefully flip each shrimp to the other side. Cook for an additional 1 to 1 ½ minutes until the flesh is opaque and no longer translucent. Avoid overcooking to maintain a juicy texture.
- Repeat the process: Transfer the cooked shrimp to a plate and repeat the searing process with the remaining batch. Serve immediately for the best results.
Essential Shrimp Preparation Techniques
Selecting the Right Shrimp Size
The 21/30 count refers to the number of shrimp per pound. This medium-large size is optimal for pan-searing because it offers enough thickness to remain juicy in the center while cooking quickly on the outside.
If you use jumbo shrimp, you may need to increase the cooking time by 30 to 60 seconds per side. Conversely, smaller shrimp will cook much faster and can become rubbery within seconds if not monitored closely.
Proper Thawing Methods for Frozen Shrimp
Never use hot or warm water to thaw frozen shrimp, as this can partially cook the outer layers and ruin the texture. The safest method is to place the shrimp in the refrigerator overnight to thaw slowly.
For a faster approach, place the shrimp in a colander or bowl under a steady stream of cold running water. This process usually takes only a few minutes and keeps the protein temperature low enough to prevent bacterial growth.
The Necessity of Deveining
Deveining involves removing the digestive tract, which appears as a dark vein running along the back of the shrimp. This step is important for both aesthetics and to avoid a gritty texture during consumption.
Most store-bought large shrimp are sold pre-deveined, but it is always wise to double-check. If they are not, use a small paring knife to make a shallow slit along the back and lift out the vein.
Mastering the Pan-Searing Process
Why Stainless Steel is Preferred
Stainless steel pans provide superior heat distribution and the ability to create a fond, which is the browned food residue that sticks to the pan. This is what gives seared shrimp their deep, caramelized flavor.
While non-stick pans are easier to clean, they often do not reach the same searing temperatures. This can result in shrimp that look pale rather than golden brown, missing out on the Maillard reaction.
The Synergy of Butter and Olive Oil
Butter provides an unmatched richness and flavor, but it has a low smoke point, meaning it burns quickly at high temperatures. Mixing it with olive oil stabilizes the butter, allowing you to sear at medium-high heat without the fat smoking.
This combination ensures the shrimp get a buttery taste while the oil protects the butter solids from scorching. This prevents the dish from tasting bitter or burnt.
The Importance of Drying Surface Moisture
Water is the enemy of a good sear. When wet shrimp hit a hot pan, the water evaporates into steam, which surrounds the shrimp and boils them instead of frying them.
By thoroughly patting the shrimp dry with paper towels, you ensure the heat goes directly into the protein. This results in a crisp, brown exterior and a tender interior.
Avoiding Pan Crowding
Crowding the skillet drops the temperature of the pan significantly and traps moisture between the shrimp. This leads to the same steaming effect mentioned previously, preventing caramelization.
Working in batches ensures that each piece of shrimp has enough space to maintain contact with the hot surface. A 12-inch skillet is typically the minimum size recommended for one pound of shrimp.
Seasoning Variations and Flavor Swaps
Creating a Custom Seafood Rub
While Old Bay is a traditional choice, you can create your own blend using smoked paprika, garlic powder, onion powder, and a pinch of cayenne pepper. This allows you to control the heat level and saltiness.
For a more herbal approach, replace the seafood seasoning with a mix of dried oregano, thyme, and lemon pepper. These flavors complement the sweetness of the shrimp without overpowering them.
Alternative Fat Options for Searing
If you prefer a different flavor profile, ghee (clarified butter) is an excellent substitute. Ghee has a much higher smoke point than regular butter, making it ideal for high-heat searing without the need for olive oil.
For a more neutral taste, avocado oil can be used. It has one of the highest smoke points of all cooking oils, which is perfect if you want the seasoning of the shrimp to be the primary focus.
Adding Fresh Aromatics
To elevate the dish, add two cloves of minced garlic to the pan during the last minute of cooking. Be careful not to add the garlic at the beginning, as it can burn and turn bitter.
A squeeze of fresh lemon juice added immediately after the shrimp leave the pan brightens the flavor. The acidity cuts through the richness of the butter and enhances the natural sweetness of the seafood.
Serving and Pairing Ideas
Combining with Fresh Greens
These seared shrimp pair perfectly with a Green Goddess salad. Use mixed spring greens, cherry tomatoes, feta cheese, and thinly sliced red onions, then top with the warm shrimp.
The contrast between the chilled salad and the warm, seasoned shrimp creates a balanced meal. The creaminess of the dressing complements the spicy notes of the Old Bay seasoning.
Integrating Shrimp into Pasta
For a hearty dinner, serve the shrimp over a bed of linguine or angel hair pasta. Toss the pasta in a simple garlic and olive oil sauce or a light lemon-butter glaze.
Adding a handful of fresh parsley and a sprinkle of parmesan cheese adds layers of flavor. The caramelized edges of the shrimp provide a great textural contrast to the soft pasta.
Building Shrimp Tacos
Use these shrimp as a filling for corn or flour tortillas. Top them with a crunchy cabbage slaw, sliced avocado, and pickled red onions for a vibrant meal.
A drizzle of lime-infused crema or a spicy sriracha mayo adds moisture and tang. This transformation turns a simple appetizer into a complete, satisfying dinner.
Creating Protein-Packed Rice Bowls
Place the seared shrimp over a bowl of steamed jasmine rice or quinoa. Add steamed broccoli, shredded carrots, and edamame for a nutrient-dense meal.
A drizzle of soy-ginger glaze or a dollop of hummus can tie the components together. This is an excellent option for meal prep throughout the work week.
Storage and Reheating Guidelines
Safe Refrigeration Practices
Store leftover shrimp in an airtight glass container in the refrigerator. They will remain safe to eat and maintain their quality for up to three to four days.
Ensure the shrimp are completely cooled before sealing the container to prevent excess condensation. This helps prevent the shrimp from becoming soggy during storage.
Optimal Reheating Methods
To avoid rubbery shrimp, reheat them slowly. Place them in a skillet over medium-low heat with a small knob of butter or a teaspoon of olive oil.
Heat them just until they are warmed through; do not let them sizzle for long. Overheating cooked shrimp causes the proteins to tighten, resulting in a tough texture.
Using Leftovers in Cold Applications
The best way to use leftover seared shrimp is in cold dishes where reheating isn’t necessary. Chop them into bite-sized pieces and stir them into a macaroni salad or a creamy potato salad.
They also work well in cold shrimp cocktails or as a topping for a chilled cucumber salad. This preserves the texture and prevents the risk of overcooking.
Troubleshooting Common Issues
Why is my shrimp rubbery?
Rubbery shrimp are almost always the result of overcooking. Shrimp cook incredibly fast, and even an extra 30 seconds in the pan can change the texture from tender to tough.
Watch for the shrimp to curl into a ‘C’ shape. If they curl tightly into an ‘O’ shape, they are likely overcooked.
Why did the shrimp steam instead of sear?
This happens if the shrimp were not dried properly or if the pan was too crowded. When moisture is trapped, it turns to steam and prevents the surface from browning.
Ensure you use a large pan and pat the shrimp dry right before they go into the oil. If the pan begins to pool with liquid, remove the shrimp and wipe the pan clean before starting the next batch.
Why did the butter burn?
Butter burns when it exceeds its smoke point, which is relatively low. This usually happens if the heat is too high or if there is not enough oil to stabilize the milk solids in the butter.
If you see the butter turning dark brown or black, remove the pan from the heat immediately. Wipe out the skillet and start again with a fresh mix of oil and butter.
Frequently Asked Questions
How long do you cook raw shrimp in a skillet?
The exact time varies based on the shrimp size and pan heat, but generally, it takes about 1.5 to 2 minutes per side. Focus on the visual cue: the shrimp are done when the thickest part turns opaque.
Do you cook shrimp with oil or butter?
Using both is the best approach. Olive oil provides the high-heat stability needed for searing, while butter provides the rich flavor and golden color.
How do you know when pan seared shrimp is done?
Raw shrimp are translucent and greyish. Once cooked, they turn a vibrant pink/white and become opaque throughout the thickest part of the body.
Print
Pan Seared Shrimp
- Total Time: 15 minutes
- Yield: 2 servings 1x
- Diet: Seafood
Description
The easiest way to enjoy fresh shrimp! Pan seared shrimp features caramelized edges and juicy middles in each perfectly seasoned bite. Ready to eat in 15 minutes!
Ingredients
- 1 pound large shrimp (21/30) (peeled and deveined)
- 1 tablespoon unsalted butter
- 1 tablespoon olive oil
- 1 ½ teaspoon old bay seasoning
- pinch kosher salt
Instructions
- Dry: Dry shrimp on a paper towel or a clean hand towel. Carefully dry both sides of the shrimp. This will give you a better sear.
- Season: Transfer the dried shrimp to a large bowl. Add the old bay seasoning and a pinch of kosher salt. Stir well to coat the shrimp evenly.
- Heat: Heat a large stainless steel skillet over medium-high heat. Add the butter and olive oil to the pan.
- Sear: Once the butter is melted and the pan is hot, add half of the shrimp to the skillet in an even layer. Cook for 1 1/2 minutes, then carefully flip the shrimp to the other side.
- Cook: Cook for an additional minute and a half or until the shrimp is no longer translucent. Do not overcook the shrimp!
- Repeat: Transfer the cooked shrimp to a plate and repeat with the remaining shrimp. Enjoy immediately!
Notes
Ensure the pan is hot and do not crowd the shrimp to avoid steaming and ensure a proper caramelized sear.
- Prep Time: 5 minutes
- Cook Time: 10 minutes
- Category: Appetizer, Main Course
- Method: Pan-searing
- Cuisine: American
Nutrition
- Serving Size: 1 serving
- Calories: 309 kcal
- Sugar: 0.05 g
- Sodium: 271 mg
- Fat: 14 g
- Saturated Fat: 5 g
- Unsaturated Fat: 8 g
- Trans Fat: 0.2 g
- Carbohydrates: 1 g
- Fiber: 0.2 g
- Protein: 46 g
- Cholesterol: 380 mg